
Cars BMW Cars Volkswagen Cars Chevrolet Cars Land Rover Cars Lada Cars Honda Cars Peugeot
English Русский
Български
Беларускі
Український
Српски
Hrvatski
Română
Polski
Slovenský
Magyar
Bookmark News and articles Sitemap Feedback Site search
MercedesMan.ru


A-Class C-Class E-Class G-Class M-Class S-Class Others
W163 (1997-2005)
  • Main
  • M-Class
  • W163 (1997-2005)
  • General information
  • Maintenance
  • Checking the condition of multi-rib belts for auxiliary drive units

Checking the condition of multi-rib belts for auxiliary drive units (Mercedes-Benz M-Class W163)

0
Checking the accessory drive belt

Checking the accessory drive belt
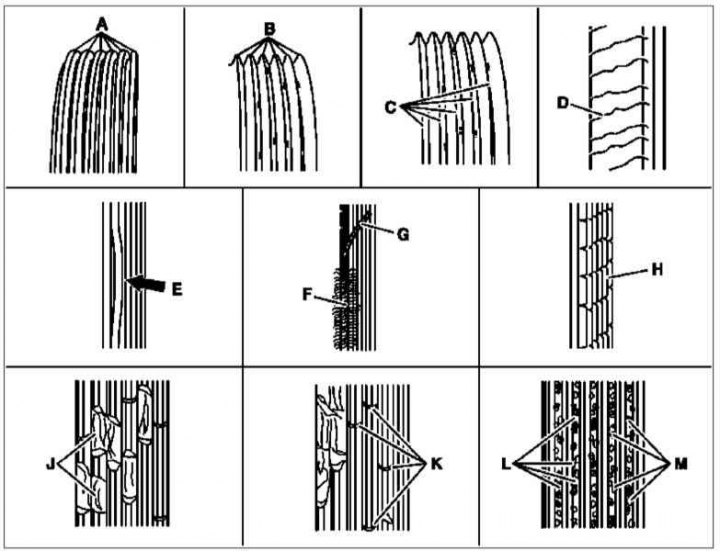
A - New belt; B - Wall wear - ribs are sharpened (on new belts they are trapezoidal); C - Cord exposure; D - Cracks on the back of the belt; E - Peeling of rubber from the base; F - Outer cord wear; G - Side cord break; H - Cracks across the ribs; J - Rib injury; K - Cracks of individual ribs; L - Contamination or stones stuck between the ribs; M - Tearing rubber on the ribs


1. The diagrams of the serpentine belt routing for auxiliary units are presented in Section Replacement of the auxiliary drive belt and elements of its tensioning mechanism.

2. With fingers (and using a flashlight if necessary) walk the entire length of the belt, feeling for cracks and delamination. Also check for abrasions and polished areas. The belt should be inspected from both sides, which means twisting it to check the condition of the reverse side. At the same time, check for rust, cracks and burrs on the pulleys. Shallow perpendicular cracks are allowed on the working surface of the belt. If these cracks do not extend beyond one rib and are not very deep, there is no need to replace the belt.


3. The drive belt tension is adjusted automatically. It is necessary to periodically check the condition of the belt, and if defects are found, replace the belt.

4. The belt tension is carried out by an automatic tensioner and does not require checking.

5. Turn off the engine, set the transmission to neutral. Raise and place the car on stands.

6. Mark the belt with chalk in a clearly visible place.

[Article text obtained from the website: MercedesMAN.ru]

7. Using a socket wrench, turn the engine by the crankshaft pulley bolt in the direction of normal rotation (clockwise) until the chalk marking appears again, carefully examine the condition of the belt tape along its entire length.

8. The belt tension can be checked by pressing firmly with your thumb and determining the degree of deflection. Measure the deflection with a ruler. If the distance between the pulley centers is between 180 and 280 mm, the deflection should be 6 mm. If the distance between the pulley centers is between 300 and 400 mm, the deflection should be 13 mm.

9. If one or more of the above damages are present, the belt must be replaced (see Chapter Engine).

10. Make sure the belt is seated correctly on the pulleys.
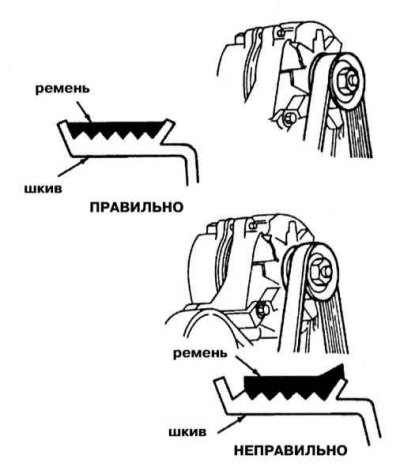
10. Make sure the belt is seated correctly on the pulleys.


When installing the drive belt, place it correctly on the pulleys - it should be located strictly in the center of the pulley (even short-term operation of an incorrectly installed belt can lead to its damage).
This article is available at: russian, bulgarian, belarusian, ukrainian, serbian, croatian, romanian, polish, slovak, hungarian
The article has been verified: Panova Maya Vladimirovna
Share with friends:
◀ Previous
M-Class W163 / Maintenance
Next ▶

Checking the condition and replacing engine compartment hoses, localizing leaks
Checking the fuel system, replacing the fuel filter
Checking the brake system
Changing engine oil and oil filter
Checking the condition of tires and their pressure, designating tires and wheel rims, rotating wheels
Checking the cooling system and frost resistance of the coolant, replacing the liquid
Checking the condition of the exhaust system
Replacement and checking of ATF level, replacement of AT filter
Visual inspection of automatic transmission for leaks
Checking the condition of suspension and steering components
More similar articles for repairing other models

☛ V-belt — checking condition Mercedes W168 (1997-2004)
☛ Checking the condition of the ribbed belts of the serpentine drive of… Mercedes W203 (2000-2007)
☛ Checking the condition of the rear wheel drive shaft mudguards Mercedes W210 (1996-2002)
☛ Checking the condition of multi-rib belts for auxiliary drive units Mercedes W463 (1999-2019)
☛ Checking the condition of the ribbed belts of the serpentine drive of… Mercedes W140 (1991-1998)
☛ Checking the drive belts Mercedes Vito 1 (1996-2003)
Link in different formats to this article
Comments and feedback from visitors
No comments yet


How much will 28 + 36 ?


W163 (1997-2005) 
  • General information
  • Introduction to the guide
  • Controls and instruments
  • Driving and operation
  • Maintenance
  • Power unit
  • Gasoline engines
  • Diesel engines
  • Cooling system
  • Heating and ventilation
  • Power system (gasoline)
  • Fuel system (diesel)
  • Exhaust system
  • Ignition and control system
  • Charging and starting system
  • Transmission
  • Mechanical gearbox
  • Automatic gearbox
  • Clutch
  • Drive shafts and cardan
  • Transfer case
  • Chassis
  • Brake system
  • Front suspension
  • Rear suspension
  • Steering
  • Suspension geometry
  • Body
  • Exterior (external elements)
  • Interior (internal elements)
  • Doors and locks
  • Electrical equipment
  • Equipment and devices
  • Drive motors
  • Lighting and signaling
  • Audio system
  • Electrical circuits
 
MercedesMan.ru © 2017–2026 · Mobile version · Read about Mercedes · Sitemap: EN BG BY UA RS HR RO PL SK HU · Feedback · Site search · Bookmark A-Class (W168) · C-Class (W201) · C-Class (W202) · C-Class (W203) · E-Class (W123) · E-Class (W124) · E-Class (W210) · G-Class (W463) · M-Class (W163) · S-Class (W116, petrol) · S-Class (W126, petrol) · S-Class (W140) · S-Class (W220) · Sprinter · Vito 1 · Vito 2 · Vario 814D ·
 
We only use cookies without which some of the site's features may not be available.