
Checking the serpentine drive belt of auxiliary units
Schemes for laying the belt of the serpentine drive of auxiliary units
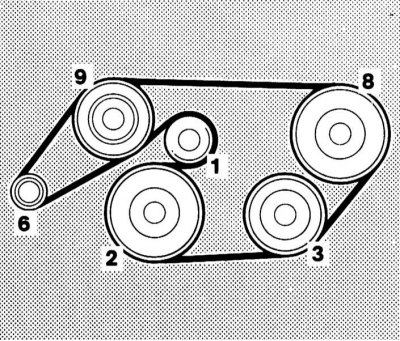
Serpentine accessory drive belt routing diagram on S280 and S320 models
1 - Tension roller with tensioner; 2 - Crankshaft; 3 - Air conditioning compressor; 4 - Fan; 5 - Air pump; 6 - Generator; 7 - Guide roller; 8 - Power steering pump; 9 - Water pump; 10 - Air pump
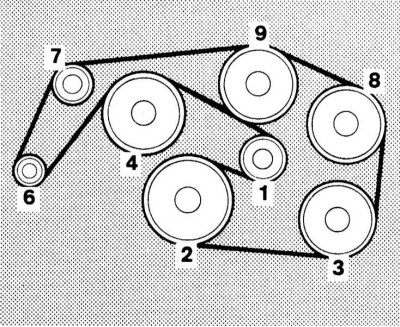
Serpentine accessory drive belt routing diagram on S420 and S500 models
1 - Tension roller with tensioner; 2 - Crankshaft; 3 - Air conditioning compressor; 4 - Fan; 5 - Air pump; 6 - Generator; 7 - Guide roller; 8 - Power steering pump; 9 - Water pump; 10 - Air pump
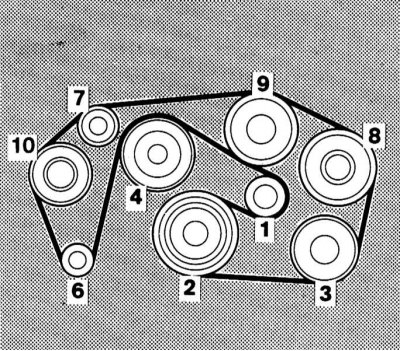
Serpentine accessory drive belt routing diagram on S600 models
1 - Tension roller with tensioner; 2 - Crankshaft; 3 - Air conditioning compressor; 4 - Fan; 5 - Air pump; 6 - Generator; 7 - Guide roller; 8 - Power steering pump; 9 - Water pump; 10 - Air pump
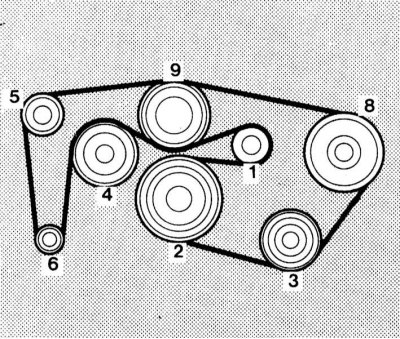
Serpentine accessory drive belt routing diagram on S300TDI models
1 - Tension roller with tensioner; 2 - Crankshaft; 3 - Air conditioning compressor; 4 - Fan; 5 - Air pump; 6 - Generator; 7 - Guide roller; 8 - Power steering pump; 9 - Water pump; 10 - Air pump
fingers (and using a flashlight if necessary) walk along the entire length of the belt, feeling for cracks and delaminations. Also check the belt for scuffs and polished areas. The belt must be inspected from both sides, which means that it must be twisted to check the condition of the wrong side. Along the way, check for rust, cracks and burrs on the pulleys. On the working surface of the belt, the presence of shallow perpendicular cracks is allowed. If these cracks do not go beyond the boundaries of one rib and are not very deep, there is no need to replace the belt.
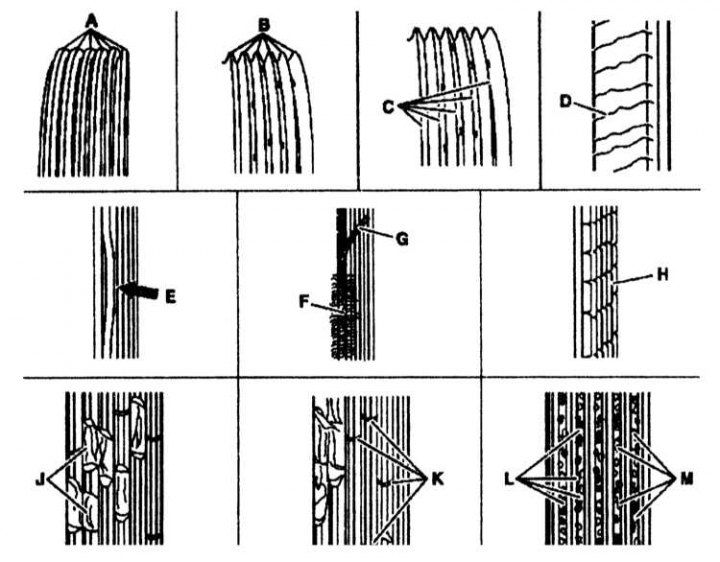
Checking the accessory drive belt
A - New belt; B - Wall wear - ribs are pointed (on new belts they are trapezoidal); C - Cord exposure; D - Cracks on the back of the belt; E - Detachment of rubber from the base; F - Wear of the outer cord; G - Rupture of the side cord; H - Cracks across the ribs; J - Damage to the ribs; K - Cracks of individual ribs; L - Pollution or stones stuck between the ribs; M - Tearing rubber on the ribs
Ribbed belt tension is automatic. It is necessary to periodically check the condition of the belt, and if defects are found, replace the belt.
The belt tension is carried out by an automatic tensioner and does not need to be checked.
1. Turn off the engine, put the transmission in neutral. Raise and place the car on stands.
2. Mark the belt with chalk in a clearly visible place.
3. Use the head to turn the engine by the crankshaft pulley in the direction of rotation, i.e. to the right so that the chalk markings are visible. At the same time, view the belt section by section.
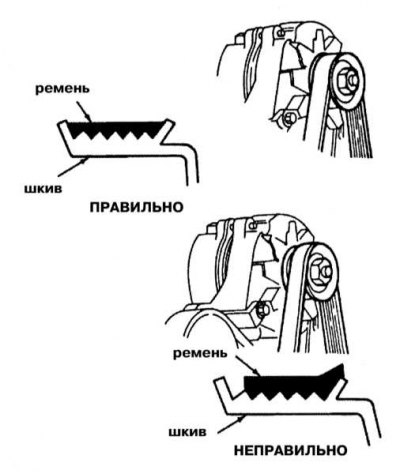
When installing the drive belt, place it correctly on the pulleys - it must be exactly in the center of the pulley (even short-term operation of an incorrectly installed belt can damage it)
Belt tension can be checked by pressing firmly on the belt with your thumb and determining the amount of deflection. Measure the deflection with a ruler. If the distance between the centers of the pulleys is from 180 to 280 mm, then the amount of deflection should be 6 mm. If the distance between the centers of the pulleys is between 300 and 400 mm, the deflection should be 13 mm.
If one or more of these damages are present, the V-belt must be replaced with a new one.