
Attention! Parts of the valve drive and oil sprayer have many modifications, therefore, when replacing them, it is necessary to consult a Mercedes-Benz representative.
The valve drive is combined with the camshaft bearing caps. The rocker arms are mounted on separate short axles, which are also fixed to the camshaft bearing caps. Each camshaft bearing cap has one rocker arm that controls the intake and exhaust valves.
Hydraulic pushers are fixed in the rocker arms, the oil supply to which is carried out through the holes in the rocker arms.
Removing
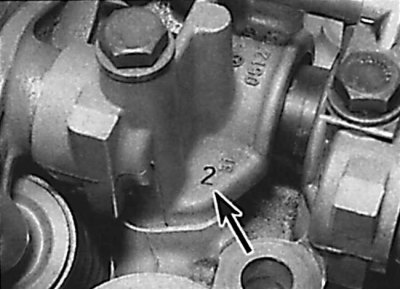
The location of the markings of the camshaft bearing caps
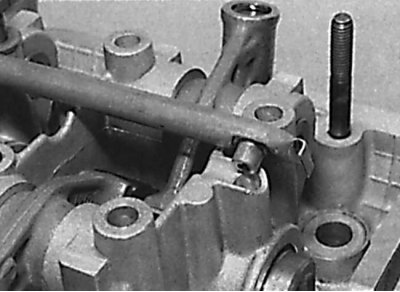
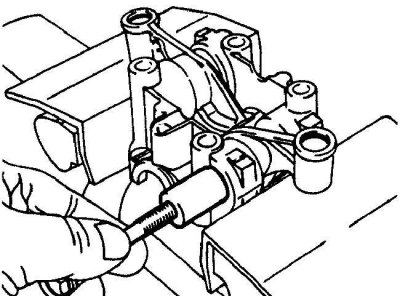
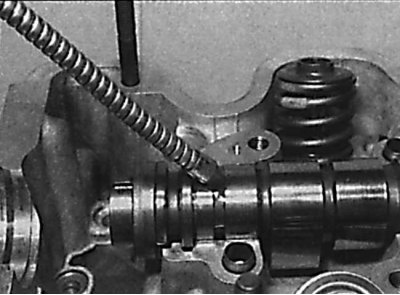
Removing the engine oil spray pipe
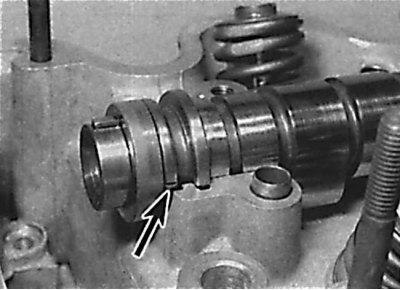
Removing the camshaft bearing cap together with the rocker arms attached to them
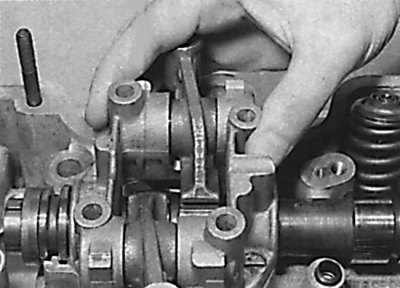
Removing the contact washer from the top of the valve stem
1. Remove the air filter.
2. Remove the cylinder head cover.
3. Remove the camshaft sprocket.
4. Check that the rocker arms and bearing caps are marked. The bearing caps are numbered 1 to 4 on the camshaft sprocket side, and the numbers on the bearing caps are on the exhaust manifold side (see fig. The location of the markings of the camshaft bearing caps). A similar marking is also applied to the cylinder head under the camshaft.
5. Loosen the camshaft bearing cap bolts evenly and gradually in a diagonal sequence. As soon as the pressure of the valve springs stops, unscrew the bolts completely. When unscrewing the bolts, mark the location of the engine oil spray tube brackets.
6. Remove the engine oil spray pipe (see fig. Removing the engine oil spray pipe).
7. Remove the camshaft bearing caps together with the rocker arms attached to them. The camshaft bearing caps are mounted on guide pins.
8. Remove the contact washers from the tops of the valve stems and fold them in such a way that they can be reinstalled later (see fig. Removing the camshaft bearing cap together with the rocker arms attached to them, Removing the contact washer from the top of the valve stem).
9. Being careful, remove a camshaft from a head of the block of cylinders.
Disassembly, inspection and assembly
Camshaft
1. Check the running surfaces of the camshaft bearings and the contours of the camshaft lobes for wear. If there is any wear, replace the camshaft. When replacing the camshaft, the rocker arms must also be replaced.
Valve drive
Removing the rocker axle using a long M8 bolt
1. After removing the camshaft bearing caps, the rocker arms can be removed from the bearing caps by removing the short shafts of the rocker arms from the caps. Before removing the rocker arms, check that they are marked, and also note the location of the rocker arms relative to the camshaft bearing cap.
2. To remove the rocker shaft from the camshaft bearing cap, use an inertial hammer with a special adapter. Alternatively, screw a long M8 bolt with a washer into the rocker shaft and, by hitting the washer with a hammer, pull the rocker shaft out of the camshaft bearing cap (see fig. Removing the rocker axle using a long M8 bolt). After removing the axle, remove the rocker arm. Store the removed parts in such a way that they can be reinstalled later.
3. Check the condition of the contact washers for wear. In the presence of wear, it is necessary to replace the part as a set.
4. Lubricate the working surfaces of the rocker arms with clean engine oil, then install the rocker arms on the cover and secure with the axle. When reinstalling the parts, check that they are in place. Install the rocker shafts so that the notch for the camshaft bearing cap bolt in each axle aligns with the bolt hole in the bearing cap. In the absence of special tools for pressing the rocker shaft, press the shaft using a long M8 bolt and a hammer.
Pushers
Rocker parts
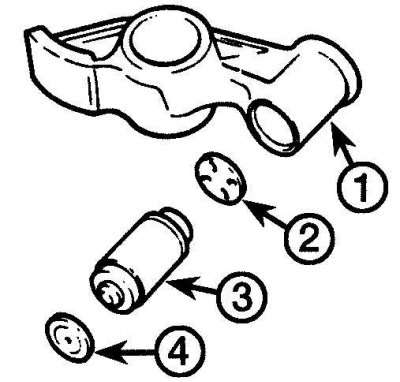
1 - rocker; 2 - gasket washer; 3 - pusher; 4 - contact washer
The location of the hydraulic pusher in the rocker arm
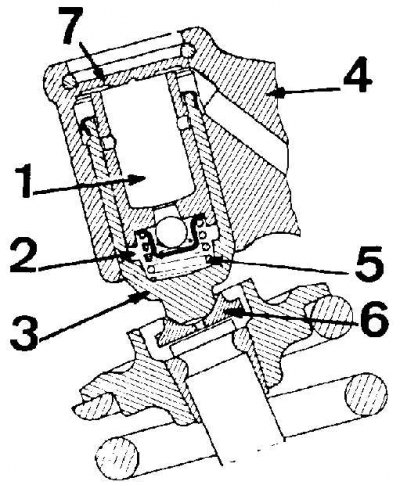
1 - working cavity with oil; 2 - working chamber; 3 - pusher; 4 - rocker; 5 - spring; 6 - contact washer
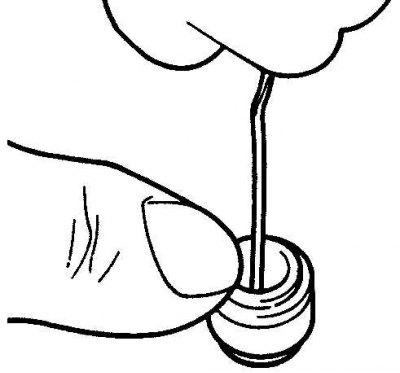
Using thin steel wire to press the hydraulic tappet ball valve
1. To remove the pusher from the rocker arm, insert a suitable drift through the hole in the upper part of the rocker arm and press the pusher out of the rocker arm.
2. Remove the spacer from the pushrod seat in the rocker arm (see fig. Details of the rocker, Location of the hydraulic pusher in the rocker).
3. Arrange the parts of the rocker in such a way that they can later be installed in their places.
4. Check up a condition of pushers and, if necessary, replace them.
5. Hydraulic valve lifters are designed in such a way that the amount of travel of the pusher to compensate for valve clearance is negligible. This is due to the small size of the hydraulic valve lifters. In order to ensure that the stroke of the hydraulic tappet is sufficient to compensate for valve clearances, shim washers of various thicknesses are used.
6. If valve clatter is heard while the engine is running, the valve clearance may not be up to specification. In this case, a new washer of a different thickness must be installed.
7. Determining the required shim thickness requires the use of a special tool and this work must be done at a service station.
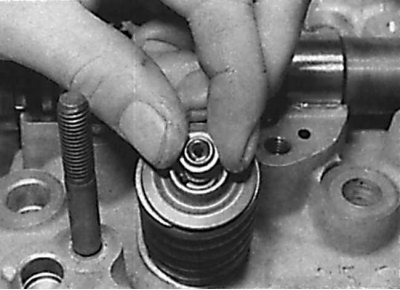
8. Before installing the hydraulic tappets, they must be filled with engine oil. To do this, install the tappets vertically in a container filled with clean engine oil. Press the ball valve with a thin steel wire and, moving the pusher plunger up, introduce oil into the working cavity of the pusher.
9. Repeat this operation until the working chamber of the hydraulic pusher is completely filled with oil (see fig. Using thin steel wire to press the hydraulic tappet ball valve).
10. Install the washer into the pusher seat in the rocker arm with the washer oil passage towards the hydraulic tappet. Install the hydraulic pusher in the rocker.
Installation
Applying grease to the journals and camshaft cams
The alignment of the groove on the flange of the front of the camshaft with the upper plane of the cylinder head
1. Lubricate the camshaft journals and cams and bearings in the covers and cylinder head with clean engine oil and install the camshaft in the cylinder head. Rotate the camshaft so that the recess in the flange at the front of the camshaft is aligned with the top plane of the cylinder head (see fig. Applying lubricant to the journals and cams of the camshaft Aligning the groove on the flange of the front of the camshaft with the upper plane of the cylinder head).
2. Install the contact washers on top of the valves.
3. Establish covers of bearings of a camshaft, and marking of covers has to be from a final collector.
4. Install the oil sprayer, with the holes for the oil supply to the sprayer aligned with the corresponding holes in the camshaft bearing caps.
5. Insert the camshaft bearing cap bolts and finger-tight, then tighten the cap bolts in a diagonal sequence gradually turning each bolt half a turn in one pass until each cap contacts the cylinder head. Then, in the same sequence, tighten the bolts to the required torque.
6. Check that the timing marks are aligned with the pointers, then install the camshaft sprocket.
7. Install the cylinder head cover.
8. Install the air filter.