
Front o-ring
1. Remove the crankshaft pulley/vibration damper and hub.
2. Measure the installation depth of the front O-ring.
3. Drill two small holes in the o-ring at diametrically opposite ends of the o-ring. Insert two self-tapping screws into the drilled holes in the O-ring and use pliers to pull the O-ring out past the screw heads.
4. Alternatively, the O-ring can be removed using the blade of a screwdriver as a lever, but be careful not to damage the O-ring seat.
5. Check the condition of the spacer on the front of the crankshaft and replace if necessary.
6. Clean the o-ring seat.
7. Dip a new o-ring in clean engine oil and, using a suitable diameter tubular drift, install the o-ring in the seat to the desired depth. Cover the end of the spacer sleeve with adhesive tape beforehand to avoid damaging the sealing ring lips during installation.
8. Remove the adhesive tape from the end of the spacer.
9. Install the crankshaft pulley/vibration damper and hub.
Rear o-ring
Rear crankshaft sealing ring
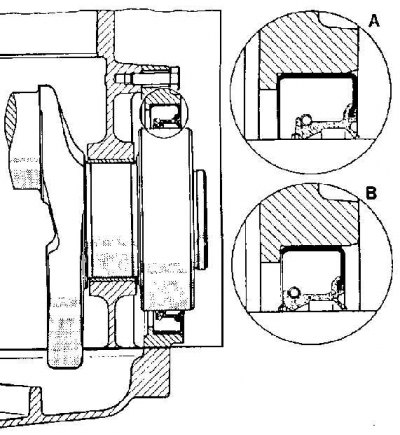
A - ring installed at the factory;
B - ring installed during repair
1. Remove flywheel/drive plate.
2. Measure the installation depth of the O-ring.
3. Remove the rear o-ring using the same method as the front o-ring.
4. Check the condition of the surface of the crankshaft in contact with the O-ring. If the crankshaft surface is worn, the crankshaft must be replaced.
5. Clean the o-ring seat.
6. Dip a new o-ring in clean engine oil and, using a suitable diameter tubular drift, install the o-ring in the seat to the desired depth. Preliminarily close the rear end of the crankshaft with adhesive tape in order not to damage the working edges of the sealing ring during installation.
7. Remove the adhesive tape from the crankshaft.
8. Install flywheel/drive plate.