
Installation details of the intermediate bearing of the rear propeller shaft
Installation details of the intermediate bearing of the rear propeller shaft
Installation details of the intermediate bearing of the rear propeller shaft
Removing
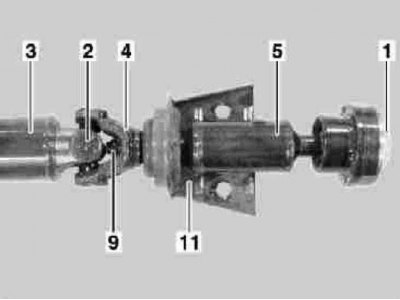
1. Remove cardan shaft (see Section Removal and installation of the rear propeller shaft) and transfer it to the workbench - try not to damage the front flange (1).
2. After laying the shaft in a straight line, mark the relative installation positions of the universal joint (2) rear shaft section (3), connecting arm (4) and front section of the shaft (5).
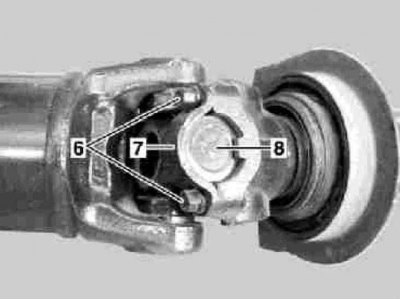
3. Turn out four bolts (6) and remove two clamps (7) front cardan joint.
4. Separate the rear section of the shaft (3) from connecting lever (4), - try not to drop the hinged cups (8).
5. Loosen the coupling nut (9) and remove the adjusting washer.
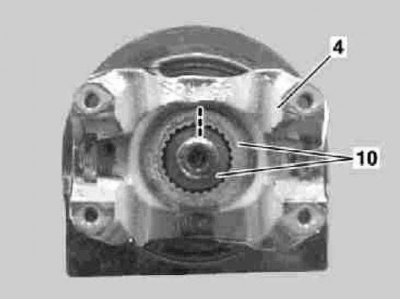
6. Mark the position of the connecting arm (4) relative to the internal wedge-shaped spline joint.
7. Remove lever from shaft assembly (4) and intermediate bearing assembly (11), - in the latter case, use a two-jaw puller, try not to damage the front flange (1).
Installation
1. Fit the intermediate bearing (11) on the front section of the shaft (5) mounting holes in front.
2. Having followed the correct alignment of the landing marks applied during the dismantling process (see paragraph 6 above), seat on the front section of the shaft (5) connecting lever (4).
3. Install the shim and tighten the nut (9).
4. After thoroughly cleaning the mating surfaces, refuel the cardan joint (2) into the connecting arm (4), make sure that the components are correctly engaged, then achieve the correct alignment of the applied during dismantling (see paragraph 2 above) installation marks.
5. Install the shaft assembly in its proper place (see Section Removal and installation of the rear propeller shaft).