
Cars BMW Cars Volkswagen Cars Chevrolet Cars Land Rover Cars Lada Cars Honda Cars Peugeot
English Русский
Български
Беларускі
Український
Српски
Hrvatski
Română
Polski
Slovenský
Magyar
Bookmark News and articles Sitemap Feedback Site search
MercedesMan.ru


A-Class C-Class E-Class G-Class M-Class S-Class Others
Sprinter (1995-2000, diesel) Vito 1 (1996-2003) Vito 2 (2003-2014, diesel) Vario 814D (1996-2003, diesel)
  • Main
  • Mercedes-Benz
  • Sprinter (1995-2000)
  • Power unit
  • Engine repair
  • Removal and installation the crankshaft sprocket

Removal and installation the crankshaft sprocket (Mercedes-Benz Sprinter 903)

0
Removal and installation of the crankshaft sprocket must be carried out in the following order:
  • remove all components and parts that impede access to the end of the engine;
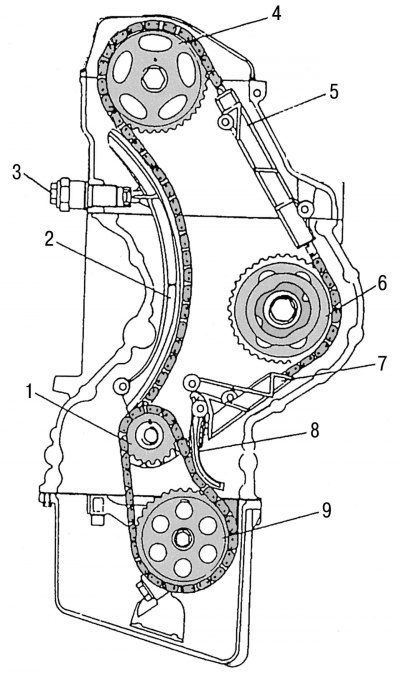
Figure 96. Camshaft drive mechanism assembly: 1 - crankshaft sprocket; 2 - chain tension shoe; 3 -…

Figure 96. Camshaft drive mechanism assembly: 1 - crankshaft sprocket; 2 - chain tension shoe; 3 - chain tensioner; 4 — camshaft drive sprocket; 5 - chain tensioner; 6 — fuel pump drive sprocket; 7 - chain tensioner; 8 — oil pump drive chain tensioner lever; 9 — oil pump drive sprocket
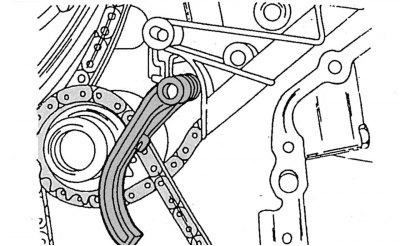

Figure 105. Removing the tension lever

Figure 105. Removing the tension lever

  • remove the tension lever mount with the oil pump drive chain pressure shoe as described in previous subsection, and remove the lever 8 shown in the figure 96 (see also figure 105);
  • unscrew the bolt securing the oil pump drive sprocket and remove the sprocket from the shaft, while simultaneously removing the drive chain from the crankshaft sprocket;
  • the position of the camshaft drive sprockets and the oil pump drive sprocket must be marked on the crankshaft in a corresponding manner so that they can be returned to their original position during subsequent assembly;
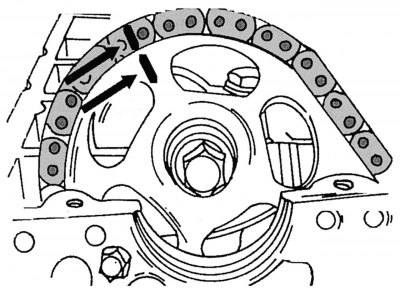
Figure 99. Marks on the camshaft drive sprocket and drive chain

Figure 99. Marks on the camshaft drive sprocket and drive chain


  • apply paint marks to the camshaft sprocket and camshaft drive chain as shown in the figure 99;
  • remove the sprocket from the camshaft, thereby releasing the tension on the drive chain;
  • remove the sprocket from the crankshaft using a suitable puller;
  • check the condition of the crankshaft keys (sprocket and pulley keys), if there are signs of wear, replace them with new ones;
  • if it becomes necessary to replace the crankshaft sprocket, you need to copy the mark from the old sprocket onto the new one, marking the corresponding tooth with paint relative to its keyway.

The installation of the sprocket on the crankshaft must be carried out in the following order:
  • insert new keys into the special crankshaft sockets. Both surfaces must be parallel to the crankshaft axis;
  • using a suitable mandrel, press the sprocket onto the crankshaft flange. Check the correct fit of the key;
  • install the sprocket and camshaft drive chain. Please note the markings made with paint before dismantling;
  • turn the engine over several times, paying attention to the marks on the top side of the camshaft (see figure 99);
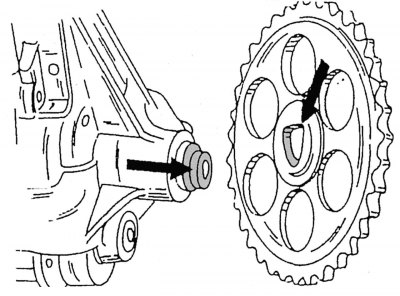
Figure 107. Installing the sprocket on the oil pump shaft

Figure 107. Installing the sprocket on the oil pump shaft


  • install the oil pump sprocket back into place. The hub of the oil pump sprocket has special seating edges that match the hole on the oil pump shaft, as shown in the figure 107;
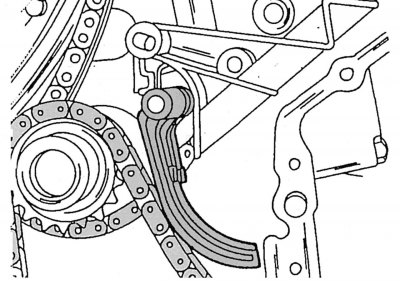
Figure 106. Correct position of the oil pump drive chain tensioner lever with pressure shoe

Figure 106. Correct position of the oil pump drive chain tensioner lever with pressure shoe

  • install tension arm with pressure shoe for oil pump drive chain (see figure 106);
  • install the camshaft drive mechanism cover in its place (subsection 2.5);
  • perform installation in the reverse order of removal.
This article is available at: russian, bulgarian, belarusian, ukrainian, serbian, croatian, romanian, polish, slovak, hungarian
The article has been verified: Levin Kirill Glebovich
Share with friends:
◀ Previous
Mercedes Sprinter / Engine repair
Next ▶

Dismantling and installation of drive chain dampers
Removal and installation the chain tension shoe
Dismantling and installation of the camshaft drive chain
Removal and installation the camshaft drive chain tensioner
Camshaft Drive Mechanism — General Description
Removal and installation the camshaft
Gas distribution mechanism
Hydraulic valve lifter compensators — device
Checking the serviceability of hydraulic tappets
Removal and installation of hydraulic tappets
More similar articles for repairing other models

☛ Crankshaft Position Sensor — Removal and Installation Mercedes W168 (1997-2004)
☛ Removal and installation the intermediate sprocket Mercedes W203 (2000-2007)
☛ Crankshaft Sprocket — Removal, Inspection and Installation Mercedes W124 (1984-1995)
☛ Removal and installation the crankshaft position sensor (CKP) Mercedes W463 (1999-2019)
☛ Removal and installation the end cover, replacing the rear crankshaft… Mercedes W163 (1997-2005)
☛ Crankshaft Sprocket — Installation Details Mercedes W140 (1991-1998)
Link in different formats to this article
Comments and feedback from visitors
No comments yet


How much will 48 + 29 ?


Vario 814D (1996-2003, diesel) 
  • General information
  • Maintenance
  • Power unit
  • Engines 602.984/985
  • Engines 904.908/914/923/936
  • Transmission
  • Clutch
  • Manual gearbox 711.613
  • Manual gearbox 710.64/66
  • Manual gearbox 715.051
  • Automatic gearbox 723.345
  • Power take-off box
  • Chassis
  • Front suspension
  • Rear suspension
  • Steering
  • Brake system
  • Body and electrical equipment
  • Interior (internal elements)
  • Exterior (external elements)
  • Heater and air conditioner
  • Electrical diagrams
Vito 2 (2003-2014, diesel) 
  • General information
  • User manual
  • Maintenance
  • Diesel engine OM646
  • Engine repair
  • Cooling and lubrication system
  • Power and exhaust system
  • Transmission
  • Clutch
  • Car gearbox
  • Chassis
  • Front suspension
  • Rear suspension
  • Steering
  • Brake system
  • Body
  • Body elements
  • Electrical equipment
  • Equipment and devices
  • Security systems
  • Electrical circuits
Vito 1 (1996-2003) 
  • General information
  • User manual
  • Maintenance
  • Petrol engines 2.0 l
  • Engine repair
  • Lubrication system
  • Cooling system
  • Power and control system
  • Petrol engines 2.8 l
  • Engine repair
  • Lubrication system
  • Cooling system
  • Power and control system
  • Diesel engines 2.3 l
  • Engine repair
  • Cooling system
  • Lubrication system
  • Turbocharging and recycling
  • Power and control system
  • Diesel engines 2.2 l
  • Engine repair
  • Cooling system
  • Lubrication system
  • Turbocharging and recycling
  • Power and control system
  • Transmission
  • Clutch
  • Mechanical gearbox
  • Automatic gearbox
  • Chassis
  • Front suspension and wheels
  • Rear suspension
  • Steering
  • Brake system
  • Body
  • Exterior (external elements)
  • Interior (internal elements)
  • Electrical equipment
  • Equipment and devices
  • Heater and air conditioner
  • Electrical circuits
Sprinter (1995-2000, diesel) 
  • General information
  • Introduction to the guide
  • Maintenance
  • Power unit
  • Engine repair
  • Lubrication system
  • Cooling system
  • Power and exhaust system
  • Transmission
  • Clutch
  • Mechanical gearbox
  • Automatic gearbox
  • Front axle
  • Rear axle and cardan
  • Chassis
  • Car suspension
  • Steering
  • Brake system
  • Tires and wheels
  • Electrical equipment
  • Equipment and devices
  • Headlights and lighting
  • Power devices
  • Electrical circuits
 
MercedesMan.ru © 2017–2026 · Mobile version · Read about Mercedes · Sitemap: EN BG BY UA RS HR RO PL SK HU · Feedback · Site search · Bookmark A-Class (W168) · C-Class (W201) · C-Class (W202) · C-Class (W203) · E-Class (W123) · E-Class (W124) · E-Class (W210) · G-Class (W463) · M-Class (W163) · S-Class (W116, petrol) · S-Class (W126, petrol) · S-Class (W140) · S-Class (W220) · Sprinter · Vito 1 · Vito 2 · Vario 814D ·
 
We only use cookies without which some of the site's features may not be available.