
Attention! When installing the steering gear, it is necessary to use new steering gear mounting bolts, new nuts for ball joints, central tie rod and tie rod, as well as new rubber coupling mounting bolts.
Removing
Steering gear with power steering
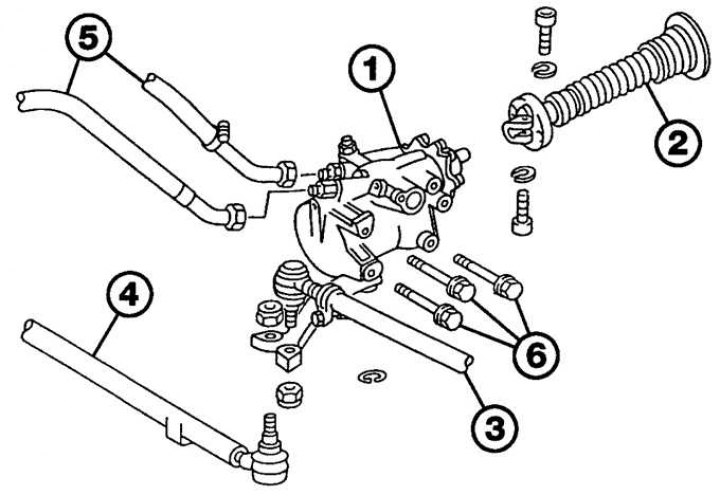
1 - steering gear; 2 - steering column; 3 – central steering draft; 4 – transverse steering draft; 5 - supply and return hoses; 6 - bolts
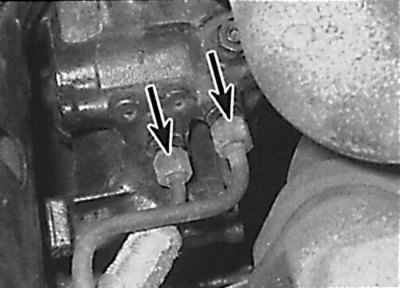
Hose connections to steering gear
1. Apply the parking brake, then raise the front of the vehicle and support it on stands.
2. Set the front wheels to the straight ahead position and lock the steering column with the steering column lock in this position.
Attention! After removing the steering gear, do not turn the steering wheel.
3. On models with power steering, use clamps to pinch the supply and return hoses near the steering gear. Mark the hoses, then unscrew the union nuts and disconnect the supply and return hoses from the steering gear (see fig. Power steering gear, Steering gear hose connections). Plug the ends of the hoses and the openings in the steering gear with plugs.
4. Using paint, mark the relative position of the lower end of the steering column, rubber clutch and steering gear shaft. On some models, the heat shield must be removed from the steering gear to access the rubber clutch.
5. Unscrew the rubber clutch mounting bolts and move it onto the steering column so that it is removed from the steering gear shaft.
6. Remove the nuts securing the tie rod and center tie rod ball joints to the steering gear arm. Using a puller, remove the tie rod ball joints from the steering gear arm.
7. Unscrew the three bolts securing the steering gear and located under the wheel arch, and remove the steering gear from the car.
Repair
1. Check the condition of the steering gear for wear and damage. Steering gear repair must be carried out at a service station. You can only replace the steering gear seal ring yourself.
Installation
Steering gear centering on early models (before 1990)
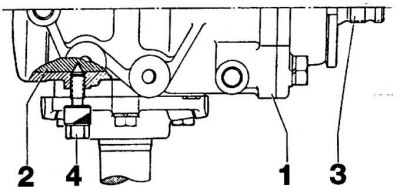
1 - steering gear; 2 - piston; 3 - gear; 4 - blocking screw
Alignment of the mark on the steering gear with the mark on the steering gear housing on models since 1990

1. Before installing a new steering gear, the steering gear must be centered.
2. On early models (before 1990) unscrew the plug and o-ring located on the side of the steering gear box. Then rotate the gear until the center hole aligns with the notch in the plug. If there is a locking taper screw, screw it in in such a way that the steering gear is securely locked (see fig. Steering gear centering on early models (before 1990)).
3. On later models (since 1990) Align the alignment mark on the steering gear with the mark on the steering gear housing (see fig. Alignment of the mark on the steering gear with the mark on the steering gear housing on models since 1990).
4. Establish steering transfer into place. Align the marks made before removal (when reinstalling the steering gear) or check the correct installation of the gear (when installing a new steering gear) and, moving the rubber sleeve towards the steering column, connect it to the steering gear shaft.
5. Secure the steering gear with new bolts, tightening them to the required torque.
6. On early models, remove the cone bolt securing the gear and reinstall the plug and o-ring.
7. Fasten the rubber coupling with new bolts, tightening them to the required torque.
8. Insert the ball joint trunnions of the central and transverse steering rods into the steering mechanism bipod and secure them with new nuts, tightening them to the required torque.
9. On models with power steering, connect the hoses to the steering gear and secure them with union nuts, tightening them to the required torque. Bleed air from the power steering hydraulic system.