
Models with VT 161, VT 167, ZL 167, LF 67/14 and ZF 67/14
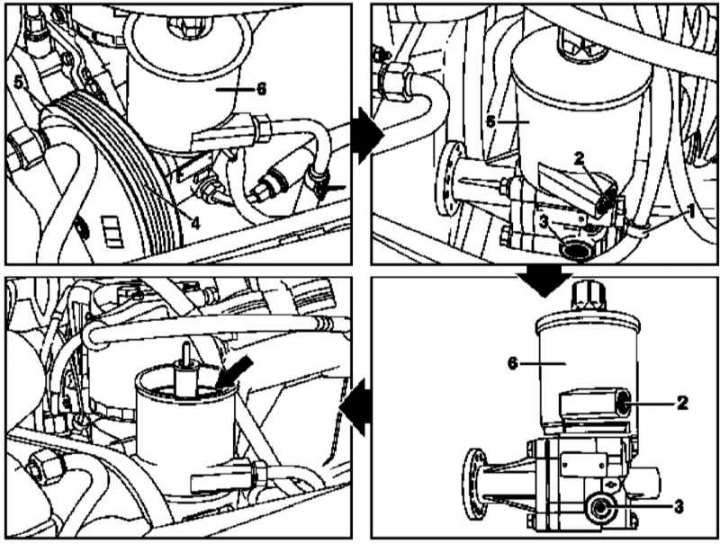
Steering pump installation details (models with VT 161, VT 167, ZL 167, LF 67/14 and ZF 67/14)
1 - Clips; 2 - Union connection of the return line; 3 - pressure fitting; 4 - Auxiliary drive belt; 5 - Pulley; 6 - Steering pump
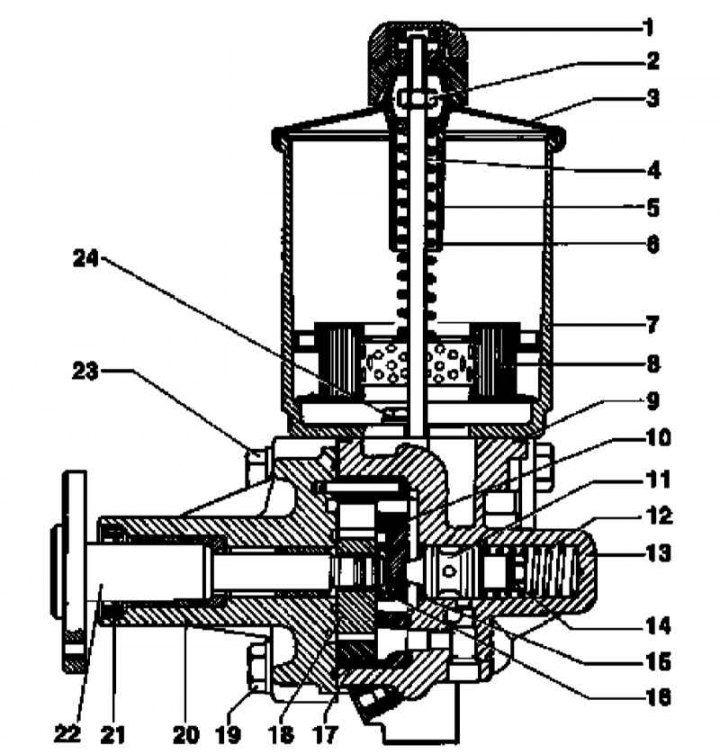
Steering pump design (models with VT 161, VT 167, ZL 167, LF 67/14 and ZF 67/14)
1 - Ventilation cover; 2 - Nut; 3 - End cap; 4 - Hairpin; 5 - Spring; 6 - Plastic sleeve; 7 - Power Steering Reservoir; 8 - Filter element; 9 - O-ring; 10 - Pressure plate; 11 - Volume control valve; 12 - Compression spring; 13 - Pump casing; 14 - Valve screw; 15, 16 - Retaining rings; 17 - Cam ring; 18 - Guide; 19, 23, 24 - Bolts; 20 - Bearing flange; 21 - Oil seal; 22 - Drive shaft
1. Remove the accessory drive belt (4) (see chapter Engine).
2. Loosen fasteners and remove pulley (5).
3. Disconnect hydraulic lines from fittings (3 and 2), - Prepare to collect spilled liquid.
4. Release the latches (1) wiring.
5. Remove the steering pump (6).
6. Thoroughly clean all components, replace defective parts.
7. Installation is carried out in the reverse order.
8. Fill the power steering reservoir with fresh fluid and bleed the hydraulic path.
9. Replace the end cap, making sure the gasket is properly seated.
Models 463.246/249 (M113)
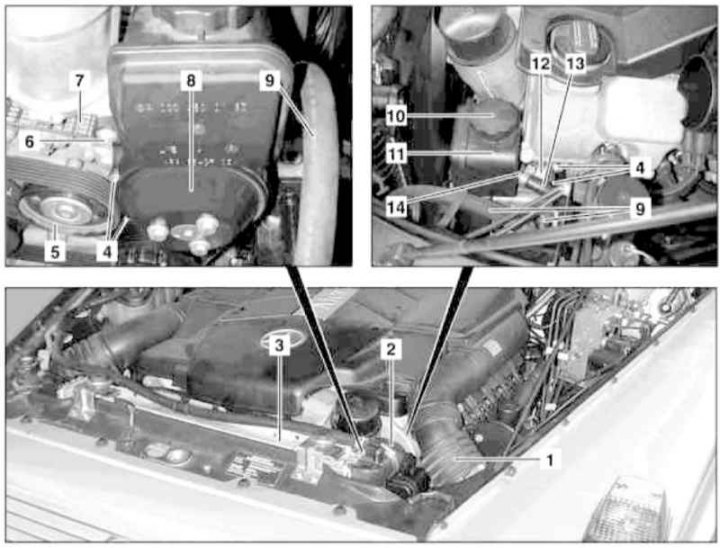
Steering pump installation details (models with M113 engines)
1 - Left air intake; 2 - Hose of the cooling path; 3 - Radiator; 4 - Bolts for fastening the steering pump to the holder; 5 - Tension roller; 6 - Bolt for fastening the tank to the pump casing; 7 - Auxiliary drive belt; 8 - Steering pump drive pulley; 9 - Expansion hose of the pressure path; 10 - Power steering reservoir cover; 11 - Power Steering Reservoir; 12 - Steering pump; 13 - Return hose
1. Remove the left air intake (1).
2. Jack up the car and put it on stands.
3. Empty the cooling system (see chapter Ongoing care and maintenance).
4. Disconnect the hose (2) cooling path from the top of the radiator (3) and take it aside - if necessary, prepare a replacement hose and clamp for its fastening.
5. Get a drain container under the car.
6. Remove the cover (10) and pump out the fluid from the power steering reservoir (11).
7. Disconnect from tank (11) return hose (13), - if necessary, prepare a replacement hose and its clamp.
8. Remove the bolt (6) tank mounts (11) to the casing of the pump assembly.
9. Remove the supply hose retainer.
10. Pressing forward, then pulling up, remove the power steering reservoir (11), - prepare a replacement sealing ring.
11. Take off the belt (7) accessory drive with pulley (8) steering pump (12).
12. Disconnect the expansion pressure hose (9).
13. Turn out fixing bolts (4) and remove the pump (12) from the holder.
14. Install in the reverse order - do not forget to fill the tank with the required amount of fresh fluid to avoid emptying the pump.
15. In conclusion, pump the power steering tract by turning the steering wheel from lock to lock several times.
Diesel models
Models 463.323 (M612)
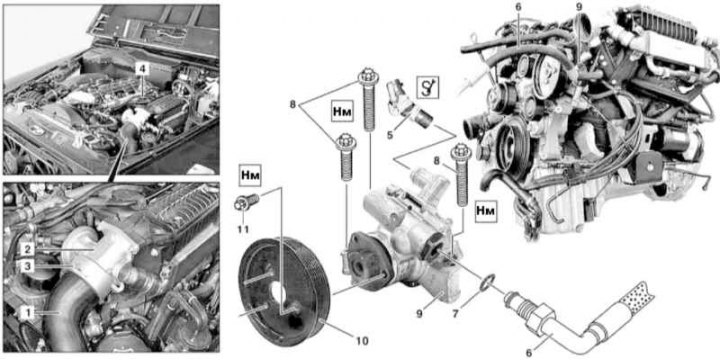
Steering pump installation details (models with M612 engines)
1 - Air intake; 2 - Mixing chamber; 3 - Spring retainer; 4 - Power Steering Reservoir; 5 - Supply hose; 6 - Expansion hose of the pressure path; 7 - O-ring; 8 - Coupling bolt; 9 - Steering pump; 10 - Pump drive pulley; 11 - Bolt
1. Remove the cylinder head cover trim panels
2. Remove the accessory drive belt (see chapter Engine).
3. Detach the sleeve (1) air intake from the mixing chamber (2), - prepare a replacement gasket.
4. Pump out the hydraulic fluid from the power steering reservoir (4).
5. Disconnect from tank (4) supply hose (5), - Prepare to collect spilled liquid.
6. Disconnect the expansion hose (6), - close the fitting immediately, if necessary, prepare a replacement sealing ring (7).
7. Remove the steering pump (9), loosen the bolts if necessary (11) and dismantle the pulley (10).
8. Install in the reverse order - do not forget to fill the reservoir with the required amount of fresh fluid to avoid emptying the pump.
9. In conclusion, pump the power steering tract by turning the steering wheel from lock to lock several times.
Models 463.333 (M628)
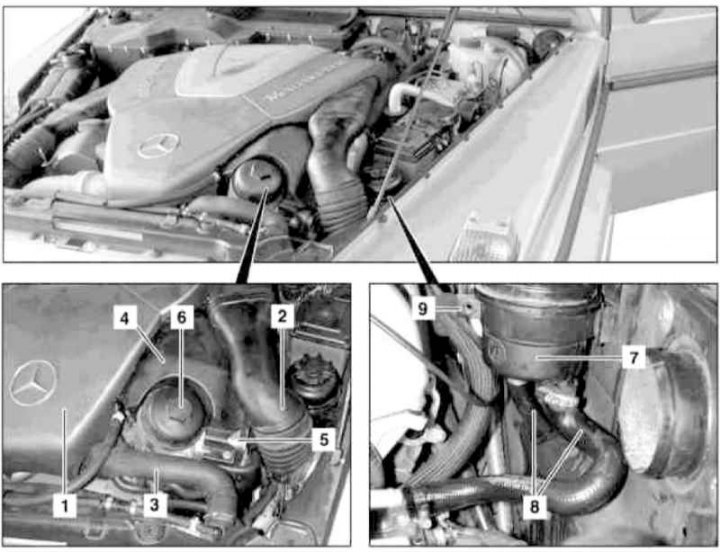
Steering pump installation details (models with M628 engines) (1 of 2)
1 - Air cleaner; 2 - Left air intake; 3 - Hose of the cooling path; 4 - Finishing panel; 5 - Oil-water heat exchanger; 6 - Oil filter; 7 - Power Steering Reservoir; 8 - Hoses; 9 - Power steering tank clamp
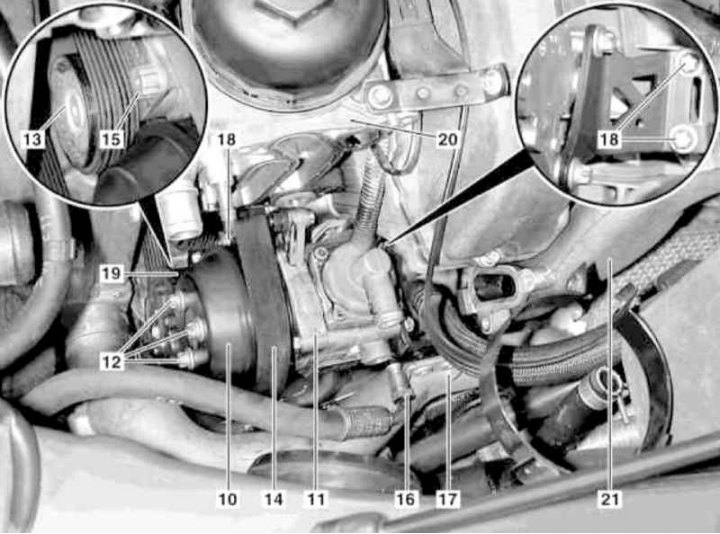
Steering pump installation details (models with M628 engines) (2 of 2)
10 - Pump drive pulley; 11 - Steering pump; 12 - Bolts; 13 - Tension roller; 14 - Auxiliary drive belt; 15 - Tension roller bolt; 16 - Power steering oil line; 17 - Left lower air duct; 18 - Pump mounting bolts; 19 - Lower pump mounting bolt; 20 - Oil filter housing; 21 - Left air intake
1. Remove the air cleaner (1).
2. Remove the left air intake (2).
3. Jack up the car and put it on stands.
4. Remove the crankcase protection.
5. Empty the cooling system (see chapter Ongoing care and maintenance).
6. Disconnect the hose from the radiator (3) and take it aside, - if necessary, prepare a replacement hose and clamp for its fastening, get ready to collect the spilled liquid.
7. Remove the four fixing screws, remove the engine oil dipstick, remove the oil filler cap and dismantle the trim panel (4).
8. Get a drain container under the car.
9. Remove the oil filter (6), drain the oil from it and install it in place, after replacing the sealing gasket.
10. Remove from filter housing (20) liquid heat exchanger (5), - prepare a replacement gasket.
11. Remove the oil filter cover (20).
12. Pump out the fluid from the power steering reservoir (7).
13. Disconnect from tank and plug hoses immediately (8), - Prepare to collect spilled liquid.
14. Loosen the clamp (9) and, pulling up, remove the tank (7).
15. Releasing the bolt (15) tension roller (13), loosen the accessory drive belt (14) and throw it off the pulley (10) steering pump (11).
16. Disconnect and plug the oil line immediately (16).
17. Turn out two bolts and disconnect from pump assembly (11) left lower air duct (17).
18. Loosen the air duct (21) on the cylinder head, then carefully, being careful not to damage, press the sleeve back.
19. Loosen the bolts (18) pump mounts (11).
20. Depressing the tension roller (13), remove the bottom bolt (19).
21. Turn out bolts of fastening of the pump to a cover of a drive of GRM and the holder.
22. Having cut the strapping, release the electrical wiring and remove the steering pump (11).
23. If necessary, remove the drive pulley from the pump assembly (10).
24. Install in the reverse order - do not forget to fill the reservoir with the required amount of fresh fluid to avoid emptying the pump.
25. Bleed the power steering tract by turning the steering wheel from lock to lock several times.
26. In conclusion, clear the memory of the processor of the on-board self-diagnosis system (see chapter Engine Electrical Systems).