
Note: New steering gear mounting bolts, tie rod nuts, tie rod ball joint and rubber coupling clamp bolts are required for installation.
Removing
1. Chock the rear wheels, apply the parking brake, raise the front of the vehicle and support it on jack stands (see "Vehicle lifting and jacking up").
2. Set the front wheels in the straight ahead direction and lock the steering wheel using the ignition key.
Note: Do not turn the column with the steering gear removed.
3. On models equipped with power steering, use brake hose clamps to pinch the supply and return hoses near the steering gear to reduce fluid loss. Label the fittings so as not to confuse them during installation, then loosen and unscrew the nuts of the inlet and drain fittings (see fig. 21.3, a, b). Get ready to collect the liquid that will flow out when you loosen the nuts. Plug the ends of the hoses and the openings in the steering gear to prevent fluid from escaping and contaminating the hydraulic system.
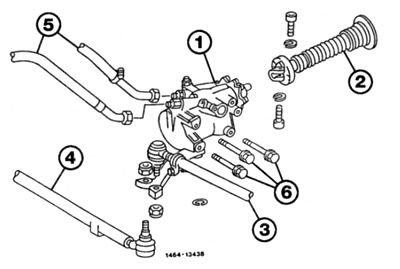
Pic. 21.3, a. Steering gear and related parts
1 steering gear
2 Steering column
3 Tie rod
4 Tie rod
5 Hydraulic hoses (inlet and outlet)
6 Mounting bolts
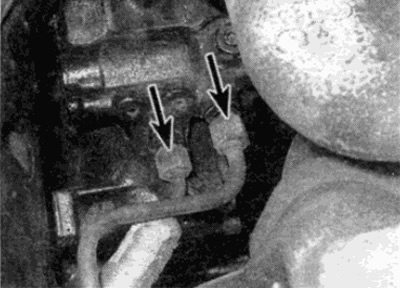
Pic. 21.3, b. Steering hydraulic hose fittings (shown by arrows)
4. Using paint or a marker, apply alignment marks between the lower end of the steering column, rubber sleeve and steering gear. Please note that on some models you have to unscrew the steering gear heat shields to get to the clutch.
5. Loosen and remove the clamp bolts, then slide the clutch up and onto the steering column to separate it from the steering gear.
6. Turn away nuts of fastening of spherical hinges of steering drafts to a steering bipod. Separate the ball joints from the steering arm, if necessary using a universal ball joint remover.
7. Working from below, from under the wheel arch, loosen and remove the three steering gear mounting bolts and pull the steering gear out from under the vehicle.
Repair
8. Check up a condition of the steering mechanism. If repair is necessary, contact a Mercedes-Benz dealer workshop. The only operation that you can easily do yourself is to replace the steering gear seal (see paragraph 23).
Installation
9. If a new steering gear is being installed, the steering gear must be correctly positioned before installation.
10. On early models (until 1990) unscrew the plug and o-ring on the side of the steering gear, then turn the gear to align the center hole with the hole in the plug. If there is a special pointed fixing bolt, screw it in to securely fix the steering gear (see fig. 21.10).
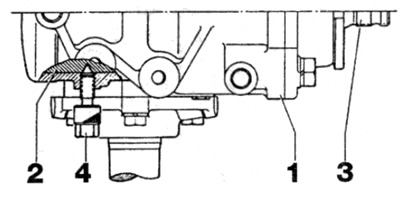
Pic. 21.10. Steering Centering Parts - Pre-1990 Models
1 steering gear
2 piston
3 Gear
4 Fixing bolt
11. On late models (release after 1990) align the mark on the gear with the mark on the steering gear housing (see fig. 21.11).
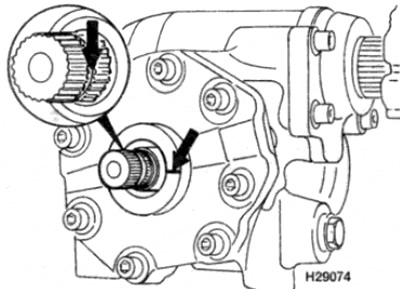
Pic. 21.11. On late models (after 1990), to center the mechanism, align the mark on the gear with the line on the crankcase
12. Establish the steering mechanism into place. Align the marks made during removal ("native" node) or make sure the gear stays properly centered (new mechanism) and, connect the gear with the rubber clutch.
13. Move the rubber clutch into place until it stops, then install new steering gear mounting bolts and tighten them with the required force.
14. On early models, where necessary, unscrew the center bolt and install a plug with an o-ring on the side of the steering gear.
15. Install new clamp bolts and tighten to specification.
16. Connect the ball joints of the longitudinal and transverse steering rods with the steering arm, then install new fastening nuts and tighten them to the required torque.
17. On models with power steering, connect the hydraulic hoses to the steering gear and securely tighten the union nuts. When finished, fill and bleed the hydraulic system as described in paragraph 25.