
Release models before October 1984
Removing
1. Unscrew and remove the system reservoir cap.
2. Remove the nut from the long stud in the center of the reservoir, then remove the spring from the stud.
3. Remove the filter from the tank.
4. Using a clean syringe, draw fluid from the reservoir.
5. Unscrew the fitting, then remove the fluid supply and drain pipes from the side of the pump (see fig. 24.5). Be prepared that some of the liquid may spill. Plug or cover open openings to keep dirt out.
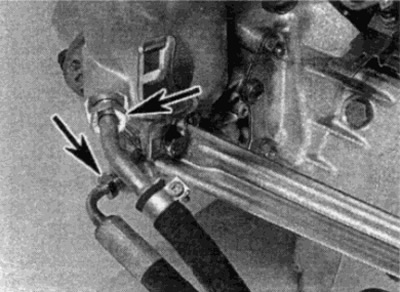
Pic. 24.5. Unscrew the fitting, then remove the supply pipes (A) and return (IN) with pump, side
6. Loosen the adjusting bolt on the rear of the pump bracket to allow the pump to be moved forward to loosen the drive belt tension (see fig. 24.6).
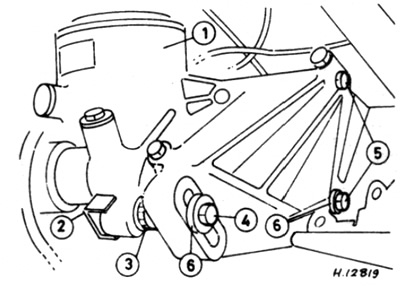
Pic. 24.6. Details of fastening of the pump of the power steering (release models before October 1983)
1 pump
2 Locknut
3 Gear adjuster
4 Regulator counterbolt
5 Mounting bolts
6 washers
7. Remove the drive belt from the pump pulley.
8. Remove the three bolts and remove the pulley from the pump shaft (see fig. 24.8).
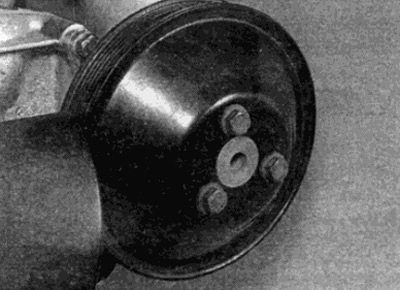
Pic. 24.8. Remove the three bolts and remove the pulley from the pump shaft
9. Remove the two mounting bolts at the back of the pump bracket and remove the threaded mounting plate from the front (see fig. 24.9).
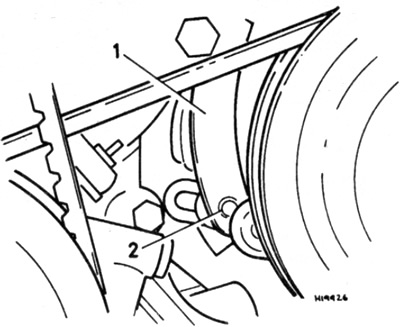
Pic. 24.9. Threaded mounting plate (1) and mounting bolts (2)
10. Loosen and remove the adjusting lock bolt at the rear of the pump, then remove the lock nut and gear adjuster.
11. Remove the pump from the engine.
Installation
12. Install the pump in reverse order, taking into account the following points:
- A) After installing the drive belt, adjust the tension as described in Chapter 1A or 1B.
- b) When installing the filter spring and nut, tighten the nut to compress the spring.
- V) When finished, fill the tank with the required fluid in the required amount, then start the engine and turn the steering wheel left and right several times until it stops. Check fluid level and top up if necessary. Repeat the procedure until the liquid level stops decreasing. Install the cap and cap nut.
Release models after October 1984
Removing
13. Apply the parking brake and raise the front of the vehicle with a jack and place it on jack stands (see "Lifting the vehicle and placing it on stands").
14. Acting as described in Chapter 1, loosen the drive belt tension and remove the belt from the pump pulley, taking into account that before loosening the belt, it is necessary to loosen the pulley mounting bolts.
15. Where necessary, remove the air tube to improve access to the pump (see chapter 4).
16. Remove the mounting bolts and remove the pulley from the power steering pump, remembering how it is installed.
17. Wipe clean area around fittings and apply identification marks to pump tubing and hoses.
18. Loosen the union nuts and disconnect the hoses from the pump. Be prepared for some of the fluid to spill and place a container under the hoses when loosening the nuts. Plug the ends of the pipes and holes in the pump to prevent spillage and contamination of the hydraulic system.
19. Where necessary, unscrew the bolts and remove the bracket from the back of the pump.
20. Loosen and remove the power steering pump mounting bolts. Remove the pump from the engine compartment.
21. If the pump is defective, contact your Mercedes-Benz dealer for replacement parts. If spare parts are available, you can repair the pump or replace it with a refurbished one. In the absence of spare parts, the pump will have to be replaced.
Installation
22.. Install the pump and tighten the mounting bolts to the required torque. If necessary, install a support stand behind the pump.
23. Using the marks made during removal, connect the hoses to the pump and securely tighten the union nuts.
24. Install the pulley on the pump, making sure it is installed correctly. Tighten the mounting bolts to the required torque.
25. Install the drive belt and tighten it as described in Chapter 1.
26. When finished, prime the pump and bleed the hydraulic system as described in paragraph 25.