
Drive Belt Check - Basics
1. Due to their application and design, belts have a limited life span and should be checked periodically to avoid problems.
2. The number of belts is determined by the number of additional systems installed (aggregates). The belt drive includes the water pump, alternator, power steering/suspension hydraulic pump, air conditioning compressor and air pump.
3. To improve belt inspection access, if desired, remove the viscous cooling fan and shroud as described in Chapter 3.
4. With the engine off, using your fingers (and, if necessary, a flashlight) move along the belts checking for cracks and delamination of the belt. Check also the fraying of the belt and the glaze, which gives the belt a shiny look. Both sides of the belts should be checked, which can be done by turning the belt. If necessary, turn the crankshaft with a wrench on the crankshaft pulley hub bolt so that the whole belt can be checked.
Drive Belt Replacement
5. Remove the cooling fan blades and shroud as described in Chapter 3. On models equipped with a non-removable fan shroud, the fan must be removed along with the shroud.
6. Loosen the nuts at the end of the tensioner arm bolt (see fig. 7.6).
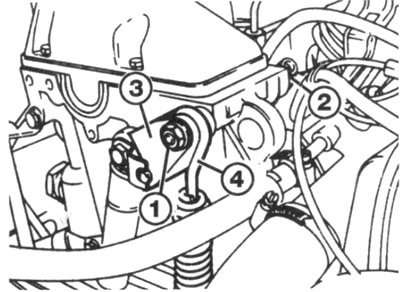
Pic. 7.6. Accessory drive belt tensioner parts.
1 Tensioner arm nut
2 Tensioner arm bolt
3 Tensioner lever
4 Tensioner spring
7. Insert a suitable lever into the hole in the tensioner arm (approximately 12.0 mm in diameter and 300 mm long - e.g. a wheel mount from a car tool kit) and push the lever counterclockwise so that the lever bolt can be moved towards the intake manifold.
8. Turn the lever clockwise to loosen the tensioner spring.
9. Pull the tension pulley back and remove the belt from the pulleys.
10. Install the new belt as follows.
11. Raise idler pulley slightly and hold in this position while tensioning.
12. Loop the belt with the leading ribs out, then pass the belt between the water pump and crankshaft pulleys (see fig. 7.12).
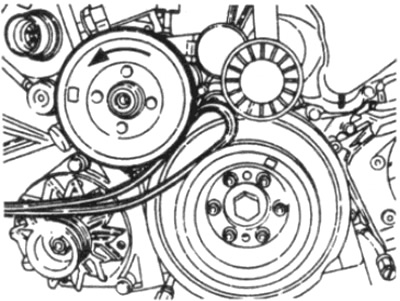
Pic. 7.12. Loop the belt and pass it between the water pump and crankshaft pulleys
13. Using your left hand, push the belt firmly onto the water pump pulley, then turn the water pump pulley counterclockwise until the belt reaches the idler pulley (see fig. 7.13).
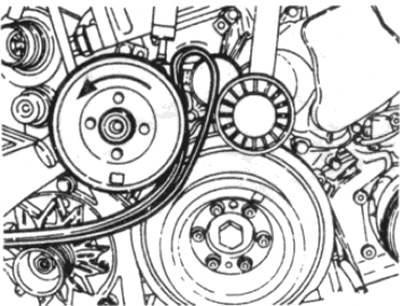
Pic. 7.13. Turn the water pump counterclockwise until the belt reaches the idler pulley
14. Slide the belt over the idler pulley and water pump pulley, then open the rest of the belt, install it around the remaining pulleys in the order shown (see fig. 7.14, a-g).
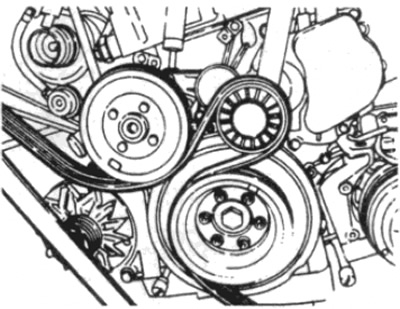
Pic. 7.14 a. Pass the belt over the top of the idler pulley, then pass it around the remaining pulleys
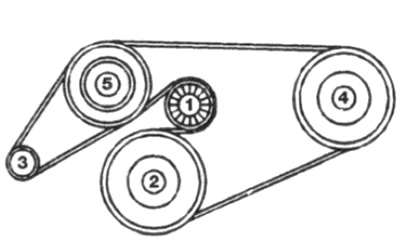
Pic. 7.14b. Accessory Drive Belt - Models Without Air Conditioning
Install the belt around the pulleys in the order shown
1 tensioner pulley
2 crankshaft pulley
3 Alternator pulley
4 Power steering pump pulley
5 Water pump pulley
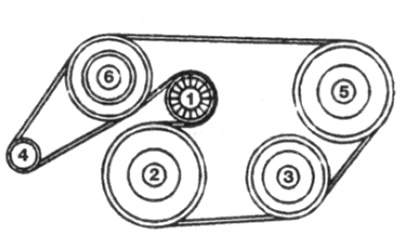
Pic. 7.14, c. Accessory Drive Belt - Air Conditioned Models Without Intermediate Idler
Install the belt around the pulleys in the order shown
1 tensioner pulley
2 crankshaft pulley
3 Air conditioner compressor pulley
4 Alternator pulley
5 Power steering pump pulley
6 Water pump pulley
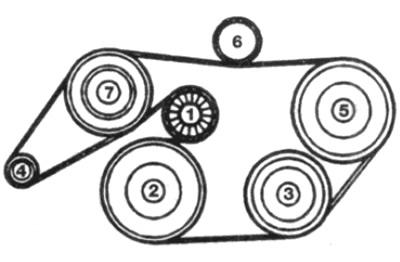
Pic. 7.14, d. Accessory Drive Belt - Air Conditioned Models with Idler Idler
Install the belt around the pulleys in the order shown
1 tensioner pulley
2 crankshaft pulley
3 Air conditioner compressor pulley
4 Alternator pulley
5 Power steering pump pulley
6 Intermediate idler pulley
7 Water pump pulley
15. Loosen the intermediate idler pulley.
16. Press down on the tensioner arm so that the arm bolt can be inserted into place.
17. Push the bolt back through the lever, making sure the lever spring is positioned correctly.
18. Install a nut on the tensioner arm bolt, and while holding the bolt from turning, tighten the nut to the required torque.
19. Install the radiator fan blades and shroud, and where necessary, the radiator as described in Chapter 3.