
Removing
Marking location on the camshaft bearing cap

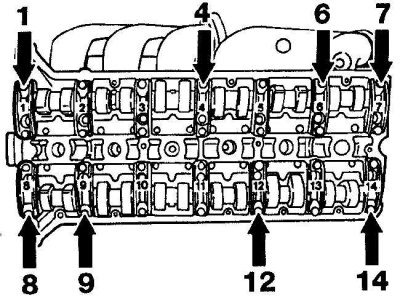
The location of the camshaft bearing caps to be unscrewed and removed first
Arrangement of persistent half rings

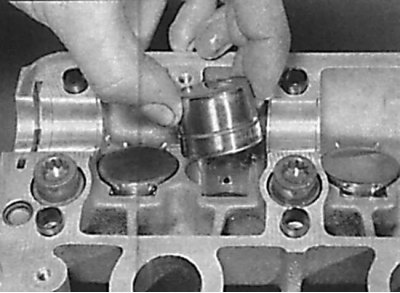
Removing the hydraulic tappets from the cylinder head
1. Set the piston of the first cylinder to TDC and check that all the alignment marks are aligned with the pointers.
2. Remove the crankshaft sprocket that controls the exhaust valves.
3. Remove the drive chain from the intake camshaft sprocket and use wire to secure the chain from falling.
4. Check for markings on the camshaft bearing caps and, if missing, apply it. The bearing caps for the exhaust camshaft are numbered 1 to 7 on the drive chain side (see fig. Marking location on the camshaft bearing cap), and the bearing caps of the camshaft that controls the intake valves are numbered from 8 to 14 from the side of the drive chain.
5. Gradually and sequentially unscrew the bolts of the bearing caps 1, 4, 6 and 7 of the camshaft that controls the exhaust valves and caps 8, 9, 12 and 14 of the camshaft that controls the intake valves (see fig. The location of the camshaft bearing caps to be unscrewed and removed first). Remove covers.
6. Gradually and sequentially, one turn per pass, unscrew the bolts securing the remaining camshaft bearing caps. Remove covers.
7. On 3.0 liter engines, remove thrust half rings near bearing caps 1, 8, 4 and 11 (see fig. Arrangement of persistent half rings).
8. Remove the camshafts from the cylinder head.
9. From sockets in a head of the block of cylinders take hydraulic pushers of valves. Position the hydraulic tappets in a container of clean engine oil in a vertical position so that they can be reinstalled (see fig. Removing the hydraulic tappets from the cylinder head).
Examination
1. Check the running surfaces of the camshaft bearings and cam contours for signs of wear. If there is any wear, the camshaft must be replaced.
2. Check up a condition of hydraulic pushers and sockets for pushers in a head of the block of cylinders. If there is wear on the tappet sockets, the cylinder head must be replaced.
Installation
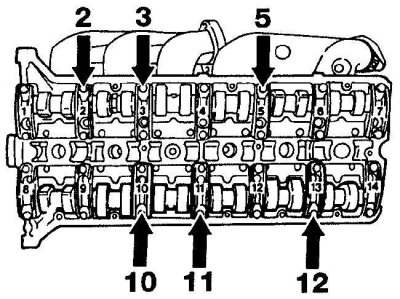
The location of the camshaft bearing caps to be installed first
1. Lubricate the hydraulic tappets with clean engine oil and slide each tappet into place in the cylinder head.
2. Lubricate the camshaft journals and cams with clean engine oil and install the camshafts in the cylinder head.
3. Rotate the camshafts so that the lobes of cylinder No. 2 of the exhaust camshaft and the lobes of cylinder No. 3 of the camshaft of inlet valves point downwards. In this case, the mounting holes on the camshaft flanges must be aligned with the upper plane of the cylinder head.
4. On 3.0L engines, install thrust washers on bearings 1, 8, 4 and 11.
5. Lubricate the bearing surfaces in the camshaft bearing caps, then install the exhaust camshaft caps 2, 3 and 5 and the intake camshaft caps 10, 11 and 13 and install the bolts in the caps (see fig. The location of the camshaft bearing caps to be installed first).
6. Tighten the camshaft bearing cap bolts by hand, then spirally tighten the camshaft bearing cap bolts by turning each bolt half a turn in one pass until each cap contacts the cylinder head. Then, in the same sequence, tighten the bolts to the required torque in several steps.
7. Install the remaining camshaft bearing caps and tighten to the correct torque in the same manner.
8. Fit the timing chain to the intake camshaft sprocket as marked previously.
9. Install the exhaust camshaft sprocket.
10. Check the original position of the camshafts.