
Cars BMW Cars Volkswagen Cars Chevrolet Cars Land Rover Cars Lada Cars Honda Cars Peugeot
English Русский
Български
Беларускі
Український
Српски
Hrvatski
Română
Polski
Slovenský
Magyar
Bookmark News and articles Sitemap Feedback Site search
MercedesMan.ru


A-Class C-Class E-Class G-Class M-Class S-Class Others
W123 (1976-1985) W124 (1984-1995) W210 (1996-2002)
  • Main
  • E-Class
  • W124 (1984-1995)
  • Power unit
  • V6 petrol engine (DOHC)
  • Oil pump chain and drives — removal, inspection and installation

Oil pump chain and drives — removal, inspection and installation (Mercedes-Benz E-Class W124)

0
Contents: Oil pump ↡ Replacing the drive chain ↡

Oil pump


Removal


Unscrewing the bolt securing the oil pickup tube to the bracket
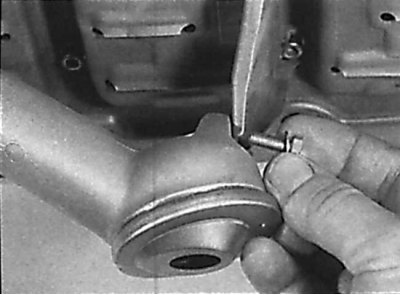


Unscrewing the bolt securing the oil pickup tube to the bracket


Unscrewing the oil catcher plate mounting bolt
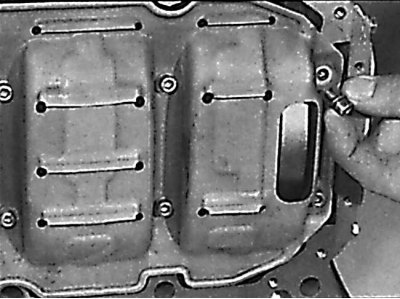


Unscrewing the oil catcher plate mounting bolt


Location of bolts securing oil pump and oil catch plate
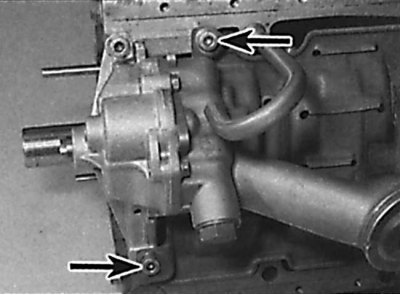


Location of bolts securing oil pump and oil catch plate


Removal the oil catcher plate
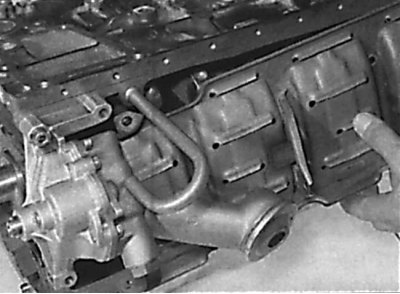


Removal the oil catcher plate


Unscrewing the oil pump mounting bolt
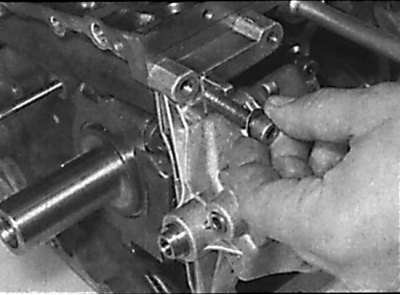


Unscrewing the oil pump mounting bolt


Removal the oil pump
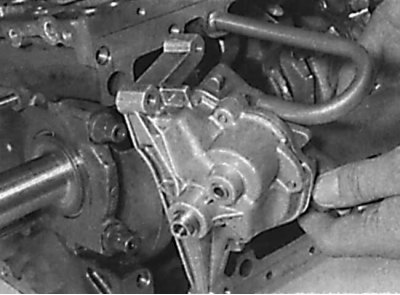


Removal the oil pump


1. Remove the oil pan.


2. Unscrew the bolt and remove the oil pump sprocket together with the drive chain.

3. Unscrew the bolt securing the oil pickup tube to the bracket (see fig. Unscrewing the bolt securing the oil pickup tube to the bracket).

4. Remove the bolts and remove the oil catcher plate from the engine. Note that the two bolts that secure the oil catcher plate also secure the oil pump (see fig. Unscrewing the oil catcher plate mounting bolt, Location of the bolts securing the oil pump and oil catcher plate, Removing the oil catcher plate).

5. Unscrew the remaining bolt and remove the oil pump (see fig. Unscrewing the oil pump mounting bolt, Removing the oil pump).

Examination


Oil pump oil pressure relief valve
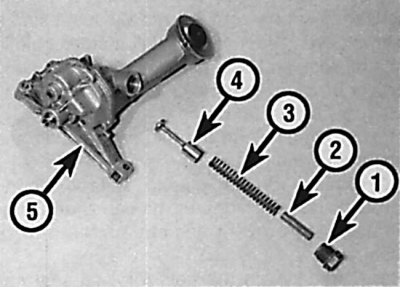


1 - cork; 2 – pin; 3 – spring; 4 – piston; 5 – oil pump housing

1 - cork; 2 – pin; 3 – spring; 4 – piston; 5 – oil pump housing


1. Only the parts of the oil pressure relief valve can be checked.

2. Unscrew the safety valve plug. Keep in mind that it is subject to the force of the compressed spring.

3. Remove the spring, guide pin and piston (see Fig. Oil pump oil pressure relief valve).

4. Clean all parts, check their condition and replace if necessary.

5. Install the oil pressure relief valve components in the reverse order of removal.


Installation


Installation is carried out in the reverse order of removal, taking into account the following points.

1. Before installation, fill the oil pump with clean engine oil.

2. Install the oil pump sprocket with the convex side facing the pump.

Replacing the drive chain


Caution: When replacing the oil pump drive chain, the oil pump sprocket must also be replaced.


Attention! When removing the chain, it is necessary to use an emery wheel or vulcanite to cut off the protruding caps of one of the chain links.


1. Remove the oil pan.

2. Remove the spark plugs.

3. Loosen the oil pump sprocket mounting bolt.

4. Using an emery wheel or vulcanite, grind down the rivets on one of the chain links.

5. Remove the chain link retaining plate and knock out the chain link.

6. Unscrew the oil pump sprocket mounting bolt and remove the sprocket from the pump shaft.

7. Install the new sprocket onto the oil pump shaft with the convex side facing the pump.

8. Using the link removed from the chain, connect the end of the old chain to the new chain. Rotate the engine crankshaft clockwise and pass the new chain around the crankshaft sprocket. At the same time, constantly keep the chain taut so that it does not come off the crankshaft sprocket.

9. After the new chain comes out, disconnect the old chain from it.

10. Install the ends of the new chain onto the oil pump sprocket and connect them with a connecting link.

11. Install the locking plate on the connecting link of the chain and rivet the connecting link. Check that there are no metal burrs left after riveting the connecting link.


12. Tighten the oil pump sprocket mounting bolt to the specified torque.

13. Install the oil pan.

14. Screw in the spark plugs.
This article is available at: russian, bulgarian, belarusian, ukrainian, serbian, croatian, romanian, polish, slovak, hungarian
The article has been verified: Levin Kirill Glebovich
Share with friends:
◀ Previous
E-Class W124 / V6 petrol engine (DOHC)
Next ▶

Oil pan — removal and installation
Cylinder head — removal and installation
Checking and adjusting the position of the camshafts
Camshafts and tappets — removal, inspection and installation
Camshaft adjustment mechanism
Replacing the sealing rings
Oil radiator — removal and installation
More similar articles for repairing other models

☛ Water pump — removal and installation Mercedes W168 (1997-2004)
☛ Oil pump and drive chain — removal, inspection and installation Mercedes 190 (W201) (1982-1993)
☛ Checking the condition of the timing chain on the M628 engine Mercedes W463 (1999-2019)
☛ Replacing the timing chain Mercedes W163 (1997-2005)
☛ Replacing the oil pump drive chain Mercedes W140 (1991-1998)
☛ Replacing the oil pump drive chain Mercedes Vito 1 (1996-2003)
Link in different formats to this article
Comments and feedback from visitors
No comments yet


How much will 31 + 31 ?


W210 (1996-2002) 
  • General information
  • Vehicle description
  • Working conditions and tools
  • Car care
  • Diesel engines
  • Engine repair
  • Lubrication system
  • Cooling system
  • Injection system
  • Supply system
  • Exhaust system
  • Gasoline engines
  • Engine repair
  • Lubrication system
  • Cooling system
  • Control system
  • Power and exhaust system
  • Transmission
  • Clutch
  • Mechanical gearbox
  • Automatic gearbox
  • Drive shafts
  • Chassis
  • Car suspension
  • Steering
  • Tires and wheels
  • Brake system
  • Body
  • Exterior (external elements)
  • Interior (internal elements)
  • Doors and windows
  • Heating and ventilation
  • Electrical equipment
  • Equipment and devices
  • Power devices
  • Lighting and signaling
  • Electrical circuits
W124 (1984-1995) 
  • General information
  • Governing bodies
  • Driving and operation
  • Weekly care
  • Maintenance (gasoline)
  • Maintenance (diesel)
  • Troubleshooting
  • Power unit
  • I4 petrol engine
  • V6 petrol engine (SOHC)
  • V6 petrol engine (DOHC)
  • Diesel engines
  • Engine overhaul
  • Cooling system
  • Heating and ventilation
  • Fuel system (carburetor)
  • Injection system «Bosch CIS-E»
  • Injection system «Bosch HFM»
  • Diesel fuel system
  • Supply system
  • Starting and charging system
  • Ignition system (I4)
  • Ignition system (V6)
  • Preheating
  • Transmission
  • Clutch
  • Mechanical gearbox
  • Automatic gearbox
  • Drive shafts
  • Chassis
  • Brake system
  • Car suspension
  • Steering
  • Body
  • Exterior (external elements)
  • Interior (internal elements)
  • Doors, locks and windows
  • Electrical equipment
  • Equipment and devices
  • Switches
  • Headlights and lighting
  • Electrical circuits
W123 (1976-1985) 
  • General information
  • Introduction to the guide
  • Power unit
  • Engine device
  • Repair M102 engines
  • Repair M110 and M123 engines
  • Cooling and lubrication (M102)
  • Cooling (M110 and M123)
  • Ignition system
  • Power system «Stromberg»
  • Power system «Solex 4A1»
  • Fuel injection «K-Jetronic»
  • Fuel injection «L-Jetronic»
  • Transmission
  • Clutch
  • Mechanical gearbox
  • Automatic gearbox
  • Cardan and rear axle
  • Chassis
  • Front suspension
  • Rear suspension
  • Steering
  • Brake system
  • Body
  • Exterior (external elements)
  • Interior (internal elements)
  • Doors, locks and windows
  • Electrical equipment
  • Equipment and devices
  • Power devices
  • Electrical circuits
 
MercedesMan.ru © 2017–2026 · Mobile version · Read about Mercedes · Sitemap: EN BG BY UA RS HR RO PL SK HU · Feedback · Site search · Bookmark A-Class (W168) · C-Class (W201) · C-Class (W202) · C-Class (W203) · E-Class (W123) · E-Class (W124) · E-Class (W210) · G-Class (W463) · M-Class (W163) · S-Class (W116, petrol) · S-Class (W126, petrol) · S-Class (W140) · S-Class (W220) · Sprinter · Vito 1 · Vito 2 · Vario 814D ·
 
We only use cookies without which some of the site's features may not be available.