
Oil pump
Removing
1. Remove the drip tray as described in paragraph 11.
2. Turn away a bolt of fastening of an asterisk of the pump and remove a washer. Remove the oil pump sprocket along with the drive chain from the oil pump shaft.
3. Turn away bolts of fastening of an oil pick-up tube to the block of cylinders and remove washers.
4. Turn away three bolts of fastening of the oil pump to the block of cylinders and remove washers (see fig. 12.4).
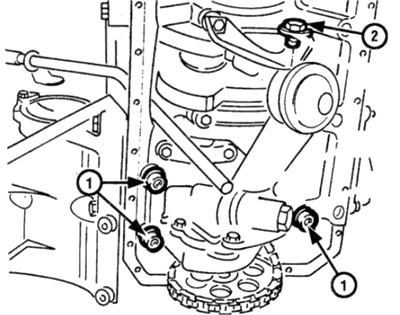
Pic. 12.4. Oil pump mounting details
1 Oil pump bolts
2 Bolt for securing the oil pickup tube to the support bracket
5. Remove the pump from the cylinder block, taking into account that it is located on two keys.
Examination
6. Except for the bypass valve, the oil pump is a non-separable unit. To remove the valve, follow these steps.
7. Remove the bypass valve plug. Be careful as the plug is spring-loaded and will be pushed out when it reaches the end of the thread (see fig. 12.7).
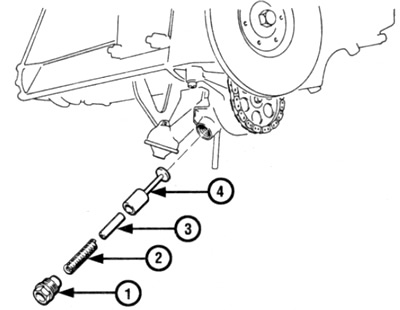
Pic. 12.7. Oil pump bypass valve parts
1 Cork
2 spring
3 Guide rod
4 piston
8. Remove spring, guide rod and piston.
9. Thoroughly clean all parts and check their condition. If significant wear or damage is found, replace the part (And) - pay special attention to the spring.
10. Install parts in reverse order. Tighten the plug to the required torque.
Installation
11. Installation is carried out in the reverse order, taking into account the following points:
- A) Drain the oil pump into clean engine oil.
- b) Check that the pump is mounted on keys.
- V) Tighten the pump mounting bolts to the required torque.
- G) Install the pump sprocket with the convex side facing the pump.
- d) Tighten the pump sprocket bolt to the required torque.
- e) Install the pallet as described in paragraph 11.
Drive chain - replacement
Note: Removing the chain using the above method involves using a portable electric grinder to cut one of the chain links. Before starting work, make sure that you have access to this tool and a new chain and connecting link. The oil pump sprocket should be changed along with the chain.
12. Remove the oil pan as described in paragraph 11.
13. Loosen the oil pump sprocket bolt.
14. Using a grinder, grind down the chain link tab on the top of the sprocket - be careful not to damage the sprocket.
15. Remove the chain link plate and push the link to the back of the chain (see fig. 12.15).

Pic. 12.15. Replacing the oil pump drive chain
1 Chain link plate
3 Oil pump sprocket bolt
2 chain link
4 Oil pump sprocket
16. Turn away a bolt of fastening of an asterisk of the oil pump and remove a washer, then an asterisk from a pump shaft.
17. Install the new sprocket on the pump shaft with the concave side facing the pump.
18. Using a new link, connect one end of the new chain to the end of the old chain so that when the crankshaft is turned clockwise, the new chain runs down around the sprockets, then rises up on the other side. Install the link from the back of the sprocket and make sure the link is securely in place - do not install the link plate at this stage to secure the link.
19. After that, it is necessary to pass the new chain through the sprockets and guides. During this procedure, the following points should be observed:
- A) Maintain chain tension so that the chain links do not come off the camshaft sprocket.
- b) Pull the old chain up to prevent it from slipping off the crankshaft sprocket or from warping and jamming in the housing.
Advice. Temporarily secure the ends of the new chain to the camshaft sprocket with string or wire passed through the holes in the sprocket and around the chain.
20. Using a suitable socket wrench on the crankshaft pulley hub bolt, slowly turn the crankshaft clockwise, following the recommendations given in the previous paragraph.
21. When the end of the new chain appears, remove the link (checking that the tension of the new chain has not decreased and that the chain links remain aligned with the sprockets) and disconnect the new circuit from the old one. Remove the old chain.
22. Put a new chain on the camshaft sprocket, then connect the two ends of the chain to the connecting link inserted from the back of the sprocket.
23. Install the link plate and secure the link by flattening out the studs of the link fingers. A special device is intended for these purposes, however, satisfactory results can be achieved with a hammer and a metal bar (or second hammer), to support the back of the chain. Be careful not to damage the chain or sprocket.
24. Check that the link is securely fastened without metal burrs or chips.
25. Tighten the oil pump sprocket bolt to the required torque,
26. Install the drip tray as described in paragraph 11.