
Removing
Note: This operation requires a hoist and winch. Installation will require a new gasket and may require new exhaust clamp nuts.
1. Disconnect the negative battery terminal.
2. Remove the air cleaner as described in Chapter 4.
3. Unfasten the radiator fan shroud and position it on top of the fan blades as described in Chapter 3.
4. Remove the motor shield from below as described in Chapter 11.
5. Remove the front anti-roll bar as described in Chapter 10. Please note that the stabilizer can be left under the car, providing the ability to unscrew the bolts securing the supports.
6. Drain the engine oil as described in Chapter 1A.
7. Where provided, disconnect the wires from the oil level sensor mounted on the sump.
8. Disconnect the wires from the emergency oil pressure lamp switch.
9. On models with an automatic transmission turn away bolts of fastening and disconnect lines of the heat exchanger of liquid of a transmission from the pallet.
10. Similarly, on models with a suspension leveling system, unscrew the mounting bolt and disconnect the hydraulic tube from the sump.
11. Disconnect the front sections of the exhaust system from the exhaust manifold as described in chapter 4.
12. Where it is provided, working from below under the car, turn away nuts of collars and release details of system of release of the fulfilled gases from an arm on a transmission.
13. Insert a sheet of metal or thick cardboard between the rear of the engine and the bulkhead to protect the bulkhead and brake lines during the following operations (see fig. 11.13).
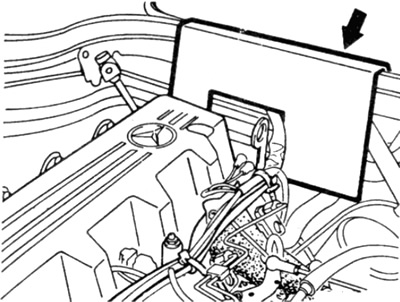
Fig.11.13. Insert sheet (shown by arrow) on the back of the engine to protect the baffle
14. Disconnect the steering tie-rod on the left side and the steering shock absorber on the right side, as described in Chapter 10.
15. Attach the hoist and winch to the engine rigging brackets and raise the hoist to support the engine.
16. Working in turn on each side of the vehicle, remove the bolts of the lower right and left engine mounts.
17. Carefully lift the engine just enough to remove the pan mounting bolts.
18. Acting gradually in a diagonal sequence, unscrew the bolts securing the pallet (see fig. 11.18). Remember the location of the bolts as they vary in length.
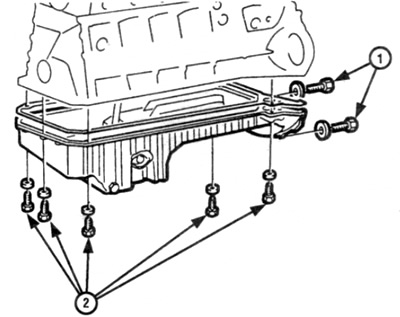
Pic. 11.18. Loosen the pan mounting bolts
7 Bots securing the pallet to the gearbox
2 Bots of fastening of the pallet to the block of cylinders
19. Remove the pallet down and remove the gasket.
Installation
20. Installation begin with removal of the remained laying of the pallet and the block of cylinders, then wipe surfaces dry.
21. Position the new gasket on the sump, then lift the sump into place and insert the bolts into place.
22. Tighten the bolts gradually, with the required force.
23. Gently lower the engine into place, then install and tighten the lower support bolts to the required torque.
24. Disconnect the winch from the rigging brackets and remove the hoist.
25. Connect the steering damper and tie rod as described in Chapter 10.
26. Where required, install the clamps for fastening parts of the exhaust system to the gearbox bracket and secure with new nuts.
27. Connect the receiver sections to the manifold as described in Chapter 4.
28. Where provided, tighten the bolt (s) attaching transmission fluid heat exchanger tubes and/or suspension control system hydraulic tubes to the sump.
29. Connect the oil pressure lamp switch wire and, where provided, the oil level sensor wires.
30. Install the front anti-roll bar as described in Chapter 10.
31. Make sure the drain plug is installed and tightened. Then install the engine cover.
32. Install the radiator fan shroud (Chapter 3).
33. Install the air cleaner.
34. Lower the car to the ground and fill the engine with the required oil (see "Weekly check" And Chapter 1A).
35. Connect the negative battery terminal.