
Cars BMW Cars Volkswagen Cars Chevrolet Cars Land Rover Cars Lada Cars Honda Cars Peugeot
English Русский
Български
Беларускі
Український
Српски
Hrvatski
Română
Polski
Slovenský
Magyar
Bookmark News and articles Sitemap Feedback Site search
MercedesMan.ru


A-Class C-Class E-Class G-Class M-Class S-Class Others
190 (W201) (1982-1993) W202 (1993-2000) W203 (2000-2007)
  • Main
  • C-Class
  • W201 (1982-1993)
  • Power unit
  • Petrol engine V6
  • Camshaft Drive Chain — Checking and Replacing

Camshaft Drive Chain — Checking and Replacing (Mercedes-Benz C-Class W201)

0
Contents: Examination ↡ Replacement ↡

Examination


1. Remove the upper timing chain cover as described in paragraph 6.

2. Using a socket wrench on the crankshaft pulley/vibration damper hub bolt, turn the crankshaft to gradually expose the entire chain to the camshaft sprocket.

3. The chain should be replaced if the sprocket or chain is worn (manifests itself in increased longitudinal play between the links and increased noise during operation). It is recommended to replace the chain every time the engine is disassembled. Note that the rollers on a worn chain may be worn out. To avoid problems in the future, if there is any doubt about the condition of the chain, replace it.

Replacement


Note: Removing the chain using this method requires using a portable electric grinder to cut one of the chain links. Before you begin, make sure you have access to this tool and a new chain and connecting link.


4. Disconnect the negative battery terminal.

5. If not already done, remove the upper timing chain cover as described in paragraph 6.

Material taken from a web resource (www.mercedesman.ru)

6. Remove the chain tensioner as described in paragraph 8.

7. Remove the spark plugs as described in Chapter 1A.

8. Cover the camshaft and the portion of the chain not covered by the casing with clean rags. Do not cover the top of the camshaft sprocket with rags.

9. Using a grinder, file down the chain link protrusion on the top of the sprocket - be careful not to damage the sprocket.

10. Remove the chain link plate and push the link to the back of the chain.


11. Collect the rags, taking care to prevent the shavings from falling down into the chain case.

12. Using a new link, connect one end of the new chain to the end of the old chain so that when the crankshaft is turned clockwise, the new chain will pass down around the sprockets, then up the other side. Fit the link to the back of the sprocket and ensure that the link is securely in place - do not fit the link plate to secure the link at this stage.

13. After this, it is necessary to pass the new chain through the sprockets and guides. During this procedure, the following points should be observed: (see fig. 7.13).
  • a) Maintain chain tension so that the chain links do not jump off the camshaft sprocket. Otherwise, the valve timing will be disturbed.
  • b) Pull the old chain upwards to prevent it from slipping off the crankshaft sprocket or becoming skewed in the guides.
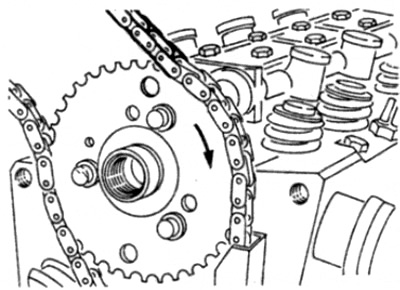
Fig. 7.13. Maintain tension on the new chain as you thread it around the sprockets and guides

Fig. 7.13. Maintain tension on the new chain as you thread it around the sprockets and guides


14. Using a suitable socket wrench, slowly turn the crankshaft pulley hub bolt clockwise, following the recommendations given in the previous step.


15. When the end of the new chain appears, remove the link (checking that the tension of the new chain has not decreased and that the chain links remain aligned with the sprockets) and disconnect the new chain from the old one. Remove the old chain.

16. Place the new chain on the camshaft sprocket, then connect the two ends of the chain with the connecting link inserted into the back of the sprocket.

17. Install the link plate and secure the link by flattening the ends of the link pins. A special device is provided for this purpose, however, satisfactory results can be achieved using a hammer and a block of metal (or the second hammer), to support the back of the chain. Be careful not to damage the chain or sprocket.

18. Check that the link is securely fastened without any metal burrs or chips.

19. Install the chain tensioner as described in paragraph 8.

20. Turn the crankshaft clockwise to set the piston of the 1st cylinder to the TDC position, checking that the timing marks of the crankshaft and camshaft are correctly aligned, as described in paragraph 3.

21. It is possible that during this operation the chain will shift by one tooth of the camshaft sprocket. In this case, the valve timing can be adjusted by removing the sprocket (see paragraph 8) and changing the position of the camshaft and sprocket by one tooth in relation to the chain.

22. Install the spark plugs.

23. Install the upper timing chain cover as described in paragraph 6.

24. Connect the negative battery terminal.
This article is available at: russian, bulgarian, belarusian, ukrainian, serbian, croatian, romanian, polish, slovak, hungarian
The article has been verified: Lukyanov Nikita Ilyich
Share with friends:
◀ Previous
C-Class 190 (W201) / Petrol engine V6
Next ▶

Timing Chain Covers — Removal and Installation
Crankshaft Pulley/Vibration Damper and Hub — Removal and Installation
Camshaft Cover — Removal and Installation
Engine and Timing Marks — Basic Information and Use
Compression — checking and analyzing the results
Timing chain tensioner, sprockets and guides
Camshaft, Tappet and Sprocket — Basics, Checking and Installation
Cylinder head — removal, inspection and installation
Pallet — removal and installation
Oil pump and drive chain — removal, inspection and installation
More similar articles for repairing other models

☛ Clutch drive — bleeding air and replacing fluid in the hydraulic drive Mercedes W168 (1997-2004)
☛ Replacing the camshaft drive chain Mercedes W123 (1976-1985)
☛ Checking the condition of multi-rib belts for auxiliary drive units Mercedes W463 (1999-2019)
☛ Checking the condition of multi-rib belts for auxiliary drive units Mercedes W163 (1997-2005)
☛ Replacing the oil pump drive chain Mercedes W140 (1991-1998)
☛ Removal and installation the camshaft drive chain tensioner Mercedes Sprinter (1995-2000, diesel)
Link in different formats to this article
Comments and feedback from visitors
No comments yet


How much will 24 + 24 ?


W203 (2000-2007) 
  • General information
  • Introduction to guide
  • User manual
  • Maintenance
  • Power unit
  • Gasoline engines
  • Diesel engines
  • Cooling system
  • Ventilation and heating
  • Supply system
  • Injection system (gasoline)
  • Injection system (diesel)
  • Exhaust system
  • Ignition and control system
  • Charge and launch systems
  • Transmission
  • Mechanical gearbox
  • Automatic gearbox
  • Clutch and drive shafts
  • Differential
  • Chassis
  • Brake system
  • Car suspension
  • Steering
  • Body
  • Exterior (external elements)
  • Interior (internal elements)
  • Electrical equipment
  • Equipment and devices
  • Lighting system
  • Electrical diagrams (2000)
  • Electrical diagrams (since 2001)
W202 (1993-2000) 
  • General information
  • User manual
  • Driving a car
  • Car care
  • Maintenance
  • Power unit
  • Gasoline engines
  • Diesel engines
  • Lubrication system
  • Cooling system
  • Heating and ventilation
  • Ignition system
  • Fuel system
  • Injection system (gasoline)
  • Injection system (diesel)
  • Exhaust system
  • Transmission
  • Clutch
  • Car gearbox
  • Chassis
  • Suspension, wheels and tires
  • Steering
  • Brake system
  • Body
  • Exterior (external elements)
  • Interior (internal elements)
  • Doors and windows
  • Electrical equipment
  • Equipment and devices
  • Power devices
  • Lighting system
  • Electrical circuits
190 (W201) (1982-1993) 
  • General information
  • Introduction to the guide
  • Operation and care
  • Maintenance (gasoline)
  • Maintenance (diesel)
  • Troubleshooting
  • Power unit
  • Petrol engine I4
  • Petrol engine V6
  • Diesel engines
  • Engine overhaul
  • Cooling and heating
  • Power system (carburetor)
  • Injection system (gasoline)
  • Injection system (diesel)
  • Exhaust system
  • Charge and start system
  • Ignition system (I4)
  • Ignition system (V6)
  • Diesel heating system
  • Transmission
  • Clutch
  • Mechanical gearbox
  • Automatic gearbox
  • Cardan shaft and axle shafts
  • Chassis
  • Brake system
  • Car suspension
  • Steering
  • Body
  • Exterior (external elements)
  • Interior (internal elements)
  • Doors, locks and windows
  • Electrical equipment
  • Equipment and devices
  • Electrical circuits
 
MercedesMan.ru © 2017–2026 · Mobile version · Read about Mercedes · Sitemap: EN BG BY UA RS HR RO PL SK HU · Feedback · Site search · Bookmark A-Class (W168) · C-Class (W201) · C-Class (W202) · C-Class (W203) · E-Class (W123) · E-Class (W124) · E-Class (W210) · G-Class (W463) · M-Class (W163) · S-Class (W116, petrol) · S-Class (W126, petrol) · S-Class (W140) · S-Class (W220) · Sprinter · Vito 1 · Vito 2 · Vario 814D ·
 
We only use cookies without which some of the site's features may not be available.