
Attention! Due to the fact that the hydraulic clutch system works on brake fluid, read the relevant provisions of the chapter «Removal of air from the brake system». Remember that brake fluid is poisonous and can damage paintwork.
Attention! Below is the procedure for removing air from the hydraulic clutch without using a special tool. In this case, some air may remain in the system. The fact that air remains in the system can be recognized by the characteristic scratching sounds, in addition, clutch separation will occur with deviations from the norm. If these signs occur after the system has been bled, then it is recommended to repeat the bleed immediately, but already in the workshop using a special device.
Air removal without special tool
1. Check the brake fluid level in the expansion tank. Add liquid if necessary.
Attention! Do not allow a significant drop in the liquid level in the expansion tank when bleeding the system. Keep replenishing the fluid volume.
2. Install the car on the goats.
Attention! There is a risk of injury when the vehicle is jacked up or placed on jack stands. Read the safety precautions in the chapter «car jacking».
3. Remove the mudguard (protection) for vehicles with a diesel engine.
4. Remove the dust cap from the bleeder port on the slave cylinder (see arrow in illustration). Put a transparent hose on the bleed valve located on the working cylinder (see illustration).
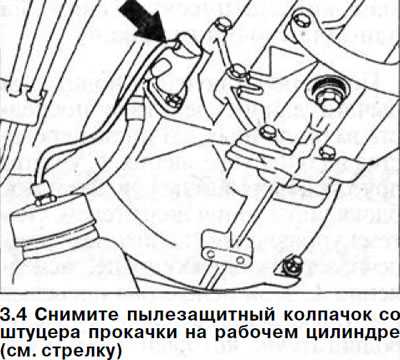
Attention! The illustration shows a non-A class vehicle.
5. Carefully loosen the nipple using a hex wrench.
6. Lower and hold the free end of the hose in a container half filled with brake fluid.
The end of the hose must always be in the brake fluid to prevent air being drawn into the system.
7. Ask the assistant about 10 times to slowly squeeze the clutch pedal to the stop, and then hold it in the pressed position.
8. Open the bleeder valve to allow fluid to come out. After the appearance of air bubbles in the outgoing brake fluid stops, wrap the fitting.
Attention! Monitor the level of fluid in the brake system and replenish its volume.
9. Release the clutch pedal, and then squeeze it again about 10 times and leave it pressed.
10. Open the bleeder valve, allow a small amount of brake fluid to drain and close the bleeder screw again. Repeat this procedure until there are no air bubbles in the escaping brake fluid. At the same time, constantly add brake fluid to the expansion tank.
Attention! If it is necessary to completely drain the fluid from the system, bleed until the newly filled brake fluid begins to flow into the hose, which differs from the previous one in a lighter color.
11. Remove the hose from the bleeder fitting and close it with a dust cap.
12. Reinstall the engine mudguard.
13. Add brake fluid to the expansion tank up to the MAX mark and close the tank with a lid.
14. Check up functioning of coupling and brake system.
Air removal using a special device
In workshops, the removal of air from the hydraulic clutch is carried out using a special device that creates pressure in the system.
15. Install the car on the goats and remove the engine mudguard.
16. Remove the cap from the expansion tank with brake fluid.
17. Connect the bleed tool following the tool manufacturer's instructions.
18. Remove a dustproof cap from the prorolling union on the working cylinder and put on the prorolling union a transparent hose. Lower the free end of the hose into a container half filled with brake fluid.
19. Open the bleeder valve and keep it open until air bubbles in the escaping brake fluid stop coming out.
Attention! If it is necessary to completely drain the fluid from the system, bleed until the newly filled brake fluid begins to flow into the hose, which differs from the previous one in a lighter color.
20. Remove the hose from the bleeder fitting and close it with a dust cap.
21. Disconnect the clutch bleed tool.
22. Add brake fluid to the expansion tank up to the MAX mark and close the tank with a lid.