
Attention! Since the working fluid of the hydraulic clutch is brake fluid, before proceeding with the procedure, read the precautions set out in Chapter Brake and auxiliary systems. Remember that brake fluid is toxic and chemically aggressive!
The air from the clutch hydraulic drive must be removed if the clutch pedal does not return to its original position when released, or or returns with a delay, as well as in case of malfunction of the clutch disengagement and after opening the hydraulic path.
Air removal without the use of a special device
Attention! If during the procedure it is not possible to completely remove air from the clutch drive path (rattle is felt and the quality of clutch disengagement is impaired), it is necessary to bleed the system in conditions of one hundred using a special device (see below).
1. Check the level in the brake fluid reservoir, correct if necessary (see chapter Checking fluid levels, leak control).
Attention! During the procedure, the liquid in the GTZ tank should not drop excessively - periodically adjust its level by adding fresh!
2. Jack up the car and put it on stands.
3. Remove the crankcase protection.
4. Remove a dustproof cap from the valve of prorolling on the executive cylinder. Pull a piece of transparent hose over the valve, lower the free end of it into a drain container partially filled with brake fluid to prevent air from being drawn in during pumping.
Note. The accompanying illustration is for informational purposes and may not fully correspond to the models described.
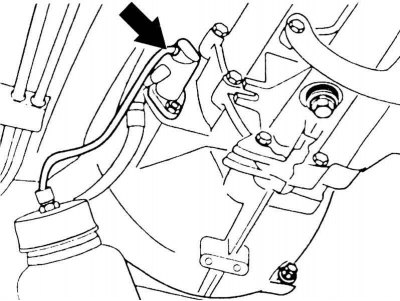
Location of the bleed valve on the clutch slave cylinder
5. Using a ring wrench, carefully loosen the valve.
6. Ask an assistant to press the clutch pedal to the stop about 10 times and then fix it in the lower position.
7. Open the valve - the brake fluid will begin to flow into the drain container. If the pressure drops, close the valve and repeat the procedure.
8. Continue pumping until the fluid pumped out of the system is completely free of air bubbles / fresh fluid starts to be pushed out of the hose (in case of replacement), - do not forget to check and, if necessary, correct the liquid level in the GTZ reservoir.
9. When finished priming, tighten the valve, remove the hose and replace the dust cap.
10. Reinstall the crankcase guard.
11. Correct the fluid level in the GTZ reservoir (see chapter Checking fluid levels, leak control).
12. Check up serviceability of functioning of brake system and coupling.
Air removal using a special device
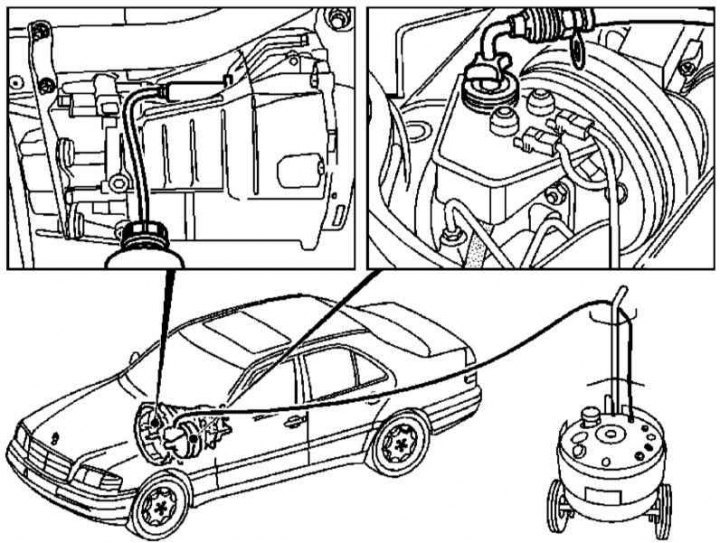
Bleeding the hydraulic path of the clutch drive using a special device
1. At the service station, air is removed from the clutch system, as a rule, using a special device that provides the necessary fluid pressure in the hydraulic path. Only deviations from the standard procedure described above are listed below.
2. Acting strictly in accordance with the manufacturers' instructions, connect the instrument to the GTZ reservoir.
3. Carry out the procedure of paragraph 4 (see above).
4. Open the valve and keep it open until the end of the release of air / the beginning of the release of fresh liquid (when replacing the last).
5. After tightening the valve, disconnect the hose and install the dust cap.
6. Disconnect the device.
7. Correct the level in the GTZ tank and close the latter.
8. In conclusion, make sure that the brake system and clutch are working properly.