
4-cylinder petrol engine
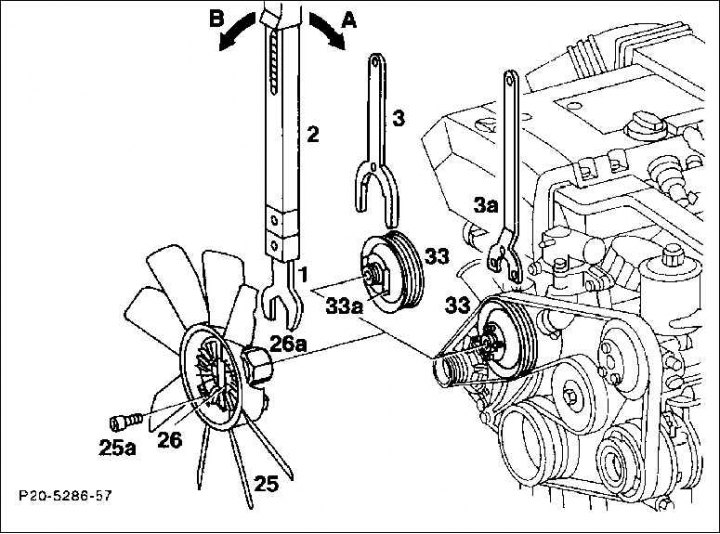
1. Open-end wrench attachment; 2. Torque wrench; 3. Counter support at the pulley with a flat lock washer; 3a. Counter support at the pulley with bolts having an internal hexagon; 25. Fan 25a. Bolt 6 x 14, 10 Nm; 26. O-ring; 26a. union nut; 33. Pulley; 33a. Flat lock washer; A - Unscrewing; B - Screwing
Removing
1. Unscrew the union nut with an open-end wrench, while using a counterhold, clamp the pulley of the pump for supplying coolant.
Attention! The nut has a left-hand thread.
2. Pull out the hydraulic coupling together with the fan.
3. Unscrew 3 fixing bolts and separate the fan from the coupling.
Installation
1. Connect the coupling to the fan.
Attention! The correct mounting position of the fan is determined by the welded fin.
2. Screw on the hydraulic coupling with a torque of 10 Nm.
3. Insert the hydraulic coupling together with the fan and tighten with a torque of 40 Nm This requires a torque wrench with an open-end wrench attachment.
Attention! The nut has a left-hand thread.
6-cylinder petrol engine
Removing
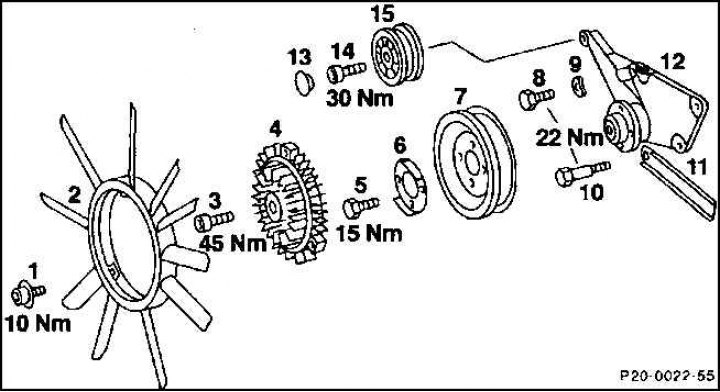
1. Remove the fan shroud.
2. Remove the bolt (3) on the hydraulic clutch of the fan. At the same time, keep the pulley from rotating in the opposite direction with a homemade key on the disc flat (6).
3. Remove the fan together with the hydraulic clutch.
Installation
1. Insert the fan clutch in this way so that the welded part number is forward on the radiator side.
2. Screw the fan clutch with a torque of 45 Nm, while keeping the pulley from rotating in the opposite direction.
3. Install the fan shroud.
2.0/2.2L diesel engine
Removing
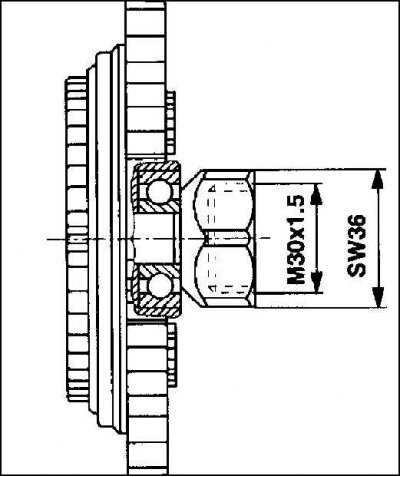
1. unscrew (A) union nut (2a) wrench (5), while securing the water pump pulley with a counterhold (9).
Attention! The nut has a left-hand thread.
2. Pull together with fan (1) hydraulic clutch (2).
3. Remove the three fixing screws (3) and separate the fan from the clutch.
Installation
1. Insert the sleeve into the cooling fan. The protrusion on the fan ring determines the correct mounting position of the fan. Marking "VORNE FRONT" points in the direction of travel.
2. Screw on the hydraulic clutch of the fan with a torque of 10 Nm.
3. Insert the coupling into the cooling fan and screw them together to the coolant pump shaft with a torque of 45 Nm. This requires a torque wrench with a 36 open end wrench.
Attention! The nut has a left-hand thread.
2.5L diesel engine
Removing
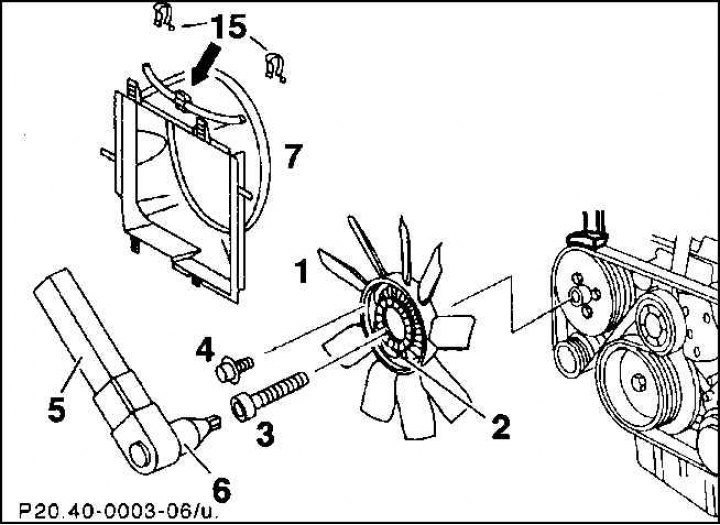
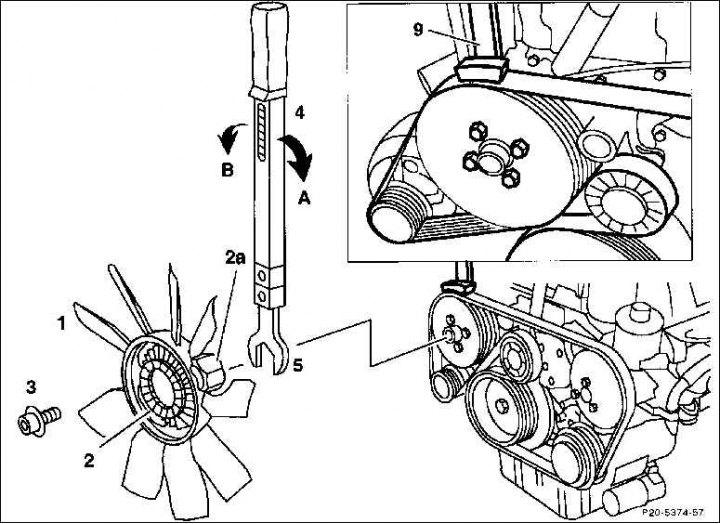
1. Remove the fan shroud and lay it over the cooling fan.
2. Unscrew the hydraulic coupling together with the cooling fan, including the hexagon socket bolt. While doing this, hold the pulley with a counterhold.
3. Pull up fan (1) together with clutch (2) and his casing.
4. Unscrew the fan with four bolts (4) from the hydraulic clutch.
Installation
1. Insert the hydraulic coupling into the cooling fan and screw it in with a torque of 10 Nm.
Attention! Marking "VORNE FRONT" points in the direction of travel.
2. Install the cooling fan clutch and fan shroud together.
3. Screw the fan clutch with a torque of 45 Nm, while locking the pulley.
4. Mount and adjust the fan shroud.