
Cars BMW Cars Volkswagen Cars Chevrolet Cars Land Rover Cars Lada Cars Honda Cars Peugeot
English Русский
Български
Беларускі
Український
Српски
Hrvatski
Română
Polski
Slovenský
Magyar
Bookmark News and articles Sitemap Feedback Site search
MercedesMan.ru


A-Class C-Class E-Class G-Class M-Class S-Class Others
190 (W201) (1982-1993) W202 (1993-2000) W203 (2000-2007)
  • Main
  • C-Class
  • W202 (1993-2000)
  • Power unit
  • Cooling system
  • Checking the cooling system

Checking the cooling system (Mercedes-Benz C-Class W202)

0
Contents: Overpressure relief valve ↡ Vacuum valve ↡ Coolant indicator sensor (diesel…↡ Examination ↡ Removal ↡ Installation ↡
Using a standard test device, you can check for leaks in the cooling system and the operation of the relief valve in the threaded cap of the cooling system.
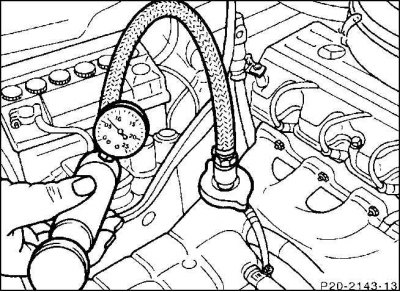
Using a standard test device, you can check for leaks in the cooling system and the operation of…


Attach the test device to the filler neck of the expansion tank. Use the hand pump of the device to create excess pressure of about 1.4 bar. If the pressure drops, find the leaky spot where the coolant is leaking and eliminate the leak. If the pressure drops without any signs of coolant leaking or even increases, then it is possible to assume that there is a loss of coolant inside the engine, for example, due to damage to the cylinder head gasket or a crack in the housing.

Overpressure relief valve


The safety valve is installed in the radiator cap. Its task is to open the cooling system starting from a certain excess pressure and thus create conditions for excess coolant to flow into the compensation tank.
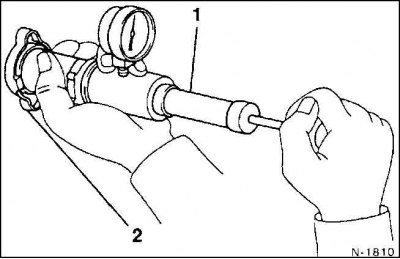
The safety valve is installed in the radiator cap. Its task is to open the cooling system starting…


Screw the radiator cap (2) onto the tester (1). Create excess pressure. The safety valve should open at a pressure of 1.3–1.4 bar. Otherwise, replace the cap.


Vacuum valve


Vacuum valve


Material borrowed from an online resource MercedesMan

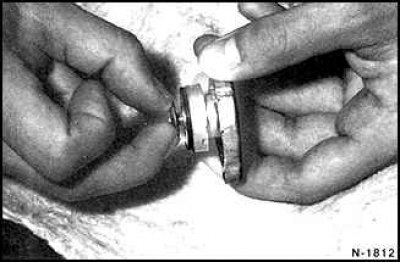
1. Pull the vacuum valve with your fingers until it opens. Check if the valve closes completely when released. The vacuum valve in the cap opens at 0.1 bar of reduced pressure.

2. Screw the cap onto the radiator. If damaged, replace the rubber sealing ring.

Coolant indicator sensor (diesel engine)


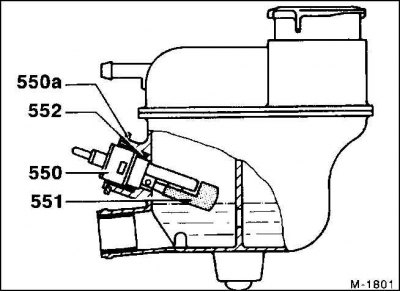
The coolant level indicator system mainly consists of a sensor in the expansion tank and a control lamp on the instrument panel.

The coolant level indicator with the engine running warns of too low a coolant level and, therefore, of possible engine overheating. As soon as the ignition is switched on, the control lamp lights up for 30 seconds. When the engine is running, this lamp goes out immediately.
The coolant level indicator with the engine running warns of too low a coolant level and,…


The coolant level in the expansion tank is measured using a float (551). When the coolant level is low, the contact (550) in the sensor closes and the control lamp lights up. Depending on the driving mode, the control lamp first flashes briefly and then continuously. If the control lamp flashes, add coolant.


Examination


1. Start the engine and let it idle.

2. Pull out the plug on the coolant level sensor.
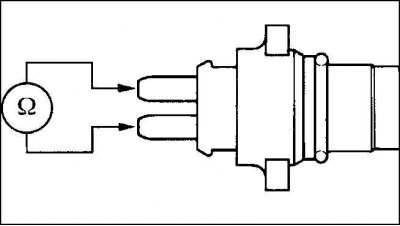
2. Pull out the plug on the coolant level sensor.


3. Connect an ohmmeter between both contacts on the sensor. When the coolant level is at the "max" mark, the measuring device should show infinity. When the expansion tank is empty, the resistance should be about 5 ohms.

4. Stop the engine.

5. If the sensor is OK although the indicator lamp does not light, check the electrical lines and indicator lamp according to the circuit diagram.

Removal


1. If necessary, drain some coolant.

2. Use a screwdriver to lift the safety ring (550a).

3. Pull the sensor out of the expansion tank.

Installation


1. Insert the new sensor with a new sealing ring (552) so that the different width protrusions on the sensor are fixed in the hole of the expansion tank.

2. Press the safety ring.

3. Fill with coolant.
This article is available at: russian, bulgarian, belarusian, ukrainian, serbian, croatian, romanian, polish, slovak, hungarian
The article has been verified: Khromov Roman Mikhailovich
Share with friends:
◀ Previous
C-Class W202 / Cooling system
Next ▶

Coolant thermostat (thermostat)
Antifreeze for radiator
Coolant (cars with air conditioning)
Coolant (diesel engines)
Coolant (petrol engines)
Hydraulic fan clutch — removal and installation
Liquid Cooling System Pump — Removal and Installation
Radiator — removal and installation
Fan shroud — removal and installation
Diagnostics of cooling system faults
More similar articles for repairing other models

☛ Checking the tightness of the cooling system Mercedes W168 (1997-2004)
☛ Checking the cooling system for leaks Mercedes W210 (1996-2002)
☛ Checking the cooling system and coolant, replacing the liquid Mercedes W463 (1999-2019)
☛ Checking the cooling system and frost resistance of the coolant,… Mercedes W163 (1997-2005)
☛ Checking the functioning of the cooling system and frost resistance… Mercedes W140 (1991-1998)
☛ Checking the level of liquid in the cooling system Mercedes Sprinter (1995-2000, diesel)
Link in different formats to this article
Comments and feedback from visitors
No comments yet


How much will 14 + 17 ?


W203 (2000-2007) 
  • General information
  • Introduction to guide
  • User manual
  • Maintenance
  • Power unit
  • Gasoline engines
  • Diesel engines
  • Cooling system
  • Ventilation and heating
  • Supply system
  • Injection system (gasoline)
  • Injection system (diesel)
  • Exhaust system
  • Ignition and control system
  • Charge and launch systems
  • Transmission
  • Mechanical gearbox
  • Automatic gearbox
  • Clutch and drive shafts
  • Differential
  • Chassis
  • Brake system
  • Car suspension
  • Steering
  • Body
  • Exterior (external elements)
  • Interior (internal elements)
  • Electrical equipment
  • Equipment and devices
  • Lighting system
  • Electrical diagrams (2000)
  • Electrical diagrams (since 2001)
W202 (1993-2000) 
  • General information
  • User manual
  • Driving a car
  • Car care
  • Maintenance
  • Power unit
  • Gasoline engines
  • Diesel engines
  • Lubrication system
  • Cooling system
  • Heating and ventilation
  • Ignition system
  • Fuel system
  • Injection system (gasoline)
  • Injection system (diesel)
  • Exhaust system
  • Transmission
  • Clutch
  • Car gearbox
  • Chassis
  • Suspension, wheels and tires
  • Steering
  • Brake system
  • Body
  • Exterior (external elements)
  • Interior (internal elements)
  • Doors and windows
  • Electrical equipment
  • Equipment and devices
  • Power devices
  • Lighting system
  • Electrical circuits
190 (W201) (1982-1993) 
  • General information
  • Introduction to the guide
  • Operation and care
  • Maintenance (gasoline)
  • Maintenance (diesel)
  • Troubleshooting
  • Power unit
  • Petrol engine I4
  • Petrol engine V6
  • Diesel engines
  • Engine overhaul
  • Cooling and heating
  • Power system (carburetor)
  • Injection system (gasoline)
  • Injection system (diesel)
  • Exhaust system
  • Charge and start system
  • Ignition system (I4)
  • Ignition system (V6)
  • Diesel heating system
  • Transmission
  • Clutch
  • Mechanical gearbox
  • Automatic gearbox
  • Cardan shaft and axle shafts
  • Chassis
  • Brake system
  • Car suspension
  • Steering
  • Body
  • Exterior (external elements)
  • Interior (internal elements)
  • Doors, locks and windows
  • Electrical equipment
  • Equipment and devices
  • Electrical circuits
 
MercedesMan.ru © 2017–2026 · Mobile version · Read about Mercedes · Sitemap: EN BG BY UA RS HR RO PL SK HU · Feedback · Site search · Bookmark A-Class (W168) · C-Class (W201) · C-Class (W202) · C-Class (W203) · E-Class (W123) · E-Class (W124) · E-Class (W210) · G-Class (W463) · M-Class (W163) · S-Class (W116, petrol) · S-Class (W126, petrol) · S-Class (W140) · S-Class (W220) · Sprinter · Vito 1 · Vito 2 · Vario 814D ·
 
We only use cookies without which some of the site's features may not be available.