
Cars BMW Cars Volkswagen Cars Chevrolet Cars Land Rover Cars Lada Cars Honda Cars Peugeot
English Русский
Български
Беларускі
Український
Српски
Hrvatski
Română
Polski
Slovenský
Magyar
Bookmark News and articles Sitemap Feedback Site search
MercedesMan.ru


A-Class C-Class E-Class G-Class M-Class S-Class Others
190 (W201) (1982-1993) W202 (1993-2000) W203 (2000-2007)
  • Main
  • C-Class
  • W202 (1993-2000)
  • Power unit
  • Cooling system
  • Coolant thermostat (thermostat)

Coolant thermostat (thermostat) (Mercedes-Benz C-Class W202)

0
Contents: Examination ↡ 4-cylinder petrol engine ↡ Features of the 6-cylinder engine ↡ Diesel engine ↡
Attention! If the engine heats up after the car has traveled a short distance, this may be due to the radiator being clogged with limescale deposits.


As the engine heats up, the thermostat opens a large circuit of coolant circulation. If the coolant thermostat is closed due to a fault, the engine becomes too hot. This can be recognized by the coolant temperature indicator, which is in the red range, while the radiator remains cold. But a faulty thermostat can remain open even after the coolant has cooled down. This is evident from the fact that the engine no longer reaches its operating temperature, or the coolant temperature indicator needle moves up more slowly than before, or in winter the power spent on heating is reduced.

Examination


Examination


1. Remove the coolant thermostat regulator.

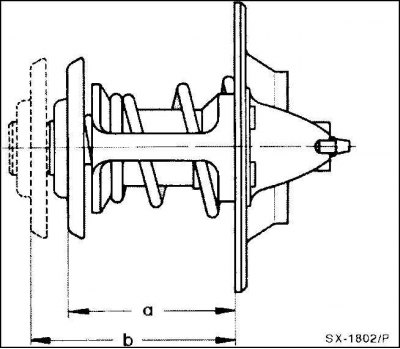
2. Measure the height of the thermostat and write down the dimension "a".
2. Measure the height of the thermostat and write down the dimension «a».


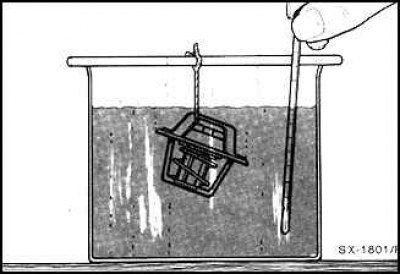
3. Heat the thermostat slowly in a water bath. It should not touch the walls of the vessel, but be completely immersed in water. Monitor the temperature with a suitable thermometer. At a temperature of about 87°C, the bimetallic plate of the regulator begins to lengthen, reaching maximum lengthening at a temperature of about 102°C. As soon as the water in the bath reaches the opening temperature, the thermostat's regulating flap should begin to open.


4. Heat the water in the bath until it boils. Remove the thermostat, measure the height (dimension "b") and compare with the first measured value (dimension "a"). At the end of the opening, the opening lift height is approximately 8 mm. Since this temperature is not reached, check whether the regulator has opened to the comparable size, otherwise replace it.

5. Finally, check whether the regulator closes completely again when cooling, otherwise replace the regulator.

6. If not functioning properly, replace the thermostat.

7. Reinstall the thermostat.

4-cylinder petrol engine


1. Bolt; 2. Coolant hose; 3. Coolant hose; 27. Coolant thermostat housing cover 27a. Coolant…

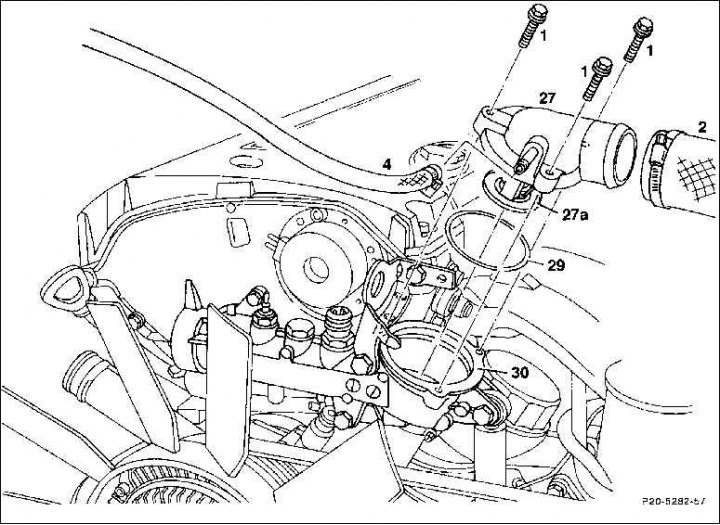
1. Bolt; 2. Coolant hose; 3. Coolant hose; 27. Coolant thermostat housing cover 27a. Coolant thermostat; 29. Sealing ring; 30. Compaction


Removal


1. Disconnect the ground (–) cable from the battery.

Attention! This will erase the radio's anti-theft code.


2. Drain the coolant into a suitable container.

3. Remove the front plastic cover.

4. Remove both coolant hoses from the thermostat cover, first loosen the clamps and slide them back.

5. Remove the bolts from the thermostat cover.

6. Remove the thermostat cover together with the thermostat.


Caution! Do not separate the thermostat from the cover, otherwise it will be damaged and will not be able to be reinstalled.


7. Check the thermostat.

Installation


1. Place the cover together with the thermostat and a new sealing ring and tighten it with a torque of 10 Nm. Clean the sealing surfaces on the housing and cover in advance.

2. Attach the air bleed hose and coolant hose and secure them with clamps.

3. Fill with coolant.

4. Let the engine warm up until the fan turns on. Check if the bottom of the radiator gets warm and if the thermostat housing is sealed.

5. Connect the ground wire to the battery. Set the time on the clock. Set the anti-theft code of the radio.

Features of the 6-cylinder engine


1. Unscrew the thermostat cap and set it aside with the hose connected. Pull out the thermostat.

2. Insert the thermostat with a new sealing ring into the housing.

Caution! When adding coolant, air is removed from the cooling system through the ball valve on the thermostat. Therefore, insert the thermostat so that the ball valve is at the highest point.


3. Place the cap on and tighten it to a torque of 10 Nm.

Diesel engine


Diesel engine 2.2/2.5 l
6. Air hose; 17. Thermostat cover; 18. Bolt M 6 x 25 19. O-ring of circular cross-section; 20.…

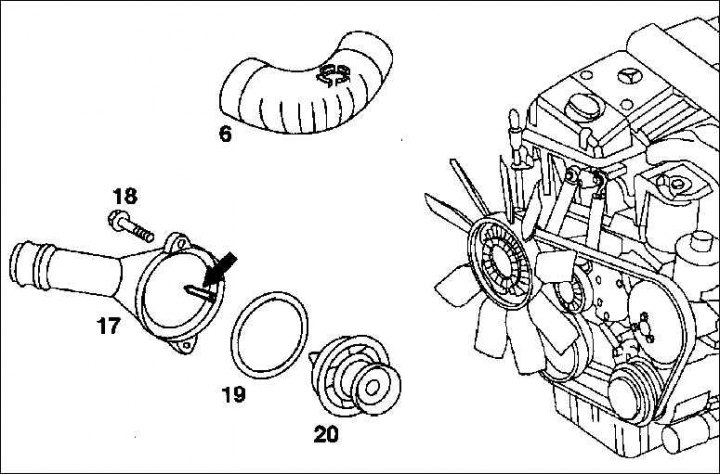
6. Air hose; 17. Thermostat cover; 18. Bolt M 6 x 25 19. O-ring of circular cross-section; 20. Coolant regulator (thermostat)


Removal


1. Disconnect the ground cable from the battery.

Attention! This will erase the radio's anti-theft code.


2. Drain the coolant into a clean collecting container.

3. Remove the air hose by loosening its clamps.

4. Unscrew the thermostat cap on the liquid cooling system pump and set it aside with the hose attached.

5. Remove the thermostat.

Installation


1. Insert the thermostat with a new sealing ring into the cover. This will engage the rib on the cover in the groove of the coolant regulator.

2. Place the cover with the regulator on and tighten it tightly with a torque of 10 Nm.

3. Fill with coolant.

4. Let the engine warm up until the fan turns on. Check if the radiator is warming up at the bottom and if the thermostat housing is sealed. Connect the ground wire to the battery terminal.

5. Connect the ground wire to the battery terminal.

6. Set the time on the clock.

7. Enter the radio anti-theft code.
This article is available at: russian, bulgarian, belarusian, ukrainian, serbian, croatian, romanian, polish, slovak, hungarian
The article has been verified: Khromov Roman Mikhailovich
Share with friends:
◀ Previous
C-Class W202 / Cooling system
Next ▶

Antifreeze for radiator
Coolant (cars with air conditioning)
Coolant (diesel engines)
Coolant (petrol engines)
Coolant circulation circuit
Checking the cooling system
Hydraulic fan clutch — removal and installation
Liquid Cooling System Pump — Removal and Installation
Radiator — removal and installation
Fan shroud — removal and installation
More similar articles for repairing other models

☛ Thermostat — removal and installation Mercedes W168 (1997-2004)
☛ Removal, checking and installation the thermostat Mercedes W123 (1976-1985)
☛ Checking the Thermostat Mercedes W463 (1999-2019)
☛ Checking the proper functioning of the thermostat Mercedes W163 (1997-2005)
☛ Removal and installation the thermostat Mercedes W140 (1991-1998)
☛ Coolant circulation pump and thermostat Mercedes Vito 2 (2003-2014, diesel)
Link in different formats to this article
Comments and feedback from visitors
No comments yet


How much will 32 + 40 ?


W203 (2000-2007) 
  • General information
  • Introduction to guide
  • User manual
  • Maintenance
  • Power unit
  • Gasoline engines
  • Diesel engines
  • Cooling system
  • Ventilation and heating
  • Supply system
  • Injection system (gasoline)
  • Injection system (diesel)
  • Exhaust system
  • Ignition and control system
  • Charge and launch systems
  • Transmission
  • Mechanical gearbox
  • Automatic gearbox
  • Clutch and drive shafts
  • Differential
  • Chassis
  • Brake system
  • Car suspension
  • Steering
  • Body
  • Exterior (external elements)
  • Interior (internal elements)
  • Electrical equipment
  • Equipment and devices
  • Lighting system
  • Electrical diagrams (2000)
  • Electrical diagrams (since 2001)
W202 (1993-2000) 
  • General information
  • User manual
  • Driving a car
  • Car care
  • Maintenance
  • Power unit
  • Gasoline engines
  • Diesel engines
  • Lubrication system
  • Cooling system
  • Heating and ventilation
  • Ignition system
  • Fuel system
  • Injection system (gasoline)
  • Injection system (diesel)
  • Exhaust system
  • Transmission
  • Clutch
  • Car gearbox
  • Chassis
  • Suspension, wheels and tires
  • Steering
  • Brake system
  • Body
  • Exterior (external elements)
  • Interior (internal elements)
  • Doors and windows
  • Electrical equipment
  • Equipment and devices
  • Power devices
  • Lighting system
  • Electrical circuits
190 (W201) (1982-1993) 
  • General information
  • Introduction to the guide
  • Operation and care
  • Maintenance (gasoline)
  • Maintenance (diesel)
  • Troubleshooting
  • Power unit
  • Petrol engine I4
  • Petrol engine V6
  • Diesel engines
  • Engine overhaul
  • Cooling and heating
  • Power system (carburetor)
  • Injection system (gasoline)
  • Injection system (diesel)
  • Exhaust system
  • Charge and start system
  • Ignition system (I4)
  • Ignition system (V6)
  • Diesel heating system
  • Transmission
  • Clutch
  • Mechanical gearbox
  • Automatic gearbox
  • Cardan shaft and axle shafts
  • Chassis
  • Brake system
  • Car suspension
  • Steering
  • Body
  • Exterior (external elements)
  • Interior (internal elements)
  • Doors, locks and windows
  • Electrical equipment
  • Equipment and devices
  • Electrical circuits
 
MercedesMan.ru © 2017–2026 · Mobile version · Read about Mercedes · Sitemap: EN BG BY UA RS HR RO PL SK HU · Feedback · Site search · Bookmark A-Class (W168) · C-Class (W201) · C-Class (W202) · C-Class (W203) · E-Class (W123) · E-Class (W124) · E-Class (W210) · G-Class (W463) · M-Class (W163) · S-Class (W116, petrol) · S-Class (W126, petrol) · S-Class (W140) · S-Class (W220) · Sprinter · Vito 1 · Vito 2 · Vario 814D ·
 
We only use cookies without which some of the site's features may not be available.