
Cars BMW Cars Volkswagen Cars Chevrolet Cars Land Rover Cars Lada Cars Honda Cars Peugeot
English Русский
Български
Беларускі
Український
Српски
Hrvatski
Română
Polski
Slovenský
Magyar
Bookmark News and articles Sitemap Feedback Site search
MercedesMan.ru


A-Class C-Class E-Class G-Class M-Class S-Class Others
W168 (1997-2004)
  • Main
  • A-Class
  • W168 (1997-2004)
  • Power unit
  • Cooling and heating
  • Checking the tightness of the cooling system

Checking the tightness of the cooling system (Mercedes-Benz A-Class W168)

0
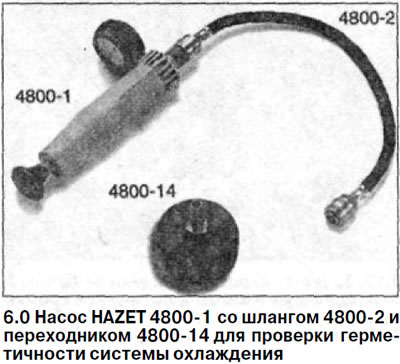
The tightness of the cooling system, as well as the functionality of the outlet valve on the filler cap of the expansion tank, can be checked using a special device, for example, HAZET 4800-1 with a hose 4800-2 and an adapter 4800-14 (see illustration 6.0).

The tightness of the cooling system, as well as the functionality of the outlet valve on the filler…


Caution! If the cooling system tightness test is performed after replacing the cylinder head gasket, first warm up the engine to operating temperature and then let it cool down. This ensures the tightness of the cylinder head gasket.


Caution! When the engine is hot, place a thick cloth on the radiator filler cap before removing it to avoid being burned by hot coolant or steam. Remove the cap only when the coolant temperature is below +90°C.


1. Turn the cap on the expansion tank 1/2 turn to the left to relieve pressure, and only then remove the cap.

2. Move the interior heating control to the maximum heating power position.

3. Check the coolant level in the expansion tank and top up if necessary.

4. Install the cooling system leak tester on the filler neck of the expansion tank. Using the hand pump of the measuring device, create a pressure of about 1.4 bar (see illustration).


[Original material on the website: www.mercedesman.ru]
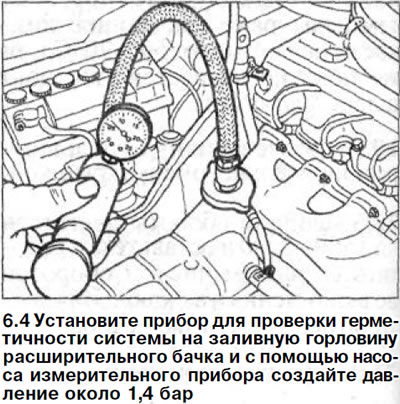
4. Install the cooling system leak tester on the filler neck of the expansion tank. Using the hand…


Please note! The illustration shows an expansion tank that does not apply to A-class vehicles.


If the pressure drops, locate the leaks in the cooling system. Due to the high pressure, coolant will leak where there are leaks.

If the test pressure drops but there are no coolant leaks, this may be caused by coolant loss inside the engine, for example due to a faulty cylinder head gasket or a crack in the cylinder block.

Exhaust valve - check


The release valve is located on the filler cap of the expansion tank. It is designed to open the cooling system when a certain pressure is formed in it.

When the coolant heats up and expands, accompanied by the appearance of excess pressure, it opens and the excess coolant flows into the expansion tank.

5. Screw the radiator filler cap 2 onto the control device 1 (see illustrations 6.5).
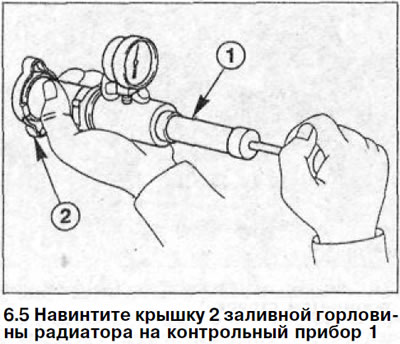
5. Screw the radiator filler cap 2 onto the control device 1 (see illustrations 6.5).


The illustration shows a filler cap that does not apply to A-class vehicles.


6. Increase the pressure in the system using the measuring device pump.

The outlet valve should open at an excess pressure of 1.3-1.4 bar. Otherwise, replace the cap with a new one.

Attention! The opening pressure of the outlet valve of the new cap is 1.4-1.5 bar.

Attention! There is an inscription on the cover indicating the pressure at which the outlet valve opens. This pressure is indicated as "bar x 100". This means that if, for example, the number "140" is indicated on the cover, then the valve opening pressure is 1.4 bar.
This article is available at: russian, bulgarian, belarusian, ukrainian, serbian, croatian, romanian, polish, slovak, hungarian
The article has been verified: Lukyanov Nikita Ilyich
Share with friends:
◀ Previous
A-Class W168 / Cooling and heating
Next ▶

Thermostat — check
Thermostat — removal and installation
Coolant — Replacement
Coolant
Coolant circulation
Water pump — removal and installation
Radiator Blower Fan — Removal and Installation
Radiator — removal and installation
Heater and air conditioner
Interior air deflectors — removal and installation
More similar articles for repairing other models

☛ Checking the tightness of the exhaust system Mercedes W203 (2000-2007)
☛ Checking the tightness of the cooling system Mercedes W210 (1996-2002)
☛ Checking the cooling system and coolant, replacing the liquid Mercedes W463 (1999-2019)
☛ Checking the cooling system and frost resistance of the coolant,… Mercedes W163 (1997-2005)
☛ Checking the functioning of the cooling system and frost resistance… Mercedes W140 (1991-1998)
☛ Checking the level of liquid in the cooling system Mercedes Sprinter (1995-2000, diesel)
Link in different formats to this article
Comments and feedback from visitors
No comments yet


How much will 25 + 15 ?


W168 (1997-2004) 
  • General information
  • User manual
  • Maintenance
  • Troubleshooting
  • Power unit
  • Engine repair
  • Cooling and heating
  • Injection system (gasoline)
  • Fuel system (diesel)
  • Fuel system
  • Exhaust system
  • Ignition system
  • Transmission
  • Clutch
  • Transmission
  • Chassis
  • Brake system
  • Suspension
  • Steering
  • Body
  • Interior (all models)
  • Interior (since 1997)
  • Interior (since 2001)
  • Exterior
  • Doors and windows
  • Electrical equipment
  • Equipment and devices
  • Power devices
  • Windshield wipers and washers
  • Headlights and lighting
  • Electrical circuits
 
MercedesMan.ru © 2017–2026 · Mobile version · Read about Mercedes · Sitemap: EN BG BY UA RS HR RO PL SK HU · Feedback · Site search · Bookmark A-Class (W168) · C-Class (W201) · C-Class (W202) · C-Class (W203) · E-Class (W123) · E-Class (W124) · E-Class (W210) · G-Class (W463) · M-Class (W163) · S-Class (W116, petrol) · S-Class (W126, petrol) · S-Class (W140) · S-Class (W220) · Sprinter · Vito 1 · Vito 2 · Vario 814D ·
 
We only use cookies without which some of the site's features may not be available.