
Removing
1. Drain the coolant from the radiator only (see relevant chapter).
2. Remove the front bumper (see relevant chapter).
3. Remove the radiator fan together with the shroud (see relevant chapter).
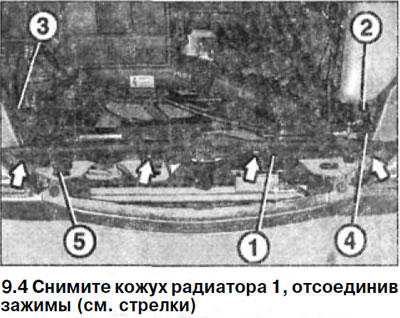
4. Remove the radiator shroud 1 by disengaging the clips (see arrows in illustration).
5. Disconnect the inlet and outlet from the radiator (2 and 3) coolant hoses. Remove the lower coolant hose from the bottom right side of the radiator.
Before doing this, loosen the hose clamps and slide them further onto the hoses (see illustration 9.4).
6. Cars with automatic transmission. Disconnect the transmission oil lines from the radiator. Collect the escaping gear oil in a suitable container. After disconnecting, plug the openings of the nozzles on the radiator and oil lines with appropriate plugs or plugs so that dirt does not get into the oil lines.
7. Pull out the clips 4 and 5 that secure the radiator at the top of the radiator on the right and left sides, pressing the radiator back (see illustration 9.4).
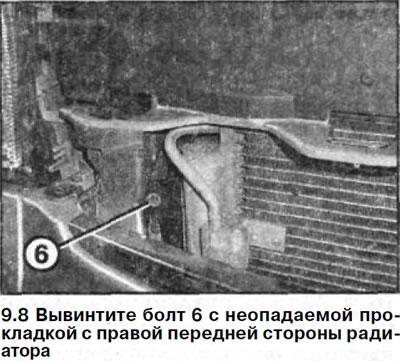
8. Unscrew bolt 6 with non-falling gasket on the right front side of the radiator (see illustration).
9. Disconnect the metal clip on the left side of the radiator by pressing the radiator back.
10. Press the radiator back, if the car is equipped with an air conditioner with an evaporator, and remove it by releasing its lower supports from the rubber pads on the cross beam.
Attention! The refrigerant circuit of the air conditioner must not be opened. If the refrigerant comes into contact with the skin, it may cause frostbite.
11. Cars with air conditioning. Disconnect the air conditioning evaporator from the radiator and secure it to the body without disconnecting the hoses.
12. Remove a radiator, having submitted it upwards and without damaging thus hoses of the conditioner.
Installation
13. Cars with air conditioning. Attach the air conditioner evaporator to the radiator housing.
14. Install the radiator, feeding it from top to bottom so that the protrusions on the radiator housing fit into the holes in the mounting pads on the cross member. If the car is equipped with air conditioning, the radiator is installed together with the connected evaporator.
15. Install the rubber padded clips on both sides at the top of the radiator.
16. Cars with automatic transmission. Connect the gearbox oil lines to the radiator. Bolt tightening torque 25 Nm.
17. Connect to a radiator and a broad tank all hoses of circulation of a cooling liquid which were disconnected, and fix them with new collars.
Attention! The clamp on the lower coolant hose must be fixed in such a way that it can be accessed through the hole in the front bumper for the tow hook.
18. Install the radiator shroud and secure with clips.
19. Install the radiator fan with shroud (see relevant chapterat).
20. Install the front bumper (see relevant chapter).
21. Fill with coolant (see relevant chapter).
22. Cars with automatic transmission. Check the oil level in the box. Top up if necessary.
23. Warm up the engine and check the cooling system for leaks.
Diesel vehicles
Attention! Only operations are indicated that differ from those on vehicles with petrol engines.
24. Remove a separate coolant expansion tank located on the right front side of the body and, without disconnecting the hoses, fix it to the side of the body.
25. Remove the windshield washer expansion tank located on the left front side of the car and, without disconnecting the hoses, fix it on the side of the body.
26. Disconnect the air intake and air line.
27. Remove both headlights (see relevant chapter).
28. Disconnect the coolant hose located along the right side of the engine compartment from the clamps.
29. Support the hood with a suitable tool.
30. Remove spacers from the right and left sides of a forward rack.
31. Remove the spacer from the front of the car and carefully lower it down without disconnecting the cable for opening the hood lock.
Tightening torques for threaded connections:
- fastening the spacer to the front - 11 Nm
- fastening the spacer to the front pillar - 23 Nm