



Accurate adjustment of headlights is only possible with the help of a special adjustment device in a workshop.
1. Disconnect the ground (-) wire terminal from the negative battery terminal, after turning off the ignition.
Warning! When you disconnect the battery from the radio, the security code is deleted, as well as all automatic settings on the radio station. If the code is unknown or not written down, then the radio can only be put into operation by resorting to the help of a workshop or the manufacturer of the radio. Therefore, make sure in advance that the code is known.
2. Left headlight. Move the locking lever to the opposite side and remove the washer reservoir.
3. Right headlight. Move the locking lever to the opposite side and remove the coolant expansion tank.
4. Unscrew two bolts 1 (see illustration).
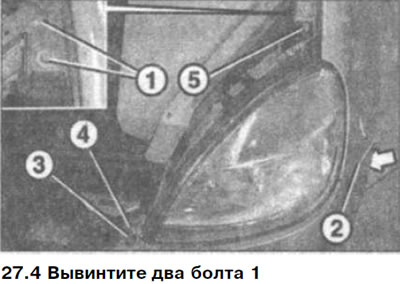
5. Unscrew bolt 2, acting from the wheel arch side (see arrow in illustration 24.4).
6. Unscrew bolt 3 on the front side of the headlight (see illustration 27.4).
7. Unscrew bolts 4 and 5 that secure the headlight (see illustration 27.4).
Attention! Removal and installation of the headlight is made easier if the bumper has been removed beforehand.
8. Remove the headlight by pushing it forward and disconnect the connectors located on its back (see arrows in the illustration). If necessary, remove the cover from the fog light.
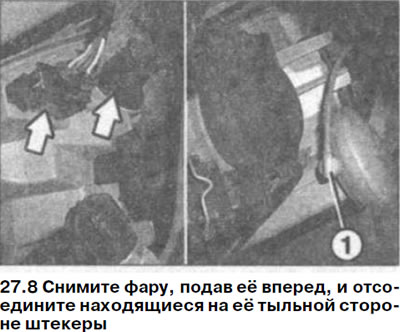
9. Carefully press the hose 1 of the pneumatic unit of the headlight position regulator with a screwdriver (see illustration 27.8).
Caution: When disconnecting the pneumatic unit, be careful not to damage the connector.
Original material on the website MercedesMan
10. Have an assistant support the fender and bumper and remove the headlight assembly if the bumper has not been disconnected before.
Installation
11. Install the headlight into the mounting hole on the fender.
12. Connect the power plugs of the headlight bulbs.
13. Connect the headlight range controller.
14. Install the fog light cover, if equipped.
15. Make sure the headlight rubber seal is seated correctly.
16. Straighten the headlight and secure it with bolts 4 and 5 (see illustration).
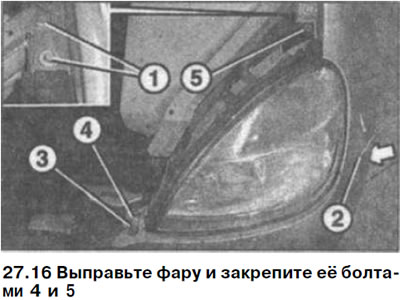
17. Screw in two bolts 1 (see illustration 27.16).
18. Screw in bolt 2, acting from the wheel arch side (see illustration 27.16).
19. Screw in bolt 3 on the front side of the headlight (see illustration 27.16).
20. Install the front bumper back in place, if removed.
21. Left headlight. Install the washer reservoir into place, inserting its protrusion into the mounting hole and secure with the locking lever.
22. Right headlight. Reinstall the coolant expansion tank if necessary.
23. Connect the negative (-) terminal of the battery, making sure that the ignition is off.
24. Enter the security code into the radio and set the clock.
25. Contact a workshop as soon as possible to check the position of the headlights and adjust it if necessary.