
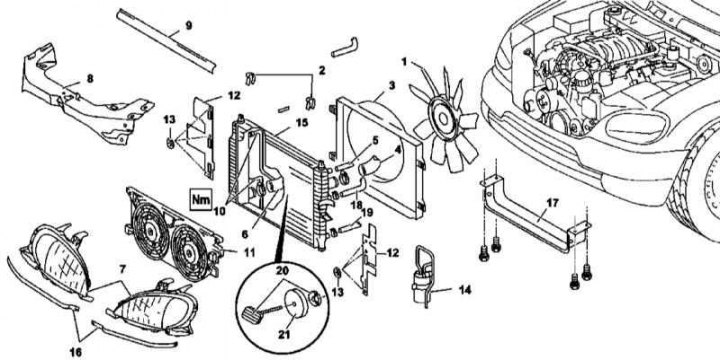
Radiator installation details on petrol models (on the example of models equipped with a viscous cooling fan)
1 - Assembling the fan of the cooling system with a viscous coupling; 2 - Clamps of the casing of the fan assembly; 3 - Casing of the fan assembly; 4 - Line of the cooling path; 5 - Pipe of the expansion tank of the cooling system; 6 - Line of the cooling path; 7 - Block headlights; 8 - Front transverse beam of the frame; 9 - Rubber seal; 10 - ATF cooling lines (models with AT); 11 - Fan grille; 12 - Guide deflectors; 13 - Fixing brackets for deflectors; 14 - Receiver-drier K / V; 15 - Radiator of the cooling system; 16 - Overlays; 17 - Air baffle (except models ML 230); 18 - Return oil line of the power steering cooling path; 19 - Oil supply line of the power steering cooling path; 20 - Fasteners; 21 - Rubber damper
1. The details of installing the radiator on petrol models are shown in the illustration, to which all references in the text refer.
2. Empty the cooling system (see chapter Checking the cooling system and frost resistance of the coolant, changing the fluid).
3. Remove the fan assembly.
4. Remove facing elements (16) and headlight assembly (7).
5. Unbolt the front cross member of the frame (8).
6. Disconnect from radiator (15) cooling path lines (4 and 6) and expansion tank overflow pipe (5).
7. Disconnect the oil lines (18 and 19).
8. On models with AT, unbolt the ATF lines from the radiator (10).
9. Release the electrical wiring from the clamps and remove the grate (11) fan assembly.
10. Unbolt the K / V condenser from the radiator and, without disconnecting the refrigerant lines, take it aside.
11. Remove fasteners (20) and remove the rubber damper (21).
12. Remove the receiver-drier of the A/C system from the radiator (14).
13. Remove the radiator (15).
14. Disconnect the guide deflectors (12).
15. Installation is carried out in the reverse order.
16. In conclusion, do not forget to check the cooling system for signs of leaks and adjust the direction of the optical axes of the headlights.
Diesel models
Models with manual transmission
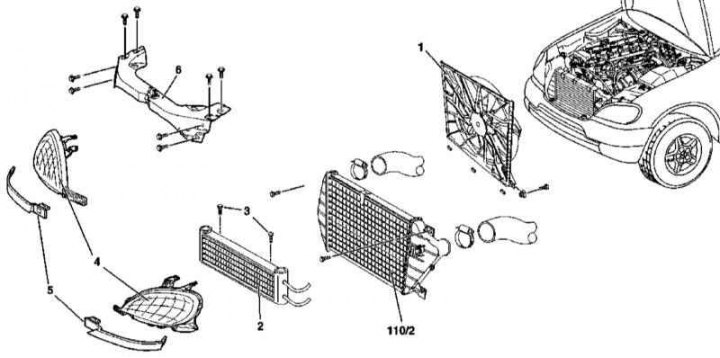
Radiator installation details on diesel models with manual transmission
1 - Electric fan of the cooling system; 2 - Low pressure cooler; 3 - Mounting bolts; 4 - Block headlights; 5 - Overlays; 6 - Front frame beam; 110/2 - Cooler of the charge air path
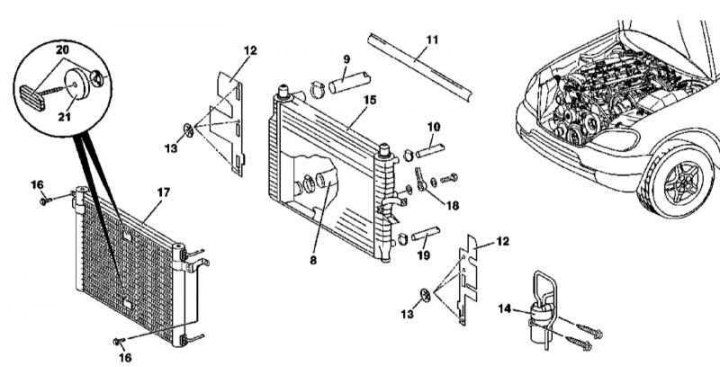
Radiator installation details on diesel models with manual transmission
8 - Hose of the cooling path going to the water pump; 9 - Hose of the cooling path going to the thermostat; 10 - Overflow hose going to the expansion tank of the cooling system; 11 - Rubber seal; 12 - Guide deflectors; 13 - Clips; 14 - Receiver-drier K / V; 15 - Radiator of the cooling system; 16 - Bolts; 17 - Capacitor; 18 - Return oil line of the power steering cooling path; 19 - Oil supply line of the power steering cooling path; 20 - Fasteners; 21 - Rubber dampers
1. Radiator installation details on diesel models with manual transmission are shown in the illustrations, which include all references in the text.
2. Open the hood and lock it in an upright position.
3. Disconnect the negative cable from the battery.
4. Remove the panel of finishing of a cover of a head of cylinders.
5. Remove the bottom section of the soundproofing.
6. Lowering down, remove the fan assembly of the cooling system.
7. Empty the cooling system (see chapter Checking the cooling system and frost resistance of the coolant, changing the fluid).
8. Remove the charge air cooler (110/2).
9. Install the A/C radiator/condenser shield.
10. Remove the rubber seal (11).
11. Pump out the hydraulic fluid from the power steering reservoir.
12. Disconnect the oil lines of the power steering cooling path (18 and 19).
13. Disconnect the water pump hose (8).
14. Disconnect the coolant hose from the thermostat (9).
15. Disconnect the expansion tank overflow hose from the radiator (10).
16. Remove guide deflectors (12).
17. Turn out fixing bolts (16) and remove the A/C capacitor (17) and, without disconnecting the refrigeration lines, take it aside.
18. Remove fasteners (2) and dismantle the rubber dampers (21).
19. Remove the A/C receiver-drier from the radiator (14).
20. On the left side of the radiator, remove the support bracket for fastening the air intake path sleeve.
21. Remove the radiator (15).
22. Installation is carried out in the reverse order.
23. Finally, check the cooling system for signs of leak development.
Models with AT

Radiator installation details on diesel models with AT (on the example of a model with a 628 series engine)
10 - Clips
1. Details of the radiator installation on diesel models with AT are shown in the illustration, which includes all references in the text.
2. Open the hood.
3. Pump out the power steering hydraulic fluid.
4. Remove headlights (see chapter Onboard electrical equipment).
5. Remove the frame cross member.
6. Remove fan assembly (see Section Removing and installing the cooling fan assembly).
7. Remove the bottom section of the soundproofing.
8. Empty the cooling system (see chapter Checking the cooling system and frost resistance of the coolant, changing the fluid).
9. Disconnect from charge air cooler (13) air sleeve (14).
10. Remove cooler (14).
11. Remove deflector panels (9 and 11).
12. Disconnect from the radiator (1) oil pipelines (2 and 3) ATF cooling path.
13. Disconnect from the radiator (1) oil pipelines (7 and 8) power steering cooling path.
14. Disconnect from the radiator (1) cooling lines (4 and 6) and ventilation (5) paths.
15. Release the latches (16) rubber dampers (17) from the back of the radiator and remove the fastener (15).
16. Remove from radiator (1) capacitor (12) and, without disconnecting the refrigeration lines, take it aside.
17. Release the radiator (1) from the rubber supports of the transverse beam and remove it from the engine compartment.
18. Remove rubber dampers (17).
19. Installation is carried out in the reverse order.
20. Finally, check the cooling system for signs of leak development.