
Petrol models
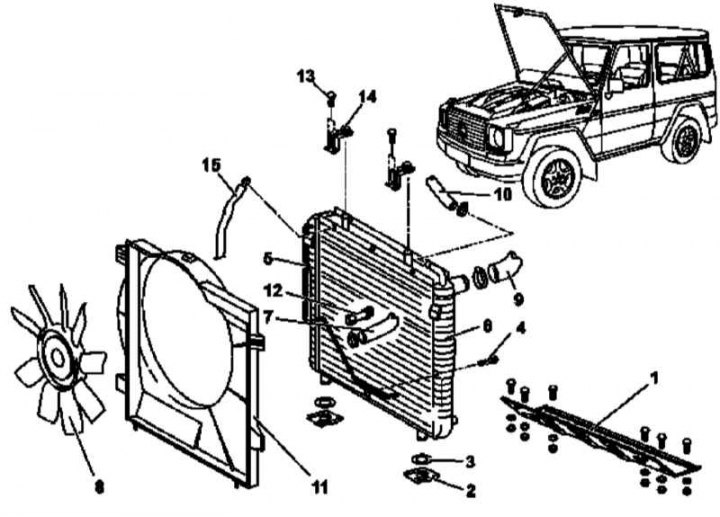
Radiator installation details on petrol models
1 - Crankcase protection; 2 - Clamps; 3 - Washers; 4 - Bolt; 5 - ATF cooling line; 6 - Radiator of the cooling system; 7 - Line of the cooling path (radiator - water pump); 8 - Fan of the cooling system with a viscous coupling; 9 - Line of the cooling path (radiator - thermostat housing); 10 - Line of the cooling path (expansion tank - radiator); 11 - Casing fan assembly; 12 - ATF cooling line; 13 - Bolts; 14 - Support brackets; 15 - Ground bus
1. Remove the crankcase protection (1).
2. Empty the cooling system (see chapter Ongoing care and maintenance).
3. Remove the fasteners (2) and washers (3).
4. Remove the bolt (4) fixings to the radiator (6) lines (5) ATF cooling.
5. Disconnect from the radiator (6) cooling line (7).
6. Disconnect from radiator (6) line (12) ATF cooling.
7. Remove the viscous fan assembly (8) (see Section Removing and installing the cooling fan assembly), - the impeller connecting nut has a right-hand thread.
8. Disconnect from radiator (6) cooling path lines (9 and 10).
9. Remove fan shroud (11) (see Section Removing and installing the cooling fan assembly).
10. Disconnect from the radiator (6) line (5) ATF cooling.
11. Turn out fixing bolts (13) and remove the support brackets (14).
12. Disconnect from the radiator (6) ground bus (15).
13. Remove the radiator (6).
14. Installation is carried out in the reverse order - make sure that the guide pins from below rest against the rubber dampers on the front cross member.
15. Finally, check the cooling system for signs of leak development.
Diesel models
M612
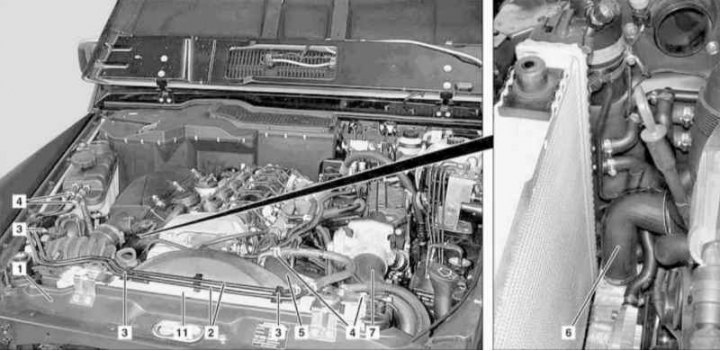
Radiator installation details on diesel models with M612 engine (1 of 2)
1 - Upper transverse bulkhead; 2 - Overflow lines of the cooling path; 3 - Support brackets; 4 - Hose clamps; 5 - Hose of the cooling path; 6, 7 - Air ducts; 11 - Radiator
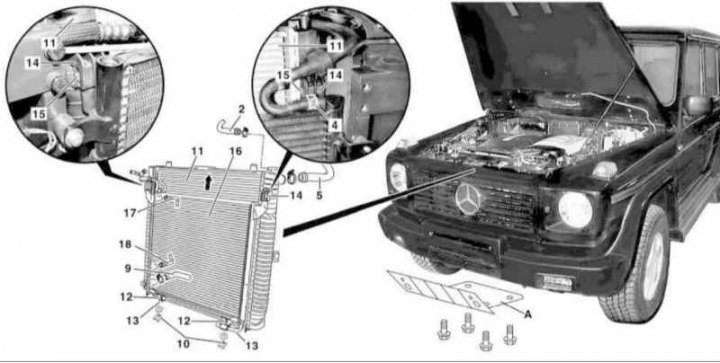
Radiator installation details on diesel models with M612 engine (2 of 2)
2 - Overflow lines of the cooling path; 5, 9 - Hoses of the cooling path; 10 - Clips; 11 - Radiator; 12 - Bolts; 13 - Guide pins; 14 - Fasteners; 15 - Rubber dampers; 16 - Capacitor; 17, 18 - ATF cooling lines; A - Crankcase protection
1. Open the hood and lock it in an upright position.
2. Remove panels of finishing of a head of cylinders.
3. Remove the decorative grille (see chapter Body).
4. Jack up the car and put it on stands.
5. Remove the crankcase protection (A).
6. Empty the cooling system (see chapter Ongoing care and maintenance).
7. Remove the upper transverse bulkhead (1) and take it aside assembled with the hood fixing lock.
8. Disconnect the support brackets (3), release the fastening clamps (4) and remove the overflow lines of the cooling path (2). Assess the condition of the lines and mounting clamps, if necessary, prepare a replacement.
9. Remove the viscous fan assembly (see Section Removing and installing the cooling fan assembly).
10. Release the fixing clamps and remove the air ducts (6 and 7), - plug the holes in the cooler immediately to prevent coolant from getting into them, evaluate the condition of the sealing rings, prepare a replacement if necessary.
Note. The presence of a small amount of oil on the air hoses is due to the normal functioning of the crankcase ventilation system and is acceptable.
11. Disconnect ATF cooling lines (17 and 18), - get ready to collect the spilled liquid, - and connect them together with a piece of hose with an inner diameter of 12 mm.
12. Disconnect the coolant hose (9), - check the condition of the fastening clamps, prepare a replacement if necessary.
13. Remove the clips (10) radiator mounts (11).
14. Turn out bolts (12).
15. Raising the radiator, separate it from the lower transverse beam of the front end and remove it from the engine compartment.
16. Install the air conditioning radiator/condenser shield (400x680x1 mm metal or plastic plate fitted with a suitable support bracket).
17. Installation is carried out in the reverse order. Make sure the guide pins (13) got into the rubber bushings on the lower front transverse beam, also make sure that the fasteners fit correctly (14) and rubber dampers (15) on the condenser (16).
18. Finally, check the cooling system for signs of leak development.
M628
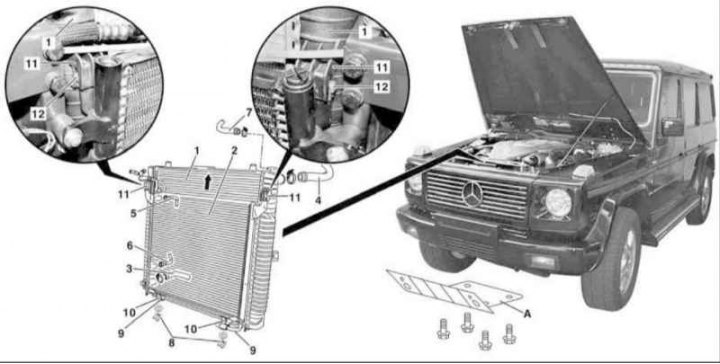
Radiator installation details on diesel models with M628 engine
1 - Radiator of the cooling system; 2 - Capacitor; 3, 4 - Lines of the cooling path; 5, 6 - ATF cooling lines; 7 - Ventilation line; 8 - Mounting clips; 9 - Guide pins; 10 - Bolts; 11 - Fasteners; 12 - Rubber dampers; A - Crankcase protection
1. Open the hood.
2. Jack up the car and put it on stands.
3. Remove the crankcase protection (A).
4. Empty the radiator (see chapter Ongoing care and maintenance).
5. Remove the air cleaner (see chapter Power supply and exhaust systems).
6. Remove fan assembly shroud (see Section Removing and installing the cooling fan assembly).
7. Disconnect the hoses of the cooling path (3 and 4), - check the condition of the fastening clamps, prepare a replacement if necessary.
8. Disconnect ATF cooling lines (5 and 6), - get ready to collect the spilled liquid, - and connect them together with a piece of hose with an inner diameter of 12 mm.
9. Remove the clips (8) radiator mounts (1).
10. Raising the heatsink assembly (1) with capacitor (2), separate it from the lower bulkhead cross member.
11. Remove the hex bolts (10) and remove the radiator (1) from the engine compartment.
12. Installation is carried out in the reverse order. Make sure the guide pins (9) got into the rubber bushings on the lower front transverse beam, also make sure that the fasteners fit correctly (11) and rubber dampers (12).
13. Finally, check the cooling system for signs of leak development.