
Cars BMW Cars Volkswagen Cars Chevrolet Cars Land Rover Cars Lada Cars Honda Cars Peugeot
English Русский
Български
Беларускі
Український
Српски
Hrvatski
Română
Polski
Slovenský
Magyar
Bookmark News and articles Sitemap Feedback Site search
MercedesMan.ru


A-Class C-Class E-Class G-Class M-Class S-Class Others
W123 (1976-1985) W124 (1984-1995) W210 (1996-2002)
  • Main
  • E-Class
  • W123 (1976-1985)
  • Power unit
  • Repair M102 engines
  • Replacing the camshaft drive chain

Replacing the camshaft drive chain (Mercedes-Benz E-Class W123)

0
The chain can be replaced from above the engine. However, when replacing it is recommended to remove the timing cover and check the condition of the dampers, shoe and tensioner of the chain and gears.

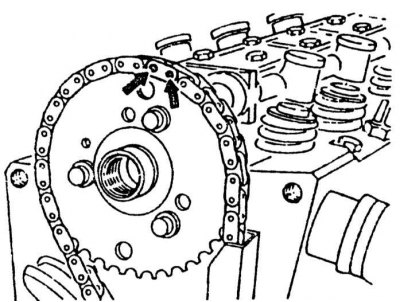
Removing the distribution chain (the arrows show the link being cut)
Removing the distribution chain (the arrows show the link being cut)


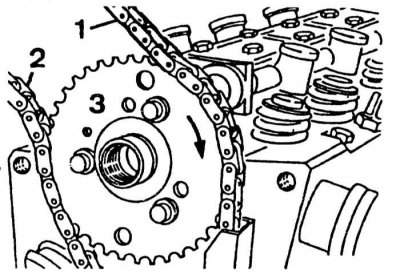
Installing a new chain on the old one

Installing a new chain on the old one

1 - new chain
2 - previous chain
3 — camshaft sprocket
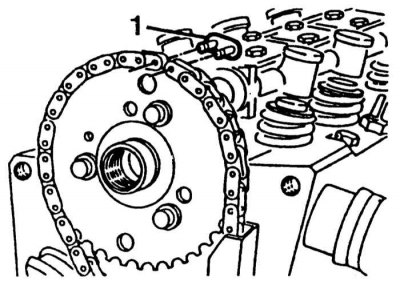

Installing the link for riveting

Installing the link for riveting
1 — link
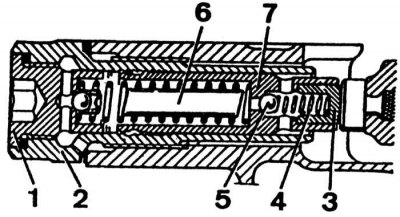


Chain tensioner

Chain tensioner

1 - cork; 2 - tensioner body; 3 - pusher; 4 - spring; 5 - check valve ball; 6 - piston
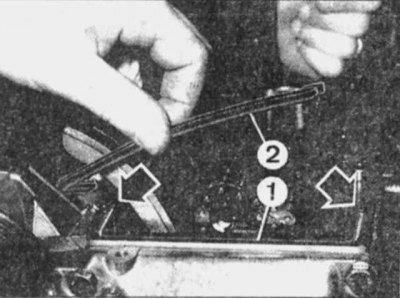

Installation of distribution chain (arrows show the places where the sealant is applied)

Installation of distribution chain (arrows show the places where the sealant is applied)
1 - lower cover of the distribution mechanism
2 - sealing gasket


1. Place the hood in a vertical position.

2. Remove the fan guide shroud.

3. Disconnect the battery ground cable.

4. Remove the air filter assembly with the cold air intake.

5. Remove the cooling fan.

6. Remove the protective cover from the distributor cap.

7. Loosen the distributor cap mounting screws.

8. Remove the lower engine shield.

9. Remove the heater outlet pipe.

10. Disconnect the high-tension wires from the spark plugs.

11. Remove the cylinder head cover with high-tension wires and the distributor cap.


If the cylinder head cover is difficult to remove, do not hit it with a hammer to avoid cracking. Pry the cover off carefully.


12. Remove the distributor rotor, drive plate and interference suppressor cover.

13. Unscrew the bolts securing the upper camshaft drive cover.

14. Remove the top cover by hitting the camshaft axis with a wooden hammer. Remove the top cover center gasket.

15. Turn the crankshaft until the piston of the 1st cylinder reaches TDC.

16. Unscrew the screw plug of the chain tensioner. Remove the sealing ring and spring.

Caution: Loosen the screw cap carefully to avoid spring ejection.


17. Remove the bottom ring.

18. Remove the tensioner.

19. To make it easier to turn the crankshaft, remove the spark plugs.

20. Place a rag under the chain. Take care to avoid metal shavings getting into the camshaft cover.

21. Cut both axles of the double link with an abrasive wheel and knock it out.

22. Attach the new chain to the old one by riveting the link.

23. Slowly turn the crankshaft, paying attention to the correct engagement of the new chain with the camshaft drive sprocket.

Caution! The chain must be in constant engagement with the camshaft sprocket.


24. Turn the crankshaft until it is possible to connect the ends of the chain by riveting the link.

25. Place a link under the chain.

26. Place the link plate in the riveting jig.

27. Apply this device to the link and rivet it.

28. Remove the riveting tool.

29. Make sure the link rivets are correctly positioned.

30. Repeat the above operations if necessary.


31. Make sure the chain and surrounding parts are clean and free of metal shavings.

32. Screw the spark plugs into the cylinder block.

33. Before installing the chain tensioner, disassemble it completely and thoroughly clean all parts.

34. Install the chain tensioner.

35. Screw in the threaded ring with the spring and the screw plug with a new sealing ring.

Read more on the website MercedesMan.ru

36. Turn the crankshaft two revolutions to check the correct operation of the timing mechanism.

37. Place a gasket on the lower camshaft drive cover, applying a small amount of sealing paste to both ends.

38. Apply a layer of sealant to the mating surfaces of the upper camshaft cover and cylinder head.

39. Lubricate the edge of the top cover gasket with engine oil.

40. Install the top cover, being careful not to damage the gasket.

41. Tighten the top cover mounting bolts.

42. Install the cylinder head cover and distributor components in the reverse order of removal.

43. Connect the cooling system hoses.

44. Fill and bleed the cooling system.

45. Install the cooling fan.

46. Install the fan guide shroud.

47. Install the lower engine shield.

48. Connect the wire to the "-" terminal of the battery.
This article is available at: russian, bulgarian, belarusian, ukrainian, serbian, croatian, romanian, polish, slovak, hungarian
The article has been verified: Levin Kirill Glebovich
Share with friends:
◀ Previous
E-Class W123 / Repair M102 engines
Next ▶

Valve timing mechanism of 4-cylinder engines
Removal auxiliary units
Complex operations only on the engine removed from the vehicle
Complex operations without removing the engine from the car
Checking clearances in the valve drive mechanism on M102.980 and M102.982 engines
Removal and installation the cylinder head
Disassembly and assembly of the cylinder head
Removal the power unit
Installation of the power unit
Disassembling the engine
More similar articles for repairing other models

☛ Clutch drive — bleeding air and replacing fluid in the hydraulic drive Mercedes W168 (1997-2004)
☛ Camshaft Drive Chain — Checking and Replacing Mercedes 190 (W201) (1982-1993)
☛ Replacing the seals of the main gear drive pinions Mercedes W463 (1999-2019)
☛ Replacing the timing chain Mercedes W163 (1997-2005)
☛ Replacing the oil pump drive chain Mercedes W140 (1991-1998)
☛ Removal and installation the camshaft drive chain tensioner Mercedes Sprinter (1995-2000, diesel)
Link in different formats to this article
Comments and feedback from visitors
No comments yet


How much will 37 + 44 ?


W210 (1996-2002) 
  • General information
  • Vehicle description
  • Working conditions and tools
  • Car care
  • Diesel engines
  • Engine repair
  • Lubrication system
  • Cooling system
  • Injection system
  • Supply system
  • Exhaust system
  • Gasoline engines
  • Engine repair
  • Lubrication system
  • Cooling system
  • Control system
  • Power and exhaust system
  • Transmission
  • Clutch
  • Mechanical gearbox
  • Automatic gearbox
  • Drive shafts
  • Chassis
  • Car suspension
  • Steering
  • Tires and wheels
  • Brake system
  • Body
  • Exterior (external elements)
  • Interior (internal elements)
  • Doors and windows
  • Heating and ventilation
  • Electrical equipment
  • Equipment and devices
  • Power devices
  • Lighting and signaling
  • Electrical circuits
W124 (1984-1995) 
  • General information
  • Governing bodies
  • Driving and operation
  • Weekly care
  • Maintenance (gasoline)
  • Maintenance (diesel)
  • Troubleshooting
  • Power unit
  • I4 petrol engine
  • V6 petrol engine (SOHC)
  • V6 petrol engine (DOHC)
  • Diesel engines
  • Engine overhaul
  • Cooling system
  • Heating and ventilation
  • Fuel system (carburetor)
  • Injection system «Bosch CIS-E»
  • Injection system «Bosch HFM»
  • Diesel fuel system
  • Supply system
  • Starting and charging system
  • Ignition system (I4)
  • Ignition system (V6)
  • Preheating
  • Transmission
  • Clutch
  • Mechanical gearbox
  • Automatic gearbox
  • Drive shafts
  • Chassis
  • Brake system
  • Car suspension
  • Steering
  • Body
  • Exterior (external elements)
  • Interior (internal elements)
  • Doors, locks and windows
  • Electrical equipment
  • Equipment and devices
  • Switches
  • Headlights and lighting
  • Electrical circuits
W123 (1976-1985) 
  • General information
  • Introduction to the guide
  • Power unit
  • Engine device
  • Repair M102 engines
  • Repair M110 and M123 engines
  • Cooling and lubrication (M102)
  • Cooling (M110 and M123)
  • Ignition system
  • Power system «Stromberg»
  • Power system «Solex 4A1»
  • Fuel injection «K-Jetronic»
  • Fuel injection «L-Jetronic»
  • Transmission
  • Clutch
  • Mechanical gearbox
  • Automatic gearbox
  • Cardan and rear axle
  • Chassis
  • Front suspension
  • Rear suspension
  • Steering
  • Brake system
  • Body
  • Exterior (external elements)
  • Interior (internal elements)
  • Doors, locks and windows
  • Electrical equipment
  • Equipment and devices
  • Power devices
  • Electrical circuits
 
MercedesMan.ru © 2017–2026 · Mobile version · Read about Mercedes · Sitemap: EN BG BY UA RS HR RO PL SK HU · Feedback · Site search · Bookmark A-Class (W168) · C-Class (W201) · C-Class (W202) · C-Class (W203) · E-Class (W123) · E-Class (W124) · E-Class (W210) · G-Class (W463) · M-Class (W163) · S-Class (W116, petrol) · S-Class (W126, petrol) · S-Class (W140) · S-Class (W220) · Sprinter · Vito 1 · Vito 2 · Vario 814D ·
 
We only use cookies without which some of the site's features may not be available.