
Replacing the timing chain on a 111 series engine
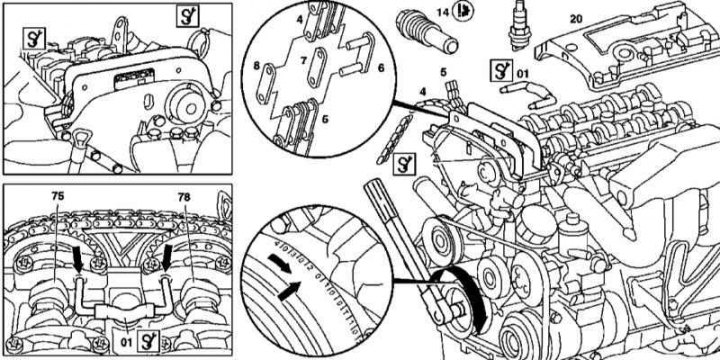
Illustrative material for replacing the timing chain for the 111 series engine is presented in the illustration, which includes all references in the text.
Removing
1. Remove the cylinder head cover (20).
2. Turn out spark plugs.
3. Turning the crankshaft in the normal direction, bring the piston of the first cylinder to a position of 20°after TDC.
4. With locking rods (01) fix the inlet (75) and graduation (78) distribution shafts.
5. Remove chain tensioner (14).
6. Using a special tool (02) fasten the chain (4).
7. Using a special tool, dismember the chain links and remove the latter from the engine.
Installation
1. Get a new chain in its regular place and, using a special tool, articulate the links.
2. Having made the necessary preparations (see Section Removal and installation of timing drive components), install the chain tensioner (14).
3. Check the correct basic position of the camshafts (see Section Setting the basic position of the camshafts).
4. Install the cylinder head cover.
5. Start the engine and check it for signs of leak development.
Replacing the gas distribution chain on 112 and 113 series engines

1 - Timing chain holder (right); 2 - Timing chain holder (left); 3 - Camshaft blocking rod (right); 4 - TORX head screws
Illustrative material for replacing the timing chain for engines of the 112 and 113 series is presented in the illustration, which includes all references in the text.
Removing
1. Disconnect the negative cable from the battery.
2. Remove the spark plugs
3. Remove the cylinder head covers.
4. Remove the electric cooling fan/viscous fan assembly (depending on configuration) and fan shroud.
5. Having turned the crankshaft in the normal direction, bring the piston of the first cylinder to the position of 40°after TDC, - the camshafts should turn in grooves to the center plane of the engine and be freely fixed by locking rods.
Note. On models equipped with an air pump, the combination valve must be unscrewed before installing the right locking pin. The copper-plated segments of the chain must align with the marks on the camshaft sprockets - in order to achieve the desired result, it may be necessary to rotate the crankshaft up to 14 times.
6. Remove chain tensioner (see Section Removal and installation of timing drive components).
7. Remove the camshaft position sensor (CMP).
8. Having turned a cranked shaft in a normal direction, provide convenient access to the dismembered links of a chain.
9. Remove the bridge of covers of bearings of the right camshaft.
10. With a pin (3) block the right camshaft.
11. Install the chain holders (1 and 2).
12. Using a special tool, dismember the chain links and remove the latter from the engine.
Installation
1. Turning the crankshaft in the normal direction, get a new chain in its regular place.
2. Remove the chain holders from the cylinder heads (1 and 2).
3. Using a special tool, articulate the chain links.
4. Turn the crankshaft in the normal direction and achieve the required combination of alignment marks.
5. Remove the sleeve blocking the right camshaft (3).
6. Establish the bridge of covers of bearings of the right camshaft.
7. Install the CMP sensor.
8. Install the chain tensioner.
9. Install the fan shroud.
10. Install the fan assembly.
11. Establish covers of heads of cylinders.
12. Screw in the spark plugs.
13. Connect the negative cable to the battery.