



Note: An assistant will be required to perform the compression pressure test procedure.
1. Compression gives an idea of the engine's condition. The results of the test show whether the valves and pistons are in order (piston rings), or they are worn out. In addition, the test results allow you to decide whether to replace the engine, whether it requires a complete overhaul, or whether it is enough to replace the cylinder head gasket. A compression tester is required for testing, which is available in specialized stores at an affordable price for gasoline engines.
Note: For diesel engines, a compression tester with a measurement range of approximately 40 bar is required.
2. Warm up the engine to normal operating temperature (about 80°C), make sure the battery is fully charged.
Petrol models
1. Switch off the engine and, if equipped, remove the power unit cover, the air cleaner assembly and, if equipped, the resonator chamber with the connecting sleeve (see Chapter Servicing air intake tract components).
2. Remove the spark plugs and turn the engine over with the starter.
3. Insert the compression tester nozzle into the spark plug hole of the first cylinder.
4. Press the gas pedal and, turning the engine with the starter, read the readings of the meter (an assistant's help will be required), - write down the measurement result.
5. Proceeding in a similar manner, measure the compression pressure in the remaining engine cylinders one by one.
6. Stop the engine, disconnect the compression tester, screw in the spark plugs and reinstall all components removed for access.
Diesel models
Stop the engine and remove the turbocharger tract air distribution hose cover and the cylinder head cover trim.
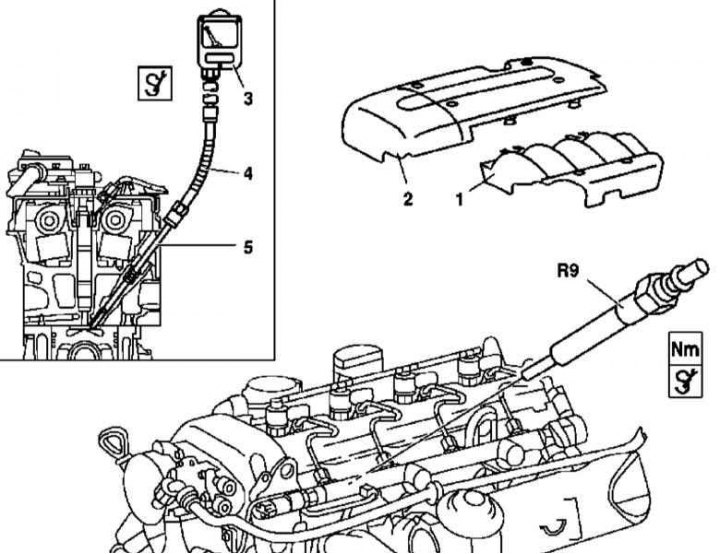
Checking Compression Pressure on Diesel Models Equipped with a 612 Series Engine
1 - Cover of the air distribution sleeve of the supercharging system tract; 2 - Cylinder head cover trim; 3 - Compression gauge; 4 - Connecting hose; 5 - Threaded nozzle; R9 - Glow plug
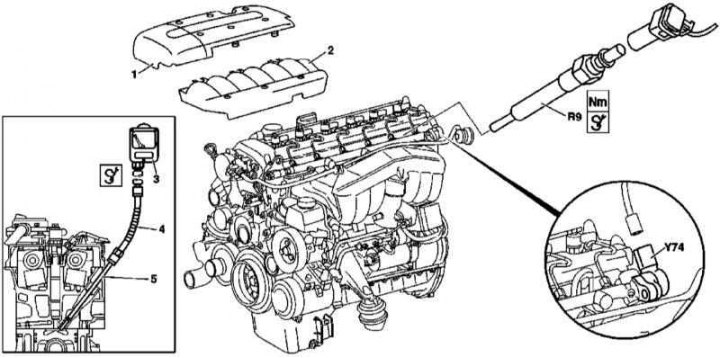
Checking Compression Pressure on Diesel Models Equipped with a 628 Series Engine
1 - Cover of the air distribution sleeve of the supercharging system tract; 2 - Cylinder head cover trim; 3 - Compression gauge; 4 - Connecting hose; 5 - Threaded nozzle; R9 - Glow plug; Y74 - Pressure Regulator Valve
M612
1. Remove the glow plugs.
2. Using a threaded nozzle with a flexible connecting hose, connect the compression tester to the spark plug hole of the first cylinder.
3. Then proceed in the same order as described above for gasoline engines.
M628
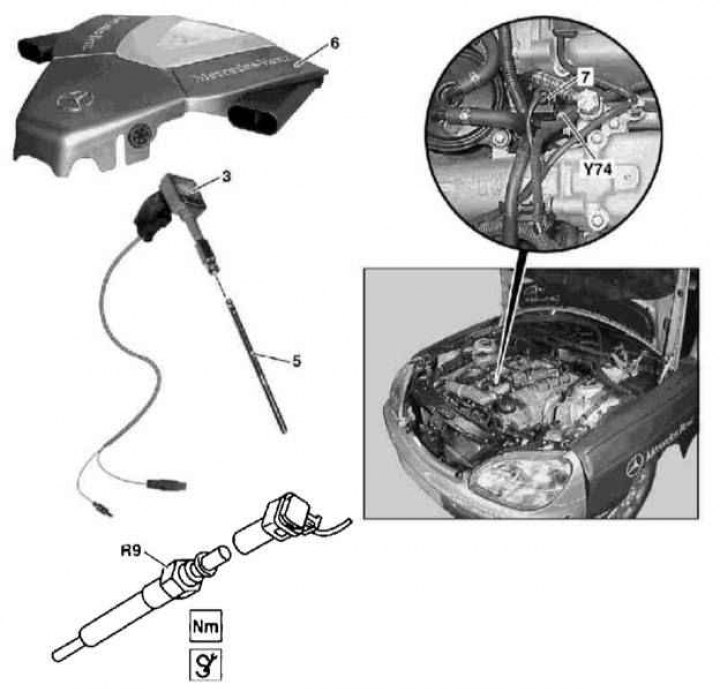
Checking Compression Pressure on Diesel Models Equipped with a 628 Series Engine
3 - Compression gauge; 5 - Threaded nozzle; 6 - Assembling the air cleaner; 7 - Pin connector; R9 - Glow plug; Y74 - Pressure Regulator Valve
1. Remove the air cleaner assembly.
2. Disconnect the air distribution pipe of the air intake tract.
3. Disconnect the pressure regulator valve connector
[Article text obtained from the website: MercedesMAN.ru]
4. Remove the glow plugs.
5. Then proceed according to the instructions given for gasoline engines.
All models
1. Compare the measurement results with the requirements of the Specifications.
2. The maximum permissible pressure difference in individual cylinders can be 1.5 bar (for diesel engines 3.0 bar).
3. Compression in a healthy engine increases very quickly. A low value after the first cycle, increasing with subsequent cycles, indicates wear of the piston rings. A low value after the first cycle, not increasing after the following ones, signals that either the valves are leaky or the head gasket is blown (the cause could also be a crack in the head). The presence of carbon deposits on the valve plates can lead to a decrease in compression.
4. It should be noted that due to the different starter speeds on different models, the results obtained from measurements may differ. The results obtained from measuring compression should be approximately the same for all cylinders.
5. If the pressure in any cylinder is at the minimum permissible level or even lower, then to find out the reason, do the following: Pour a teaspoon of engine oil into the cylinder through the spark plug hole and repeat the compression measurement.
6. If adding oil temporarily improved compression, the reason for its decrease is most likely wear of the piston, rings or cylinder. If there is no increase in compression, then it can be assumed that the reason is leaky valves or a broken cylinder head gasket.
7. Low compression in two adjacent cylinders is almost certainly a result of a blown head gasket. The presence of coolant in the combustion chambers or in the engine crankcase will confirm this assumption.
8. If the compression in one of the cylinders is approximately 20% lower than in the others, and the idle speed is unstable, then the reason may be excessive wear of the camshaft cam.
9. After completing the check, reinstall the spark plugs (refer to Chapter Routine care and maintenance), put the high-voltage wire tips on them, connect the connector to the ignition coil. Install the plastic engine cover and the fuel pump fuse in place.
Checking cylinders for leaks
1. During this test, the speed of the compressed air pumped into the cylinders and the leak locations are determined. This test is an alternative to the compression test. Moreover, from many points of view, it is much more effective, since it is easier to visually identify the source of the leak than to understand the results of the compression measurement.
2. The equipment required to check for leaks is not generally available, so this test will have to be entrusted to service center specialists.