
Examination
1. Remove the air cleaner as described in Chapter 4.
2. Remove the camshaft cover as described in paragraph 4.
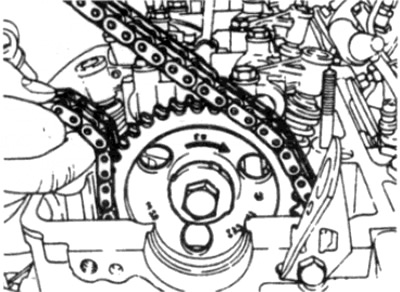
3. Using a socket wrench on the crankshaft pulley/damper hub bolt, turn the crankshaft to gradually see the entire chain on the camshaft sprocket.
4. The chain should be replaced if the sprocket or chain is worn (manifested by increased longitudinal play between the links and increased noise during operation). It is recommended to replace the chains every time the engine is disassembled. Note that rollers can be worn out on a worn chain. To avoid problems in the future, if there is any doubt about the condition of the chain, replace it.
Replacement
Note: Removing the chain using the above method involves using a portable electric grinder to cut one of the chain links. Before starting work, make sure that you have access to this tool and a new chain and connecting link.
5. Disconnect the negative battery terminal.
6. Follow the steps described in paragraphs. 1 and 2.
7. Remove the spark plugs as described in Chapter 1A.
8. Remove the chain tensioner as described in paragraph 8.
9. Cover the camshaft and the part of the chain that is not covered by the casing with clean rags. Do not cover the top of the camshaft sprocket with rags.
10. Using a grinder, grind down the chain link tab on the top of the sprocket - be careful not to damage the sprocket.
11. Remove the chain link plate and push the link to the back of the chain.
12. Collect the rags, taking care not to let the chips fall down inside the chain casing.
13. Using the new link, connect one end of the new chain to the end of the old chain so that when the crankshaft is turned clockwise, the new chain runs down around the sprockets, then up the other side. Install the link from the back of the sprocket and make sure the link is securely in place - do not install the link plate at this stage to secure the link.
14. After that, it is necessary to pass the new chain through the sprockets and guides. During this procedure, the following points should be observed (see fig. 7.14).
- A) Maintain chain tension so that the chain links do not come off the camshaft sprocket. Otherwise, the setting of the valve timing will be violated.
- b) Pull the old chain up to prevent it from slipping off the crankshaft sprocket or warping in the guides.
Pic. 7.14. Maintain tension on the new chain as you pass it around the sprockets and guides
15. Using a suitable socket wrench on the crankshaft pulley hub bolt, slowly turn the crankshaft clockwise, following the recommendations given in the previous paragraph.
16. When the end of the new chain appears, remove the link (checking that the tension of the new chain has not decreased and that the chain links remain aligned with the sprockets) and disconnect the new circuit from the old one. Remove the old chain.
17. Put a new chain on the camshaft sprocket, then connect the two ends of the target with the connecting link inserted from the back of the sprocket (see fig. 7.17).
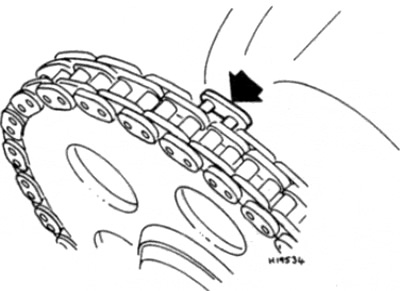
Pic. 7.17. Installing the camshaft drive chain link (shown by arrow) on the back of the chain
Advice. Temporarily secure the ends of the new chain to the sprocket with string or through the holes in the sprocket and around the chain.
18. Install the link plate and secure the link by flattening out the studs of the link fingers. A special device is intended for these purposes, however, satisfactory results can be achieved with a hammer and a metal bar (or second hammer), to support the back of the chain. Be careful not to damage the chain or sprocket.
19. Check that the link is securely fastened without metal burrs or chips.
20. Install the chain tensioner as described in paragraph 8.
21. Turn the crankshaft clockwise to set the 1st cylinder piston to TDC, checking that the crankshaft and camshaft timing marks are correctly aligned as described in paragraph 3.
22. It is possible that during this operation the chain will move one tooth of the camshaft sprocket. In this case, the timing can be corrected by removing the sprocket (see paragraph 8) and changing the position of the camshaft and sprocket by one tooth in relation to the chain.
23. Install spark plugs.
24. Install the camshaft cover as described in paragraph 4, then install the air cleaner.
25. Connect the negative battery terminal.