
Front camshaft seal
1. Unfasten the radiator fan shroud and position it on top of the fan blades as described in Chapter 3.
2. Where provided, remove the cap from the distributor cap. Disconnect the ignition coil wires from the distributor cap. After that, unscrew the three screws and remove the distributor cover. Move the cover aside along with the high-voltage wires and the housing.
3. Turn away three screws and remove the runner of the distributor.
4. Turn away a bolt of fastening and remove a leading plug of a slider (see fig. 6.8). Where provided. Unfasten the cover at the front of the upper camshaft timing chain case.
5. Gently pry off the old cuff with a screwdriver. You can drill a hole in the cuff and use a self-tapping screw and pliers to remove the cuff from its socket. Be careful not to damage the nest.
6. Thoroughly clean the oil seal seat and the front of the camshaft.
7. A piece of polyethylene or duct tape wrapped around the front end of the camshaft flange will protect the new seal from damage during installation.
8. Carefully, using a pipe or a suitable wrench head, drive in a new (dry) collar into the socket so that it is flush with the outer surface of the chain case.
9. Where used, remove the polyethylene or adhesive tape from the camshaft.
10. Where provided, install the cover from the front onto the top chain case, then install the runner drive bush, making sure the groove on the bush aligns with the boss on the shaft. Install the bushing mounting bolt and tighten it to the required torque.
11. Install the slider and tighten the mounting screws.
12. Establish a cover of the distributor and connect a high-voltage wire of the coil of ignition.
13. Install the radiator fan shroud.
Forward cuff of a cranked shaft
14. Remove the crankshaft/vibration damper pulley and hub as described in paragraph 5.
15. Measure and record the insertion depth of the cuff.
16. Pry and pull the cuff out of the case. Protect the crankshaft by wrapping the screwdriver in a rag (see fig.14.16). You can drill a small hole in the cuff, and screwing a self-tapping screw into it, use the pliers to pull out the cuff.
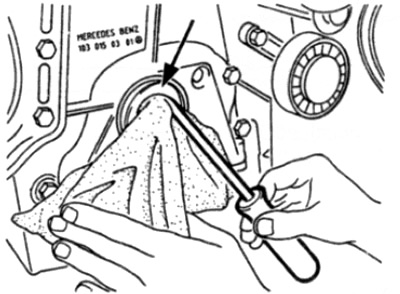
Pic. 14.16. Removing the front crankshaft seal. A rag is used to protect the shaft
17. Clean the cuff body.
18. Dip a new seal in clean engine oil and press it with a pipe or wrench head into the body (open end first) to the marked depth. A piece of thin polyethylene or duct tape wrapped around the crankshaft will help protect the boot from damage during installation.
19. Where used, remove polyethylene or adhesive tape from crankshaft.
20. Install the crankshaft/vibration damper pulley and hub as described in paragraph 5.
Rear collar of the crankshaft
21. Remove flywheel/drive faceplate as described in paragraph 13.
22. Follow the steps described in p.p. 15 and 16.
23. Whether check up the surface of a cranked shaft under a cuff is not damaged. If significant wear is found, the crankshaft should be replaced.
24. Clear the case of a cuff and a surface of a flange of a cranked shaft.
25. Dip a new seal in clean engine oil and push it with a pipe or wrench head into the body (open end first) to the marked depth. A piece of thin plastic or duct tape around the back of the crankshaft flange will help protect the oil seal from damage during installation. Please note that for reliable sealing, the cuff must be installed to the crankshaft flange at a right angle.
26. Where used, remove plastic or adhesive tape.
27. Install handwheel/faceplate as described in paragraph 13.