
Warning! Gasoline is extremely flammable and explosive, so care must be taken when working on any part of the fuel system.
Warning! The container in which the fuel was located contains fuel vapors and is potentially explosive.
Attention! Work on the fuel system must be carried out in a well-ventilated area, for which all windows and doors can be opened to create a draft.
Attention! When working on the fuel system, do not use open flames, electric welding, or tools that may generate sparks. Make sure there is a charged fire extinguisher in the immediate vicinity of the workplace.
Attention! Use goggles to protect your eyes from getting fuel in them. If fuel comes into contact with skin, wash the area with plenty of water.
Attention! Keep the fuel system clean as dirt entering the fuel system passages can block them and prevent the engine from running properly.
Removing
Models with a single fuel pump
Location of the fuel pump on models with a single pump
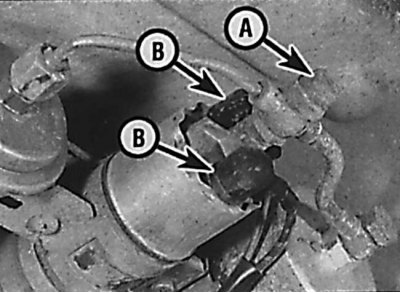
A - connecting bolt;
B - electrical connectors
1. The fuel pump is installed under the bottom at the rear of the vehicle.
2. Relieve the pressure in the fuel system.
3. Remove the ground wire from the battery.
4. Raise the rear of the car and secure it on stands.
5. Unscrew the screws and remove the protective casing of the fuel pump, fuel filter and pressure accumulator (see fig. Unscrewing the screws securing the protective casing of the fuel filter).
6. Mark and disconnect electrical connectors from the fuel pump (see fig. Location of the fuel pump on models with a single pump).
7. Using clamps, pinch the fuel hoses connected to the fuel pump.
8. Disconnect the fuel lines from the fuel pump. When using bayonet fittings, remove the seals.
9. Unscrew the screws, remove the mounting strap and remove the fuel pump from the bracket.
Models with two identical fuel pumps
Location of fuel pumps on models with two identical pumps
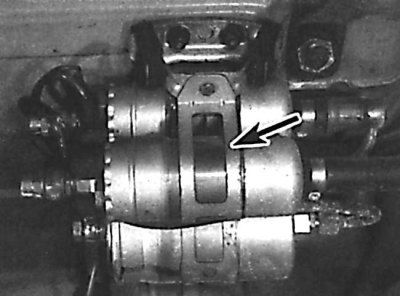
The arrow marks the fuel pump mounting belt.
1. Later models have two identical fuel pumps. Removing the fuel pumps is done in the same way as on models with a single fuel pump. It should be taken into account that the second fuel pump is installed under the first, and they are fastened with a common belt (see fig. Location of fuel pumps on models with two identical pumps).
Models with primary and secondary fuel pumps
Primary Fuel Pump Location
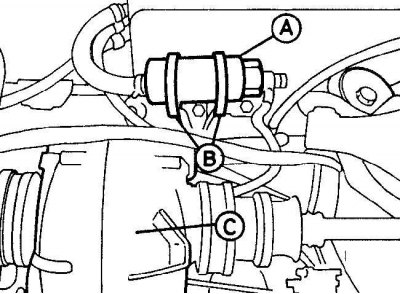
And – the primary fuel pump;
B - rubber fasteners;
C - differential housing
1. Later models of the Wagon are equipped with a primary and secondary fuel pump. Removing the secondary fuel pump is done in the same way as on models with a single fuel pump.
2. The primary fuel pump is rubber-mounted above the rear of the differential housing (see fig. Primary Fuel Pump Location).
3. Relieve the pressure in the fuel system.
4. Remove the ground wire from the battery.
5. Raise the rear of the car and secure it on stands.
6. Disconnect the mounting straps and remove the fuel pump guard and bracket.
7. Mark and disconnect from the fuel pump electric sockets.
8. Using clamps, pinch the fuel hoses connected to the primary fuel pump.
9. Disconnect the fuel hoses from the fuel pump. When using bayonet fittings, remove the O-ring.
10. Remove the fuel pump from the rubber mountings.
Installation
1. Installation is carried out in the reverse order of removal, taking into account the following points.
2. Check that the fuel pump fixing strap is correctly installed on the anti-corrosion plastic insulating tube.
3. Install new gaskets on bayonet fittings
4. Start the engine and check that there are no fuel leaks from the pipes connected to the fuel pump.