
Cars BMW Cars Volkswagen Cars Chevrolet Cars Land Rover Cars Lada Cars Honda Cars Peugeot
English Русский
Български
Беларускі
Український
Српски
Hrvatski
Română
Polski
Slovenský
Magyar
Bookmark News and articles Sitemap Feedback Site search
MercedesMan.ru


A-Class C-Class E-Class G-Class M-Class S-Class Others
W123 (1976-1985) W124 (1984-1995) W210 (1996-2002)
  • Main
  • E-Class
  • W124 (1984-1995)
  • Power unit
  • Injection system «Bosch CIS-E»
  • Fuel level sensor — removal and installation

Fuel level sensor — removal and installation (Mercedes-Benz E-Class W124)

0
Contents: Removal ↡ Installation ↡
Warning! Gasoline is extremely flammable and explosive, so care must be taken when working on any part of the fuel system.


Warning: The container that held the fuel contains fuel vapor and is potentially explosive.


Attention! Work on the fuel system must be carried out in a well-ventilated area, for which you can open all the windows and doors to create a draft.


Warning! When working on the fuel system, do not use open flames, electric welding or tools that may generate sparks. Make sure that a charged fire extinguisher is in the immediate vicinity of the work area.


Warning! Use goggles to protect your eyes from fuel getting into them. If fuel gets on your skin, rinse the area with plenty of water.


Caution! When working with the fuel system, keep it clean, as dirt that gets into the fuel system channels can block them, which will disrupt the normal operation of the engine.


Removal


Location of fuel level sensor on models with a Sedan body
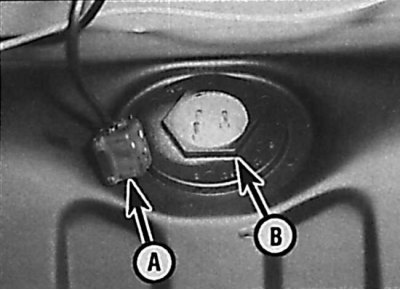


A – electrical connector of the sensor;

A – electrical connector of the sensor;
B – sensor mounting nut


1. It is advisable to remove the fuel level sensor on an empty fuel tank. If the fuel tank is completely filled with fuel, pump out at least 8 liters of fuel before removing the fuel level sensor.


2. Remove the ground cable from the battery.

3. On Sedan models, remove the trunk floor trim, release the fasteners, and remove the fuel tank gasket panel. On Wagon models, remove the front trunk trim or the third-row seatback. Release the fasteners and lift the cargo area carpet.

4. On station wagon models, remove the protective cover from the floor, then disconnect the electrical connector from the top of the fuel level sensor (see picture). Using soft wire, secure the electrical connector so that it does not fall behind the fuel tank.

5. Unscrew the sensor mounting nut and remove the fuel level sensor from the fuel tank.

6. Remove the sealing ring from the fuel level sensor installation hole.

Installation


1. Installation is carried out in the reverse order of removal, taking into account the following points.

(Original material on the website: «MercedesMan»)

2. Before installing a new fuel level sensor, remove the protective tape from it and take out the locking pin.

3. Replace the fuel level sensor sealing ring.

4. Tighten the fuel level sensor mounting nut to the specified torque.

5. Check that the electrical connector is connected to the sensor correctly and securely.

6. Before installing the fuel tank gasket panel, start the engine and check that there are no fuel leaks near the fuel level sensor.
This article is available at: russian, bulgarian, belarusian, ukrainian, serbian, croatian, romanian, polish, slovak, hungarian
The article has been verified: Levin Kirill Glebovich
Share with friends:
◀ Previous
E-Class W124 / Injection system «Bosch CIS-E»
Next ▶

Pressure accumulator — removal and installation
Fuel filter — removal and installation
Air Filter Housing — Removal and Installation
Air filter — removal and installation
Accelerator cable — removal, installation and adjustment
Fuel pump — removal and installation
Fuel tank — removal and installation
Throttle body — removal and installation
Intake manifold — removal and installation
KE-Jetronic fuel injection system components
More similar articles for repairing other models

☛ Oil level sensor — removal and installation Mercedes W168 (1997-2004)
☛ Fuel level indicator sensor — removal and installation Mercedes 190 (W201) (1982-1993)
☛ Removal and installation the fuel level sensor Mercedes W463 (1999-2019)
☛ Removal and installation the fuel level sensor Mercedes W163 (1997-2005)
☛ Oil Level Switch Sensor — Installation Details, Test Data Mercedes W140 (1991-1998)
☛ Fuel level indicator Mercedes Sprinter (1995-2000, diesel)
Link in different formats to this article
Comments and feedback from visitors
No comments yet


How much will 44 + 11 ?


W210 (1996-2002) 
  • General information
  • Vehicle description
  • Working conditions and tools
  • Car care
  • Diesel engines
  • Engine repair
  • Lubrication system
  • Cooling system
  • Injection system
  • Supply system
  • Exhaust system
  • Gasoline engines
  • Engine repair
  • Lubrication system
  • Cooling system
  • Control system
  • Power and exhaust system
  • Transmission
  • Clutch
  • Mechanical gearbox
  • Automatic gearbox
  • Drive shafts
  • Chassis
  • Car suspension
  • Steering
  • Tires and wheels
  • Brake system
  • Body
  • Exterior (external elements)
  • Interior (internal elements)
  • Doors and windows
  • Heating and ventilation
  • Electrical equipment
  • Equipment and devices
  • Power devices
  • Lighting and signaling
  • Electrical circuits
W124 (1984-1995) 
  • General information
  • Governing bodies
  • Driving and operation
  • Weekly care
  • Maintenance (gasoline)
  • Maintenance (diesel)
  • Troubleshooting
  • Power unit
  • I4 petrol engine
  • V6 petrol engine (SOHC)
  • V6 petrol engine (DOHC)
  • Diesel engines
  • Engine overhaul
  • Cooling system
  • Heating and ventilation
  • Fuel system (carburetor)
  • Injection system «Bosch CIS-E»
  • Injection system «Bosch HFM»
  • Diesel fuel system
  • Supply system
  • Starting and charging system
  • Ignition system (I4)
  • Ignition system (V6)
  • Preheating
  • Transmission
  • Clutch
  • Mechanical gearbox
  • Automatic gearbox
  • Drive shafts
  • Chassis
  • Brake system
  • Car suspension
  • Steering
  • Body
  • Exterior (external elements)
  • Interior (internal elements)
  • Doors, locks and windows
  • Electrical equipment
  • Equipment and devices
  • Switches
  • Headlights and lighting
  • Electrical circuits
W123 (1976-1985) 
  • General information
  • Introduction to the guide
  • Power unit
  • Engine device
  • Repair M102 engines
  • Repair M110 and M123 engines
  • Cooling and lubrication (M102)
  • Cooling (M110 and M123)
  • Ignition system
  • Power system «Stromberg»
  • Power system «Solex 4A1»
  • Fuel injection «K-Jetronic»
  • Fuel injection «L-Jetronic»
  • Transmission
  • Clutch
  • Mechanical gearbox
  • Automatic gearbox
  • Cardan and rear axle
  • Chassis
  • Front suspension
  • Rear suspension
  • Steering
  • Brake system
  • Body
  • Exterior (external elements)
  • Interior (internal elements)
  • Doors, locks and windows
  • Electrical equipment
  • Equipment and devices
  • Power devices
  • Electrical circuits
 
MercedesMan.ru © 2017–2026 · Mobile version · Read about Mercedes · Sitemap: EN BG BY UA RS HR RO PL SK HU · Feedback · Site search · Bookmark A-Class (W168) · C-Class (W201) · C-Class (W202) · C-Class (W203) · E-Class (W123) · E-Class (W124) · E-Class (W210) · G-Class (W463) · M-Class (W163) · S-Class (W116, petrol) · S-Class (W126, petrol) · S-Class (W140) · S-Class (W220) · Sprinter · Vito 1 · Vito 2 · Vario 814D ·
 
We only use cookies without which some of the site's features may not be available.