
Warning! Gasoline is extremely flammable and explosive, so care must be taken when working on any part of the fuel system.
Warning! The container in which the fuel was located contains fuel vapors and is potentially explosive.
Attention! Work on the fuel system must be carried out in a well-ventilated area, for which all windows and doors can be opened to create a draft.
Attention! When working on the fuel system, do not use open flames, electric welding, or tools that may generate sparks. Make sure there is a charged fire extinguisher in the immediate vicinity of the workplace.
Attention! Use goggles to protect your eyes from getting fuel in them. If fuel comes into contact with skin, wash the area with plenty of water.
Attention! Keep the fuel system clean as dirt entering the fuel system passages can block them and prevent the engine from running properly.
Removing
1. Drain the fuel from the fuel tank through the fuel filler neck.
2. Raise the rear of the car and secure it on stands.
Warning! It is undesirable to remove the fuel tank on a car installed above the inspection hole, as fuel vapors accumulate in the inspection hole, which can be harmful to health.
3. Relieve the pressure in the fuel system.
4. Remove the ground wire from the battery.
5. Working under the vehicle, disconnect the fuel supply and return hoses and the ventilation hose from the fuel tank. In order not to confuse the hoses during installation, mark them. Close the ends of the fuel lines and the openings in the fuel tank with plugs.
Sedan and coupe models
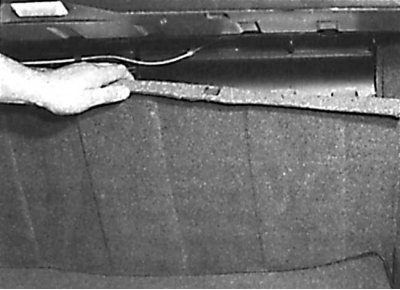
Removing the fuel tank gasket panel
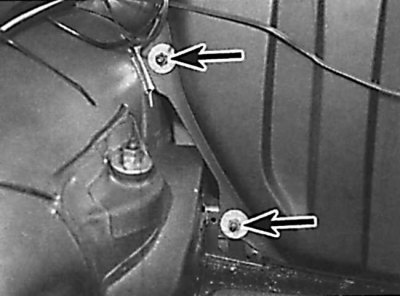
Arrangement of nuts of fastening of the left side of a fuel tank
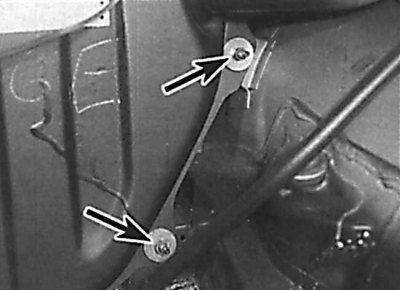
Arrangement of nuts of fastening of the right side of a fuel tank
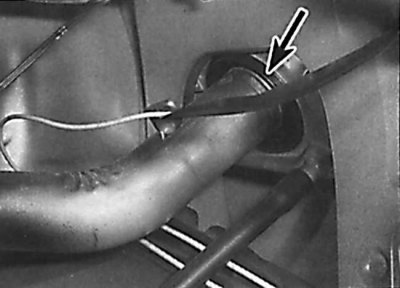
Fastening of a fuel mouth to the panel of a body
1. Remove the large rubber seal covering the fuel tank pipes.
2. In the luggage compartment, remove the caps and move the carpet to the side. Release the clips and fasteners and remove the fuel tank gasket panel (see fig. Removing the fuel tank gasket panel).
3. Disconnect the electrical connector from the fuel level sensor and remove the wires from the mounting brackets.
4. Remove the fuel tank nuts, lift the tank and disconnect the fuel drain hose. Disconnect the fuel filler neck from the body panel and remove the O-ring and bushings (see fig. The location of the left side of the fuel tank nuts, The location of the right side of the fuel tank nuts, Attaching the fuel filler to the body panel).
5. Lift the fuel tank up, then move it back and out of the luggage compartment. Remove sealing strips.
Station wagon models
Fuel tank models Station wagon
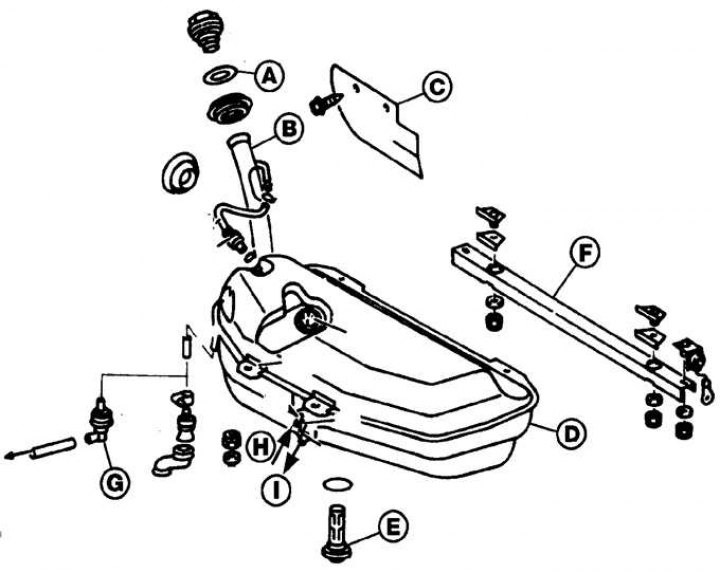
A - gasket; B - fuel filler neck; C - mudguard; D - fuel tank; E - strainer; F - support beam; G - inlet valve; H - return fuel line; I - fuel supply line
1. Remove the rear of the exhaust system from the rubber mounts and support it with boards so as not to deform the exhaust system connections.
2. Disconnect the electrical connector from the fuel level sensor.
3. Using a jack, support the fuel tank from below through a block of wood.
4. Unscrew the nuts and remove the support beam from the rear of the fuel tank. Remove the nuts securing the brackets to the front of the fuel tank and remove the washers and bushings (see fig. Fuel tank models Station wagon).
5. Slowly lower the jack with the fuel tank and disconnect the filler vent hose from the tank. Disconnect the fuel filler neck from the body panel and remove the O-ring and bushings.
6. Remove the fuel tank from under the vehicle and remove the sealing strips.
All models
1. Visually check the condition of the fuel tank from the outside. Unscrew and remove the strainer from the fuel tank. Using clean fuel, wash the build-up off the inside walls of the fuel tank. Install the strainer with a new O-ring.
2. If there is sediment or water in the fuel tank, remove the fuel level sensor and flush the fuel tank with plenty of clean fuel. If there is mechanical damage on the fuel tank, have the fuel tank repaired by a specialist workshop or have it replaced.
Warning! Do not repair the fuel tank by yourself using welding or soldering, as the fuel vapors in the tank are explosive.
Installation
1. Installation is carried out in the reverse order of removal, taking into account the following points.
2. Tighten all bolts and nuts to the specified torque.
3. Use only new self-locking nuts to secure the fuel tank on Station Wagon models.
4. Check that the sealing strips are installed correctly.
5. Check that the fuel level sensor electrical connector is connected correctly and securely.
6. Carry out a test drive, then check all installed items for fuel leaks.