
Fuel tank installation details on all models except ML 55 AMG
Fuel tank installation details on all models except ML 55 AMG
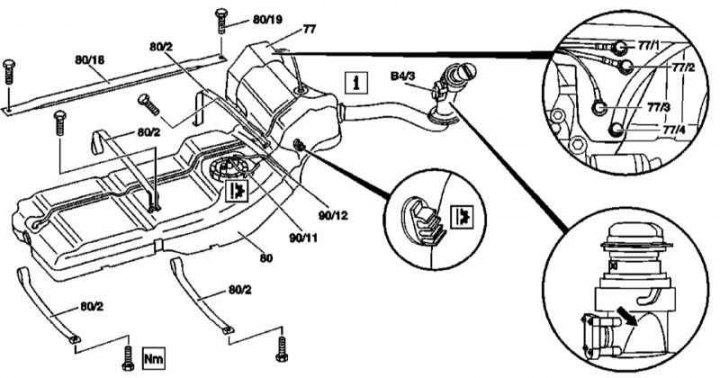
77 - Coal adsorber; 77/1 - Connector for fine ventilation line; 77/2 - Regeneration line connector; 77/3 - Spring chamber ventilation line connector (US models only); 77/4 - Purge line connector; 80 - Fuel tank; 80/2 - Mounting tapes; 80/18 - Longitudinal strip for tightening assembly tapes; 80/19 - Mounting bolts; 90/11 - Fuel return line; 90/12 - Fuel supply line; В4/3 - Pressure sensor in the fuel tank (US models only)
1. Details of the installation of the fuel tank on all models, except for the ML 55 AMG, are shown in the illustrations, which include all references in the text.
2. Drain the fuel tank (see Section Emptying the fuel tank).
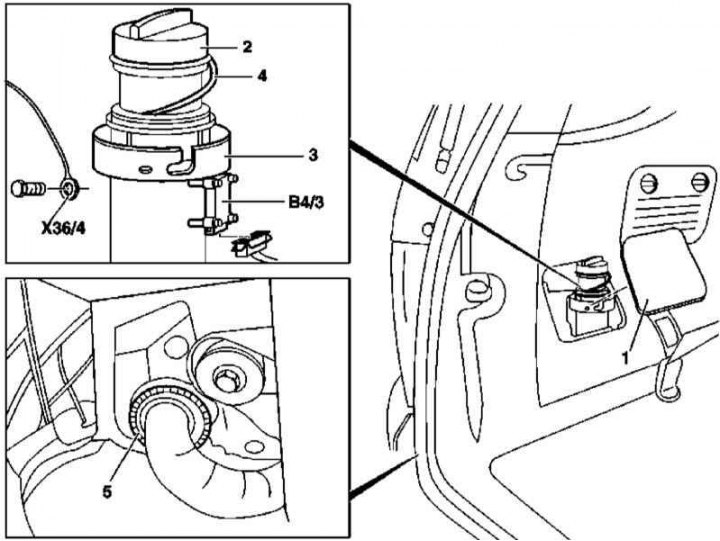
3. Remove the filler cap (2) and unplug it from the safety cord (4).
4. At the corresponding complete set remove the left seat of an additional third row.
5. Remove the cover (1) from the side trim panel of the luggage compartment.
6. Disconnect fuel lines from expansion tank (only petrol models) and filler neck.
7. Release the bayonet lock (3) and disconnect the filler neck from the guide socket, check the condition of the sealing ring, if necessary, replace it.
8. Push the neck into the luggage compartment.
9. On American models, remove the fuel tank pressure sensor (В4/3).
10. Unbolt the ground bar (Х36/4) filler neck (only petrol models).
11. Cut the cable bandages for fixing the clamps for fastening the fuel lines to the filler neck, remove the mounting clamps.
12. Drive the car onto the lift.
13. Remove the lower sealing element (5) and remove the filler neck through the luggage compartment - try not to damage the fuel lines.
14. Remove the left rear wheel.
15. Remove the spare wheel complete with holder.
16. Cut off the large safety band for fixing the filler neck to the bracket on the longitudinal beam of the frame, remove the bracket.
17. Disconnect the connectors of the regeneration (77/2) lines and purge lines (77/4) coal adsorber (77).
18. Disconnect the vent hose from the back of the charcoal canister (on rear differential assembly).
19. Remove the thermal shield of the rear section of the exhaust system - try not to damage the anthers of the drive shaft hinges.
20. Disconnect the propeller shaft from the rear differential (see chapter transmission line).
21. Release the parking brake cables from the latches on the bottom and frame of the car.
22. Loosen the rear differential control tape from the bottom of the car.
23. Remove the left stone chip protection deflector.
24. Remove the bottom mounting tapes (80/2) fuel tank fasteners and loosen the upper tension tapes - the tapes are marked with color marks and must be installed strictly in their original places.
25. Remove the longitudinal strap tightening mounting tapes (80/18).
26. At the appropriate complete set remove draft of adjustment of block headlights.
27. Give nuts of fastening of the bottom support of shock-absorbers of a back suspension bracket to cross-section levers (see chapter Suspension and steering), - nuts must be replaced without fail.
28. Bolt off the holder of the rear axle to the bottom of the car. Support the holder and lower it as low as possible.
29. Jack up and lower the fuel tank.
30. Disconnect the electrical wiring of the fuel pump, as well as the supply lines (90/12) and return (90/11) fuel, - try not to bend the tubes of the fuel lines.
31. Remove the fuel tank assembly (80).
32. Installation is carried out in the reverse order.
Models ML 55 AMG
Main tank
Installation details of the main fuel tank on ML 55 AMG models
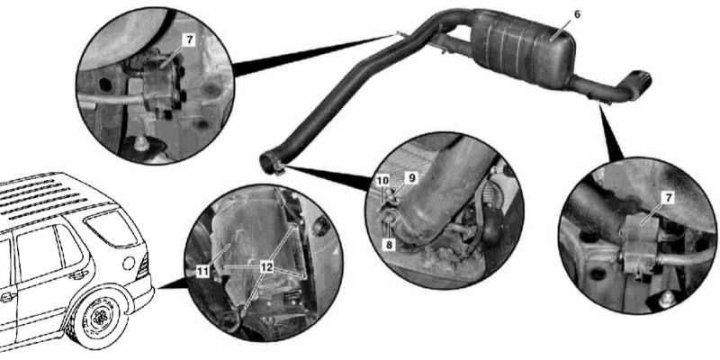
6 - Rear section of the exhaust system; 7 - Rubber cushions; 8 - Bolt; 9 - Nut; 10 - Clamp; 11 - Thermal protection screen; 12 - Bolts
Installation details of the main fuel tank on ML 55 AMG models
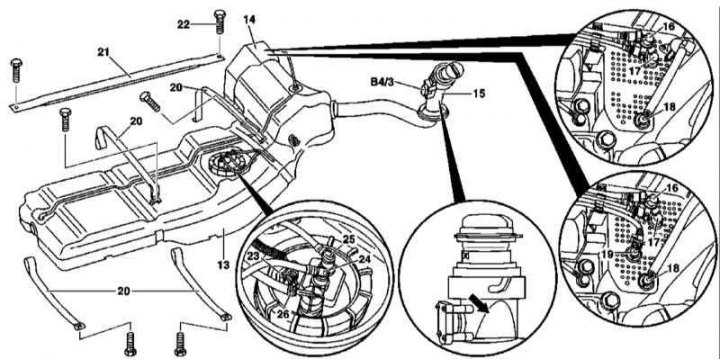
13 - Fuel tank; 14 - Coal adsorber; 15 - Filler neck; 16 - Connector for fine pumping line; 17 - Regeneration line connector; 18 - Purge line connector; 19 - Spring chamber purge line connector (US models only); 20 - Mounting tapes; 21 - Longitudinal bar for fitting mounting tapes; 22 - Mounting bolts; 23 - Contact connector of the electrical wiring of the fuel pump; 24 - Fuel supply line; 25 - Fuel return line; 26 - Stationary heater gas line; В4/3 - Pressure sensor in the fuel tank (US models only)
1. Details of installation of the main fuel tank on ML 55 AMG models are shown in the illustrations above and the illustration. Details of installation of the fuel tank on all models except ML 55 AMG, to which all references in the text apply.
2. Drain the fuel tank (see Section Emptying the fuel tank).
3. Remove the filler cap (2) and unplug it from the safety cord (4).
4. Remove the cover (1) from the side trim panel of the luggage compartment.
5. Release the bayonet lock (3) and disconnect the filler neck (15) from the guide socket, check the condition of the sealing ring, replace it if necessary.
6. Push through the neck (15) inside the luggage compartment.
7. On American models, remove the fuel tank pressure sensor (В4/3).
8. Unbolt the ground bar (Х36/4) filler neck (15).
9. Remove the rear section of the exhaust system (6).
10. Remove the screws (12) and remove the heat shield (11)
11. Remove the auxiliary fuel tank.
12. Disconnect the lines (16, 17, 18 and 19) from the coal adsorber (14).
13. Release the parking brake cables from the latches on the bottom and frame of the car.
14. Disconnect the propeller shaft from the rear differential (see chapter transmission line).
15. Remove the left rear frame trim panel.
16. Remove mounting tapes (20) fuel tank fasteners, - the tapes are marked with colored marks and must be installed strictly in their original places.
17. Remove the longitudinal strap tightening mounting tapes (21).
18. Support with a jack, unscrew from the floor frame and lower the rear axle carrier assembly as low as possible.
19. Release lines from holders on walls of a fuel tank.
20. Disconnect the electrical wiring of the fuel pump, as well as the supply lines (24) and return (25) fuel and fuel line (26) stationary heater - try not to bend the tubes of the fuel lines.
21. Disconnect the fuel pump wiring (23).
22. Lower the fuel tank assembly (13) and remove it from under the car - make sure that the filler neck does not catch on the frame or car body.
Attention! Separation of the neck from the tank is not possible!
23. Installation is carried out in the reverse order.
Additional tank
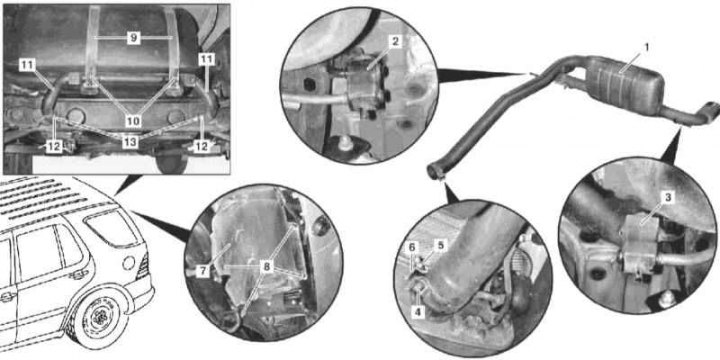
Additional fuel tank installation details on ML 55 AMG models
1 - Rear section of the exhaust system; 2 - Right rubber cushion; 3 - Left rubber pad; 4 - Bolt; 5 - Nut; 6 - Mounting clamp; 7 - Thermal protection screen; 8 - Bolts; 9 - Mounting tapes; 10 - Screws; 11 - Support bracket; 12 - Bolts; 13 - Bolts
Additional fuel tank installation details on ML 55 AMG models

Fuel tank installation details on all models except ML 55 AMG
1. The installation details of the main fuel tank on the ML 55 AMG models are shown in the illustrations, which include all references in the text.
2. Empty the fuel tank (see Section Emptying the fuel tank).
3. Remove the rear section of the muffler (1).
4. Remove the heat shield (7).
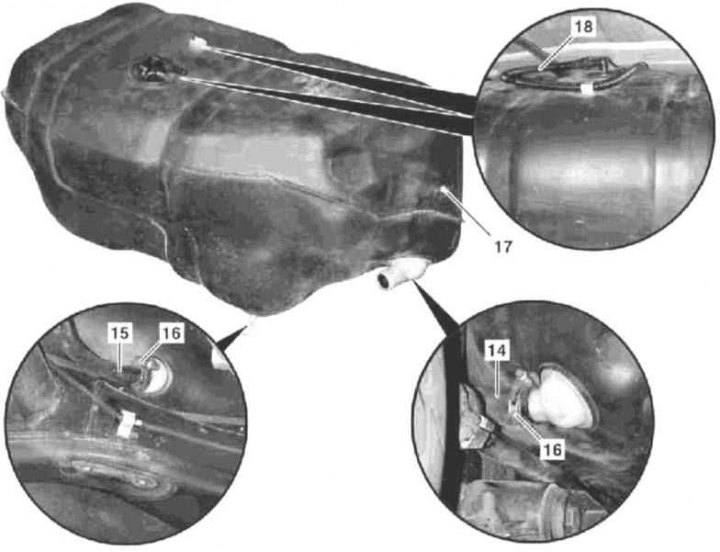
5. Disconnect from auxiliary fuel tank (17) petrol pipelines (14 and 15).
6. Loosen the bolts (10) and remove the mounting tapes (9) additional tank mounts (17).
7. Turn out bolts (12), loosen the bolts (13) and fold down the support bracket (11).
8. Disconnect the vent line from the top of the tank (18) and take her aside.
9. Remove the additional fuel tank assembly (17).
10. Installation is carried out in the reverse order - if necessary, replace the clamps (16) fuel hose fittings (14 and 15), be careful not to damage the ventilation line (18).