



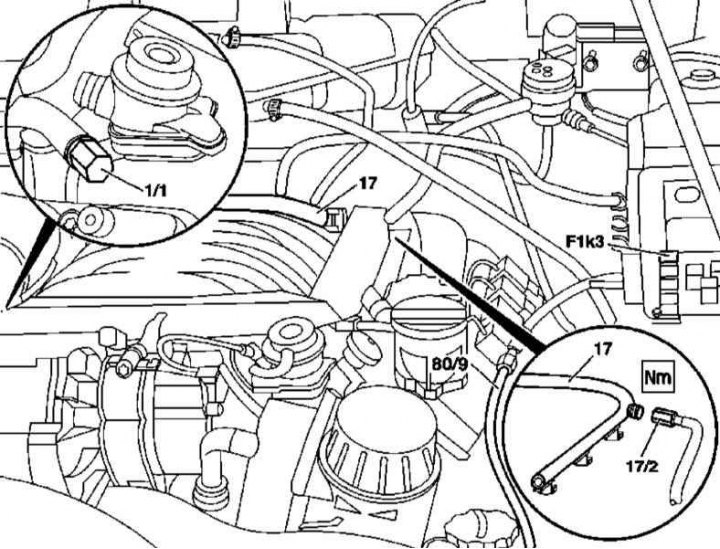
Emptying the fuel tank according to the standard scheme (petrol models)
1/1 — Service valve
1. Illustrative material on the standard procedure for emptying the fuel tank on gasoline models is presented in the illustration, to which all references in the text refer.
2. Release the pressure in the fuel system tract (see Section Relieving pressure in the fuel system of a gasoline engine).
3. Disconnect the fuel supply line (17/2) from the fuel line (17).
4. Connect a fuel hose (80/9) with a diameter of approximately 10 mm to the fuel supply line (17/2), and lower the end of the hose into a prepared drain container of suitable volume.
5. Remove the fuel pump relay (F1k3) from its socket in the mounting block.
6. Install a jumper between slots 30 (+ battery) and 87 (relay input contact).
7. Turn on the ignition and wait until the fuel has drained from the tank.
8. When finished, restore the original fuel line connection and reinstall the relay.
Emergency procedure (if the fuel pump is faulty), - all models
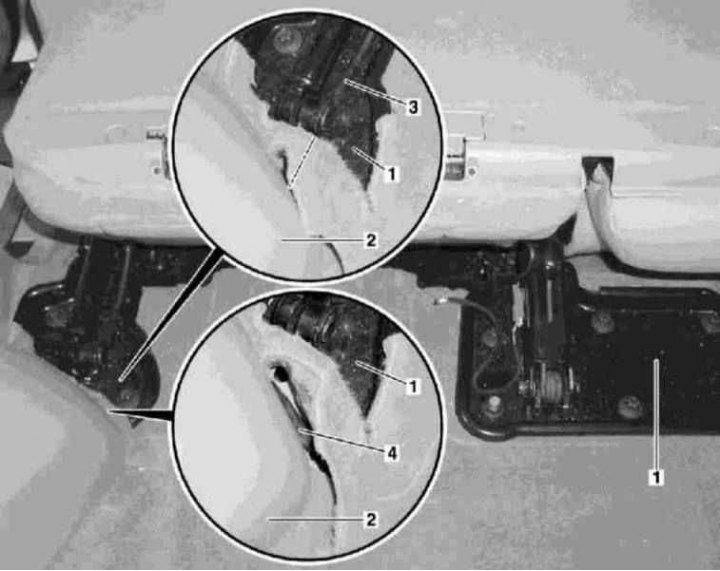
Emptying the fuel tank using the emergency procedure (all models)
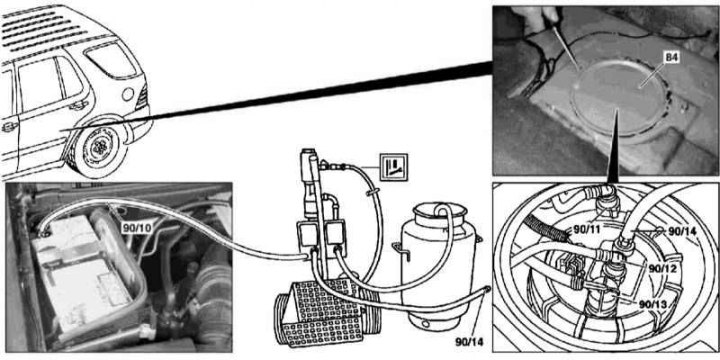
Emptying the fuel tank using the emergency procedure (all models)
84 - Access window cover; 90/10 - Grounding line (vacuum block); 90/11 - Fuel return line; 90/12 - Fuel supply line; 90/13 - Static heater connection nipple (with appropriate equipment); 90/14 - Exhaust hose
1. Illustrative material on the emergency procedure for emptying the fuel tank is presented in the illustrations to which all references in the text refer.
2. Remove the mounting bolts, lift the rear edge of the dual rear seat cushion and remove the covers installed on its frame.
Note: Remove only covers with documentary identification A, D and E.
3. Fold the pillow forward.
4. Fold forward the carpet panel under the seat frame support bracket (1), also fold forward the edge of the carpet panel in the area of the left C-pillar trim (2).
5. Cut through the carpet directly behind the seat locking cable (3) - be careful not to damage the electrical wiring (4).
6. Without bending it, fold back the floor mat and, after warming it up with a hair dryer, remove the service window cover (84) - the cover is sealed with sealant and must be replaced without fail.
7. Using a clamp or self-locking pliers, clamp and disconnect the fuel return line (90/11).
8. Using the adapter, connect the exhaust hose (90/14) to the return line connector (90/11).
9. Ground the exhaust pump (90/10).
10. Start the vacuum pump and pump the fuel from the tank into the prepared container.
11. Installation is carried out in reverse order.