Cars BMW Cars Volkswagen Cars Chevrolet Cars Land Rover Cars Lada Cars Honda Cars Peugeot
English Русский
Български
Беларускі
Український
Српски
Hrvatski
Română
Polski
Slovenský
Magyar
Bookmark News and articles Sitemap Feedback Site search
MercedesMan.ru


A-Class C-Class E-Class G-Class M-Class S-Class Others
Sprinter (1995-2000, diesel) Vito 1 (1996-2003) Vito 2 (2003-2014, diesel) Vario 814D (1996-2003, diesel)
  • Main
  • Mercedes-Benz
  • Sprinter (1995-2000)
  • Chassis
  • Brake system
  • Removal and installation parking brake pads

Removal and installation parking brake pads (Mercedes-Benz Sprinter 903)

0
Figure 292. Removing and installing the parking brake pads: 1 - brake shoe; 2 - return spring of…

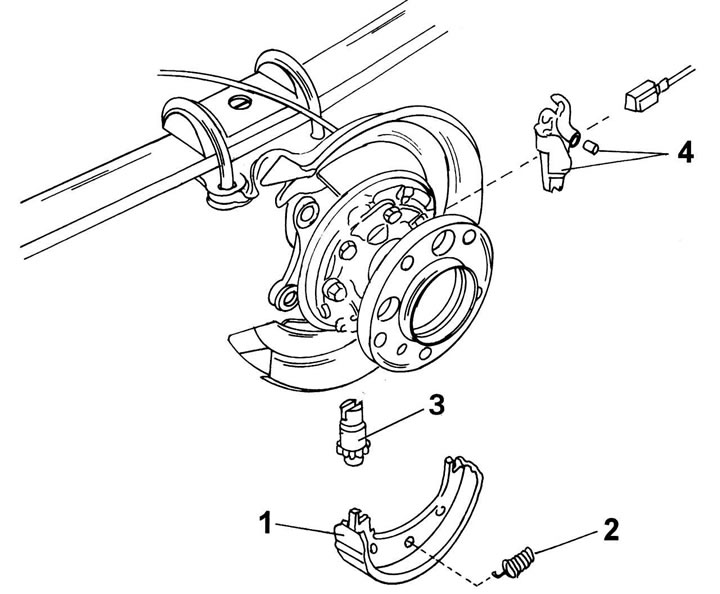
Figure 292. Removing and installing the parking brake pads: 1 - brake shoe; 2 - return spring of the drive lever; 3 - setting gear; 4 - drive lever


For the work you will need the above mentioned tool for removing and installing brake shoe springs. Otherwise, you can remove the rear wheel hubs to provide easy access to the pads. Figure 292 shows the details of the removed pads. The following describes how to remove the pads from one side, however, if one pad fails, they should be replaced as a set on both sides.

When removing the parking brake pads, the following operations must be performed:
  • remove the front parking brake cable from its mounting in the equalizer. To do this, unscrew the traction regulator until the cable can be removed;
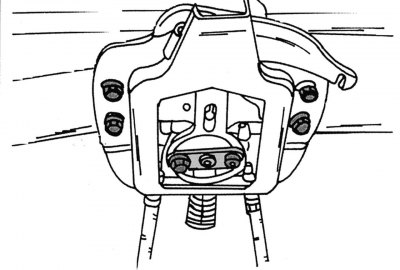
Figure 293. Location of the parking brake equalizer

Figure 293. Location of the parking brake equalizer


  • loosen the equalizer adjusting eccentric (figure 293) to relieve tension on cables;
  • remove the rear brake disc as described above. If the disk does not come off, you need to loosen the cable further by unscrewing the equalizer regulator nut;
  • use a screwdriver to turn the setting gear 3 (see figure 292), as shown, to bring the pads together as much as possible;
  • remove the parking brake cable from the 4-way drive lever lock;

Figure 294. Removing return springs using a special puller

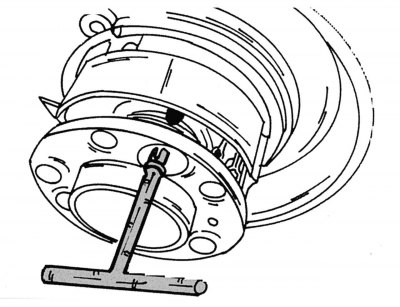
Figure 294. Removing return springs using a special puller

  • install tool 112 589 09 061 00 (figure 294), compress the spring and turn it approximately 90°, then release it from the engagement in the shield and remove it. The spring should be turned until it disengages. Also remove the spring of the second shoe. Vertically mounted spring 2 (see figure 292) remove in the same way, but install the puller from above;
  • use pliers to remove the lower return spring;
  • spread both pads from below as wide as possible so that they can be passed through the flange of the rear axle shaft. The installation gear will fall out or can be removed in advance.

When installing the pads, you need to do the following:


  • apply Molykote paste to the working surfaces of the brake shoe drive lever lock;
  • secure the parking brake cable in the lock with a pin;
  • apply long-lasting lubricant to the thread of the stop and the cylindrical part of the installation gear;
  • assemble the adjustment mechanism and set it to the extreme position;
  • insert the adjusting mechanism into the pads as shown in the figure 292 (gear down);
  • install the upper return spring on the shoe in front;
  • spread the pads at the bottom, pass them through the flange of the rear axle shaft and secure them in the lever lock;
  • hook the pressure springs into the pads on the side;
  • puller (see figure 294) compress the spring through the hole in the flange and, turning it 90°, secure it in the brake shield;
  • hook the large eye of the return spring and insert it into the second shoe;
  • install brake disc and caliper;
  • adjust the parking brake.


Material taken from a web resource www.MercedesMan.ru
This article is available at: russian, bulgarian, belarusian, ukrainian, serbian, croatian, romanian, polish, slovak, hungarian
The article has been verified: Levin Kirill Glebovich
Share with friends:
◀ Previous
Mercedes Sprinter / Brake system
Next ▶

Parking brake — general information
Repair of the main brake cylinder
Removal and installation the master brake cylinder
Master Brake Cylinder — General Information
Installing the rear brake disc
Adjusting the parking brake shoes
Adjusting the parking brake cables
Replacing the front parking brake cable
Replacing the rear parking brake cables
Brake booster — general information
More similar articles for repairing other models

☛ Parking brake pads — removal and installation Mercedes W168 (1997-2004)
☛ Parking brake pads — removal and installation Mercedes W202 (1993-2000)
☛ Checking and replacing the parking brake pads Mercedes W123 (1976-1985)
☛ Adjusting the parking brake drive Mercedes W463 (1999-2019)
☛ Assessing the degree of wear and replacing brake pads Mercedes W163 (1997-2005)
☛ Removal and installation parking brake pads Mercedes W116 (1972-1980, petrol)
Link in different formats to this article
Comments and feedback from visitors
No comments yet


How much will 43 + 28 ?


Vario 814D (1996-2003, diesel) 
  • General information
  • Maintenance
  • Power unit
  • Engines 602.984/985
  • Engines 904.908/914/923/936
  • Transmission
  • Clutch
  • Manual gearbox 711.613
  • Manual gearbox 710.64/66
  • Manual gearbox 715.051
  • Automatic gearbox 723.345
  • Power take-off box
  • Chassis
  • Front suspension
  • Rear suspension
  • Steering
  • Brake system
  • Body and electrical equipment
  • Interior (internal elements)
  • Exterior (external elements)
  • Heater and air conditioner
  • Electrical diagrams
Vito 2 (2003-2014, diesel) 
  • General information
  • User manual
  • Maintenance
  • Diesel engine OM646
  • Engine repair
  • Cooling and lubrication system
  • Power and exhaust system
  • Transmission
  • Clutch
  • Car gearbox
  • Chassis
  • Front suspension
  • Rear suspension
  • Steering
  • Brake system
  • Body
  • Body elements
  • Electrical equipment
  • Equipment and devices
  • Security systems
  • Electrical circuits
Vito 1 (1996-2003) 
  • General information
  • User manual
  • Maintenance
  • Petrol engines 2.0 l
  • Engine repair
  • Lubrication system
  • Cooling system
  • Power and control system
  • Petrol engines 2.8 l
  • Engine repair
  • Lubrication system
  • Cooling system
  • Power and control system
  • Diesel engines 2.3 l
  • Engine repair
  • Cooling system
  • Lubrication system
  • Turbocharging and recycling
  • Power and control system
  • Diesel engines 2.2 l
  • Engine repair
  • Cooling system
  • Lubrication system
  • Turbocharging and recycling
  • Power and control system
  • Transmission
  • Clutch
  • Mechanical gearbox
  • Automatic gearbox
  • Chassis
  • Front suspension and wheels
  • Rear suspension
  • Steering
  • Brake system
  • Body
  • Exterior (external elements)
  • Interior (internal elements)
  • Electrical equipment
  • Equipment and devices
  • Heater and air conditioner
  • Electrical circuits
Sprinter (1995-2000, diesel) 
  • General information
  • Introduction to the guide
  • Maintenance
  • Power unit
  • Engine repair
  • Lubrication system
  • Cooling system
  • Power and exhaust system
  • Transmission
  • Clutch
  • Mechanical gearbox
  • Automatic gearbox
  • Front axle
  • Rear axle and cardan
  • Chassis
  • Car suspension
  • Steering
  • Brake system
  • Tires and wheels
  • Electrical equipment
  • Equipment and devices
  • Headlights and lighting
  • Power devices
  • Electrical circuits
 
MercedesMan.ru © 2017–2026 · Mobile version · Read about Mercedes · Sitemap: EN BG BY UA RS HR RO PL SK HU · Feedback · Site search · Bookmark A-Class (W168) · C-Class (W201) · C-Class (W202) · C-Class (W203) · E-Class (W123) · E-Class (W124) · E-Class (W210) · G-Class (W463) · M-Class (W163) · S-Class (W116, petrol) · S-Class (W126, petrol) · S-Class (W140) · S-Class (W220) · Sprinter · Vito 1 · Vito 2 · Vario 814D ·
 
We only use cookies without which some of the site's features may not be available.