
Removing
1. Remove the engine.
2. Remove the cylinder head.
3. Remove the oil pan.
4. Remove connecting rod caps 5 (see fig. 2.51). Mark connecting rod 4 and cap 5 (arrow).
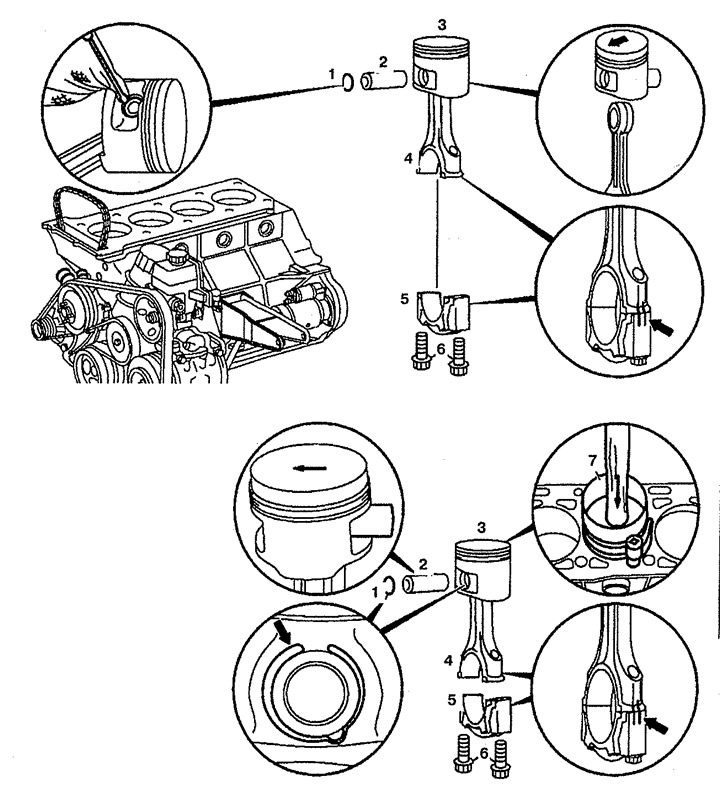
Pic. 2.51. Removal and installation of pistons:
1. Blocking ring,
2. Piston pin,
3. Piston,
4. Connecting rod,
5. Connecting rod cap,
7. Bolts connecting rod caps,
8. Guide tape.
5. Check the condition of the connecting rod cap bolts. Bolt length: 51.7-52.0mm. Maximum length: 52.9 mm.
6. Remove the piston together with the connecting rod upwards.
7. Remove retaining ring 1. Be careful not to damage the piston.
8. Push the piston pin 2 out and remove the piston from the connecting rod.
Installation
9. Lubricate the piston pin 2 and the connecting rod guide bush.
10. Install piston 3 and connecting rod 4.
11. Insert piston pin 2 by hand.
12. Insert locking ring 1 into the groove (arrow) piston.
13. Lubricate the cylinder walls, connecting rod journals, connecting rod caps and pistons 3.
14. Install guide tape 7.
15. Install piston 3 in the direction of the arrow or the color marking in the opposite direction.
16. Establish a cover of a rod 5 and tighten bolts of its fastening. Install the caps and connecting rod, matching the previously made marks on them (arrow).
17. Rotating a cranked shaft, check up its ease of rotation.
18. Measure piston protrusion. It should be 0.87-1.23 mm.
19. Install the engine oil pan.
20. Install the cylinder head.
21. Install the engine.