
Cars BMW Cars Volkswagen Cars Chevrolet Cars Land Rover Cars Lada Cars Honda Cars Peugeot
English Русский
Български
Беларускі
Український
Српски
Hrvatski
Română
Polski
Slovenský
Magyar
Bookmark News and articles Sitemap Feedback Site search
MercedesMan.ru


A-Class C-Class E-Class G-Class M-Class S-Class Others
W123 (1976-1985) W124 (1984-1995) W210 (1996-2002)
  • Main
  • E-Class
  • W123 (1976-1985)
  • Chassis
  • Front suspension
  • Removal, installation and adjustment of the hub and front wheel bearings

Removal, installation and adjustment of the hub and front wheel bearings (Mercedes-Benz E-Class W123)

0
If you hear noise from the wheels while driving, especially on sharp turns, this indicates that the bearings are damaged.

Front wheel hub section
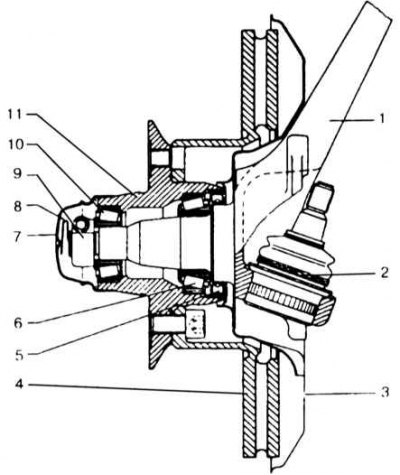


1 - steering knuckle; 2 - lower ball joint; 3 - shield; 4 - brake disc; 5 - oil seal; 6 - inner…

1 - steering knuckle; 2 - lower ball joint; 3 - shield; 4 - brake disc; 5 - oil seal; 6 - inner bearing; 7 - hub cap; 8 - contact spring; 9 - hub nut (clamping nut); 10 - outer bearing; 11 - hub
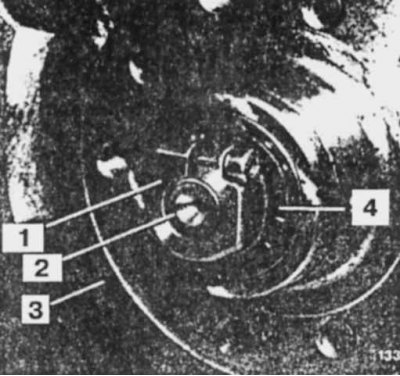

Hub lock

Hub lock

1 - clamping nut; 2 - trunnion; 3 - hub; 4 - bearing


1. Apply the parking brake, lift the front of the vehicle and place it on a stand (support), remove the wheel.

2. Using light hammer blows and a screwdriver, remove the hub cap and then the contact spring of the radio interference suppressor.

3. Remove the brake caliper without disconnecting the brake hose, move the caliper to the side and secure it to the vehicle.


4. Using a socket wrench, loosen the bolt and remove the clamp nut.

5. Remove the hub and brake disc from the steering knuckle, using a puller and a soft-faced hammer if necessary.

6. Remove the oil seal, ring and outer bearing separator.

7. Remove the oil seal, ring and inner bearing separator.

8. Using a soft metal mandrel, press the outer bearing races off the hub.

9. Wash the parts with kerosene and dry them. Conduct their defect detection.

10. Check the surfaces of the steering knuckle, especially under the cuff; if they are not in perfect condition, replace the steering knuckle.

11. Thoroughly clean and wash the wheel bearings and hub.

12. Check the condition of the bearing seat in the hub.

13. Check the condition of the outer bearing rings for signs of wear or cavities. The rolling surface should be smooth and grey.

14. If the rings have dents from rollers or have a rolling path from light brown to blue due to overheating, then these bearings must be replaced.

Text republished from the website: MercedesMan.ru

15. Check if the cone rollers rotate easily. Check if the end surfaces of the rollers are in good condition. Rust on the bearings indicates damage to the cuffs. In this case, it is necessary to replace the wheel bearing and cuff.

Note: When replacing hub bearings, both bearings must be replaced at the same time.


16. Carefully press both outer rings in place with equal force.

17. Fill the hub and bearings with 45 g of high-temperature grease.

18. Fill the baskets with rollers with grease so that the free space between the rollers is filled with grease. Install the rollers in place.


19. Fill the new seal with grease and apply a thin layer of sealant to the seating surface. Press the seal into place using a wooden mandrel.

20. Fill the front wheel hub with the remaining grease.

21. Install the brake disc and brake caliper.

Adjustment


1. If necessary, press back the brake pads to ensure free rotation of the disc.

2. Loosen the clamp nut mounting bolt.

3. While tightening the clamping nut, simultaneously rotate the wheel hub until the hub almost stops rotating. Then unscrew the clamping nut by 1/3 of a turn and hit the end of the journal with a plastic hammer to relieve tension.

4. Tighten the clamp bolt with a socket wrench.

5. Using a dial indicator, check the axial runout of the bearings, which should be 0.01-0.02 mm.

6. Install the contact spring of the radio interference suppressor, fill the hub cap with high-melting grease up to the shoulder (about 15 g) and seat it tightly on the hub with a hammer.

7. Install the wheel, tighten the mounting bolts to a torque of 11.0 kgf·m, lower the front of the car.
This article is available at: russian, bulgarian, belarusian, ukrainian, serbian, croatian, romanian, polish, slovak, hungarian
The article has been verified: Levin Kirill Glebovich
Share with friends:
◀ Previous
E-Class W123 / Front suspension
Next ▶

Removal and installation the front suspension assembly
Removal and installation the front anti-roll bar
Checking, removing and installing shock absorbers
Removal and installation front suspension springs
Design and technical characteristics of the front suspension
Removal, disassembly and installation of the steering knuckle
Removal and installation the upper suspension arm
Removal and installation the lower arm of the front suspension
Removal and installation the front suspension auxiliary rod
Checking and adjusting the front wheel alignment angles
More similar articles for repairing other models

☛ Front wheel fender liner — removal and installation Mercedes W168 (1997-2004)
☛ Adjusting the clearance in the front wheel bearings Mercedes W203 (2000-2007)
☛ Checking and adjusting the play of the front axle wheel bearing Mercedes W463 (1999-2019)
☛ Checking the amount of front wheel divergence when turning Mercedes W163 (1997-2005)
☛ Removal, installation and checking front wheel bearings Mercedes W126 (1979-1991, petrol)
☛ Front wheel alignment angles Mercedes Sprinter (1995-2000, diesel)
Link in different formats to this article
Comments and feedback from visitors
No comments yet


How much will 43 + 23 ?


W210 (1996-2002) 
  • General information
  • Vehicle description
  • Working conditions and tools
  • Car care
  • Diesel engines
  • Engine repair
  • Lubrication system
  • Cooling system
  • Injection system
  • Supply system
  • Exhaust system
  • Gasoline engines
  • Engine repair
  • Lubrication system
  • Cooling system
  • Control system
  • Power and exhaust system
  • Transmission
  • Clutch
  • Mechanical gearbox
  • Automatic gearbox
  • Drive shafts
  • Chassis
  • Car suspension
  • Steering
  • Tires and wheels
  • Brake system
  • Body
  • Exterior (external elements)
  • Interior (internal elements)
  • Doors and windows
  • Heating and ventilation
  • Electrical equipment
  • Equipment and devices
  • Power devices
  • Lighting and signaling
  • Electrical circuits
W124 (1984-1995) 
  • General information
  • Governing bodies
  • Driving and operation
  • Weekly care
  • Maintenance (gasoline)
  • Maintenance (diesel)
  • Troubleshooting
  • Power unit
  • I4 petrol engine
  • V6 petrol engine (SOHC)
  • V6 petrol engine (DOHC)
  • Diesel engines
  • Engine overhaul
  • Cooling system
  • Heating and ventilation
  • Fuel system (carburetor)
  • Injection system «Bosch CIS-E»
  • Injection system «Bosch HFM»
  • Diesel fuel system
  • Supply system
  • Starting and charging system
  • Ignition system (I4)
  • Ignition system (V6)
  • Preheating
  • Transmission
  • Clutch
  • Mechanical gearbox
  • Automatic gearbox
  • Drive shafts
  • Chassis
  • Brake system
  • Car suspension
  • Steering
  • Body
  • Exterior (external elements)
  • Interior (internal elements)
  • Doors, locks and windows
  • Electrical equipment
  • Equipment and devices
  • Switches
  • Headlights and lighting
  • Electrical circuits
W123 (1976-1985) 
  • General information
  • Introduction to the guide
  • Power unit
  • Engine device
  • Repair M102 engines
  • Repair M110 and M123 engines
  • Cooling and lubrication (M102)
  • Cooling (M110 and M123)
  • Ignition system
  • Power system «Stromberg»
  • Power system «Solex 4A1»
  • Fuel injection «K-Jetronic»
  • Fuel injection «L-Jetronic»
  • Transmission
  • Clutch
  • Mechanical gearbox
  • Automatic gearbox
  • Cardan and rear axle
  • Chassis
  • Front suspension
  • Rear suspension
  • Steering
  • Brake system
  • Body
  • Exterior (external elements)
  • Interior (internal elements)
  • Doors, locks and windows
  • Electrical equipment
  • Equipment and devices
  • Power devices
  • Electrical circuits
 
MercedesMan.ru © 2017–2026 · Mobile version · Read about Mercedes · Sitemap: EN BG BY UA RS HR RO PL SK HU · Feedback · Site search · Bookmark A-Class (W168) · C-Class (W201) · C-Class (W202) · C-Class (W203) · E-Class (W123) · E-Class (W124) · E-Class (W210) · G-Class (W463) · M-Class (W163) · S-Class (W116, petrol) · S-Class (W126, petrol) · S-Class (W140) · S-Class (W220) · Sprinter · Vito 1 · Vito 2 · Vario 814D ·
 
We only use cookies without which some of the site's features may not be available.