
Cars BMW Cars Volkswagen Cars Chevrolet Cars Land Rover Cars Lada Cars Honda Cars Peugeot
English Русский
Български
Беларускі
Український
Српски
Hrvatski
Română
Polski
Slovenský
Magyar
Bookmark News and articles Sitemap Feedback Site search
MercedesMan.ru


A-Class C-Class E-Class G-Class M-Class S-Class Others
W116 (1972-1980, petrol) W126 (1979-1991, petrol) W140 (1991-1998) W220 (1998-2005)
  • Main
  • S-Class
  • W126 (1979-1991)
  • Chassis
  • Front suspension
  • Removal, installation and checking front wheel bearings

Removal, installation and checking front wheel bearings (Mercedes-Benz S-Class W126)

0
Note: If noise is heard from the outer surface of the wheel when making sharp turns, this indicates a defect in the wheel bearings.
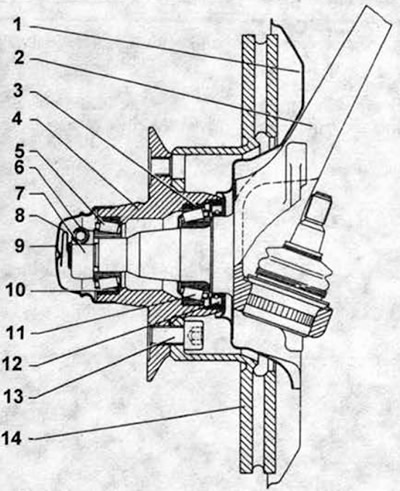

1. Brake shield. 2. Steering knuckle. 3. Outer bearing race. 4. Front part of the hub. 5. Outer…

1. Brake shield. 2. Steering knuckle. 3. Outer bearing race. 4. Front part of the hub. 5. Outer tapered roller bearing. 6. Bolt. 7. Hub nut. 8. Contact spring. 9. Hub cap. 10. Outer bearing race. 11. Inner tapered roller bearing. 12. Oil seal. 13. Brake disc clamp bolt. 14. Brake disc.


Caution: The separators and outer races of the wheel bearings must be laid out in the order they were removed so as not to mix them up during installation.


Remove the brake caliper and hang it aside so it doesn't get in the way. Pry the hub cap off with a screwdriver and remove it. Remove the contact spring, loosen the bolt and unscrew the nut that secures the hub to the steering knuckle.

Remove the front part of the hub together with the brake disc from the steering knuckle.

Caution: Be careful not to let the outer wheel bearing fall out.


Remove the brake disc.

Using an aluminum or brass punch, carefully push out the outer wheel bearing support ring, making sure that it runs straight.


Caution: The beard must be made of soft metal and not damaged so as not to damage the ring or its socket.


Using a hex key attachment, drive out the inner bearing support ring. If you don't have an attachment, you can use a punch, but try not to damage the ring.

Examination


Inspect the surface of the steering knuckle, particularly where the seal is installed. Replace the steering knuckle if necessary.

Thoroughly clean the inside of the tapered roller bearings and the hub. It is recommended to use a special cleaning solution. Check the condition of the bearing seats in the hub.

Inspect the bearing support rings in the hub for scratches. The ring is considered to be in good condition if it has a smooth gray track from a working roller bearing.

If the rings are dented by bearings, or if the races are light brown to blue in color due to overheating, the bearings must be replaced.

Check the condition and freedom of rotation of the roller bearings. The presence of rust on the bearing usually indicates a defective seal. Rusty wheel bearings must be replaced.

Caution: Always replace both hub bearings. When reinstalling old bearings, be careful not to mix up the separators and outer races.


Carefully install the bearing support rings into place, ensuring that they are seated correctly.

Apply 45 g of high-temperature roller bearing grease to the hub and bearings. Apply grease to the separators so that it fills the gaps between the rollers.

Install the separators into the hub and lubricate the front ends of the rollers.


Fill the gap between the edges of the new seal with grease and apply sealant to its outer edges (for example Curil). Drive the seal into its place in the hub using a piece of pipe of a suitable diameter.

Fill the front of the hub with the remaining grease.

Caution: If too much grease is added, it may overheat while driving and lose its lubricating properties. If too little grease is added, proper lubrication of the wheel bearings is not guaranteed.


Install the brake disc and caliper in place.
This article is available at: russian, bulgarian, belarusian, ukrainian, serbian, croatian, romanian, polish, slovak, hungarian
The article has been verified: Burova Vera Semenovna
Share with friends:
◀ Previous
S-Class W126 / Front suspension
Next ▶

Front Coil Springs — Removal and Installation
Checking the shock absorber
Front shock absorber — removal and installation
Description of the front suspension design
Adjusting the axial clearance of wheel bearings
Front and rear suspension specifications
Tightening torques for threaded connections
Front suspension — design description
Wheel alignment and kingpin tilt
More similar articles for repairing other models

☛ Front wheel fender liner — removal and installation Mercedes W168 (1997-2004)
☛ Adjusting the clearance in the front wheel bearings Mercedes W203 (2000-2007)
☛ Removal, installation and adjustment of the hub and front wheel… Mercedes W123 (1976-1985)
☛ Checking and adjusting the play of the front axle wheel bearing Mercedes W463 (1999-2019)
☛ Checking the amount of front wheel divergence when turning Mercedes W163 (1997-2005)
☛ Checking and adjusting the front wheel alignment Mercedes Vito 2 (2003-2014, diesel)
Link in different formats to this article
Comments and feedback from visitors
No comments yet


How much will 10 + 10 ?


W220 (1998-2005) 
  • General information
  • Introduction to guide
  • User manual
  • Maintenance
  • Power unit
  • Engine repair
  • Cooling and heating systems
  • Power and exhaust systems
  • Ignition and control system
  • Charge and launch systems
  • Transmission
  • Automatic gearbox
  • Drive shafts
  • Chassis
  • Brake system
  • Front suspension
  • Rear suspension
  • Steering
  • Body
  • Body elements
  • Electrical equipment
  • Equipment and devices
  • Electrical circuits
W140 (1991-1998) 
  • User manual
  • Controls and instruments
  • Driving and operation
  • Maintenance
  • Power unit
  • Petrol engine V6
  • Petrol engine V8
  • Petrol engine V12
  • Diesel engine OM603
  • Diesel engine OM606
  • Cooling system
  • Power supply and injection system
  • Control system HFM-SFI
  • Control system LH-SFI
  • Control systems ME-SFI
  • Diesel control system
  • Ignition system
  • Charge and launch system
  • Transmission
  • Mechanical gearbox 717.438
  • Mechanical gearbox 717.454
  • Automatic gearbox 722.5
  • Automatic gearbox 722.6
  • Clutch and drive shafts
  • Differential
  • Chassis
  • Brake system
  • Steering
  • Front suspension
  • Rear suspension
  • Body
  • Exterior (external elements)
  • Interior (internal elements)
  • Electrical equipment
  • Equipment and devices
  • Electrical circuits
W126 (1979-1991, petrol) 
  • Power unit
  • Engine repair
  • Ignition system
  • Lubrication system
  • Cooling system
  • Fuel system
  • Fuel injection system
  • Transmission
  • Clutch and cardan
  • Mechanical gearbox
  • Automatic gearbox
  • Chassis
  • Front suspension
  • Rear suspension
  • Steering
  • Brake system
  • Electrical equipment
  • Power devices
  • Electrical circuits
W116 (1972-1980, petrol) 
  • General information
  • Introduction to guide
  • Power unit
  • 8-cylinder V8 engine
  • 6-cylinder I6 engine
  • Cooling and lubrication system
  • Power system (carburetor)
  • Fuel injection system
  • Ignition system
  • Transmission
  • Clutch and cardan
  • Car gearbox
  • Chassis
  • Front suspension
  • Rear suspension
  • Steering
  • Brake system
  • Electrical equipment
  • Power devices
  • Electrical circuits
 
MercedesMan.ru © 2017–2026 · Mobile version · Read about Mercedes · Sitemap: EN BG BY UA RS HR RO PL SK HU · Feedback · Site search · Bookmark A-Class (W168) · C-Class (W201) · C-Class (W202) · C-Class (W203) · E-Class (W123) · E-Class (W124) · E-Class (W210) · G-Class (W463) · M-Class (W163) · S-Class (W116, petrol) · S-Class (W126, petrol) · S-Class (W140) · S-Class (W220) · Sprinter · Vito 1 · Vito 2 · Vario 814D ·
 
We only use cookies without which some of the site's features may not be available.