
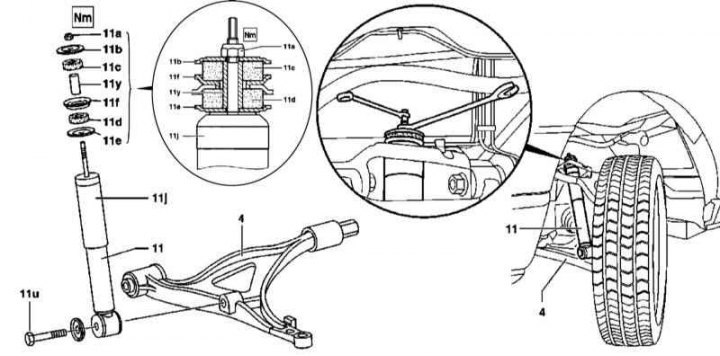
Front shock absorber installation details
4 - Lower transverse suspension arm; 11 - Shock absorber; 11a - Nut; 11b - Washer; 11c - Top cushion; 11d - Bottom cushion; 11e - Washer; 11f - Washer; 11j - Cover; 11u - Bolt; 11y - Sleeve
Attention! Shock absorbers must be replaced in pairs!
Note. All self-locking bolts and nuts must be replaced without fail!
1. Details of the installation of the front shock absorbers are shown in the illustration, to which all references in the text refer.
2. Release fasteners of the top support of the shock-absorber.
3. Jack up the car and put it on stands.
4. Remove the front wheels and wheel arch protectors.
5. Loosen the nut, remove the fixing bolt (11u), disconnect the shock absorber from the lower control arm (4) and remove it from under the car.
6. Loosen the nut (11a) and remove the upper damping assembly components (11a ÷ 11f).
Examination
1. Assess the condition of the components, replace the failed parts.
Attention! Upper (11s) and lower (11d) pillows differ in rigidity and must be installed strictly in their original places - pillows are usually marked accordingly, or painted in different colors: the top one is white, the bottom one is yellow. Also make sure that the washers are correctly installed in their places (11b, 11e and 11f).
2. Carefully examine the condition of the piston rod of the shock absorber - in case of deformation or signs of a violation of the smoothness of the piston stroke, the shock absorber must be replaced.
3. Estimate a condition of the plug of the bottom support of the shock-absorber.
4. Check for signs of external leaks.
5. Replace the defective shock absorber - better complete with the second one.
Installation
Installation is carried out in the reverse order to the dismantling of the components.