
Note. All self-locking bolts and nuts must be replaced without fail!
Removal and installation
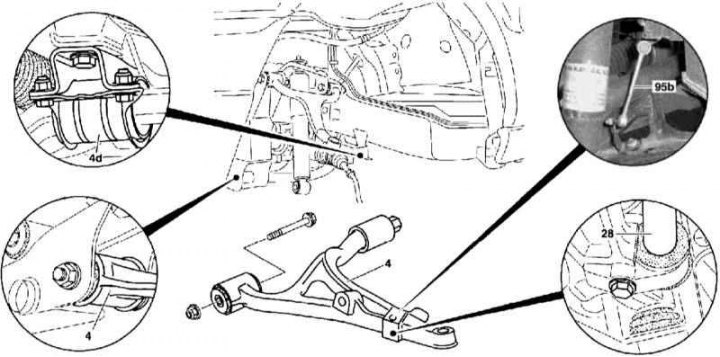
Details of the installation of the lower transverse arm of the front suspension
1. The installation details of the lower transverse arm of the front suspension are shown in the illustration, to which all references in the text refer.
2. Remove the front suspension torsion springs (see Section Removal and installation of the vacuum brake booster and diaphragm stroke sensor BAS).
3. Remove the steering knuckle (see chapter transmission line).
4. On models equipped with xenon headlights, remove the front seat leveler connecting rod (95b).
5. Disconnect from the lower transverse arm (4) torsion bar (28) (see Section Removal and installation of the main brake cylinder).
6. After giving fasteners, disconnect the lower arm (4) from the stretcher.
7. Release the turnbuckle at the rear end of the arm and lower the bearing holder down (4d).
8. Carefully examine the lever for signs of mechanical damage, prepare a replacement if necessary.
9. Installation is carried out in the reverse order - the final tightening of the lever fasteners is made after lowering the car to the ground.
10. Finally, adjust the suspension geometry.
Bushing replacement
Replacing the front bushing of the lower transverse arm of the front suspension
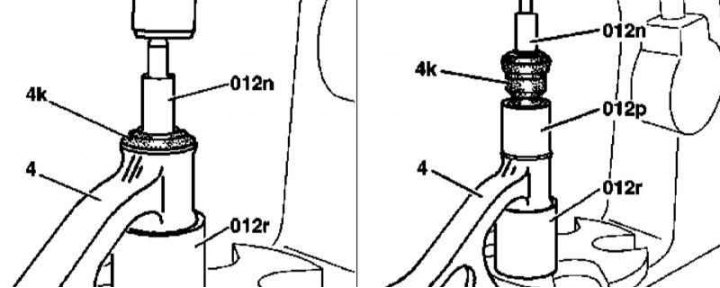
1. Illustrative material for replacing the front axle bushing of the lower transverse arm is presented in the illustration, which includes all references in the text.
2. Remove the lower arm (4) (see above).
3. With support sleeve (012r) and punches (012n) squeeze out the rubber bushing (4k) from the axial holder of the lever.
4. The landing of a new bushing is carried out in a similar manner using in addition to the tools used during removal (012n and 012r) mandrels (012r).
5. Replace the lever (see above).