
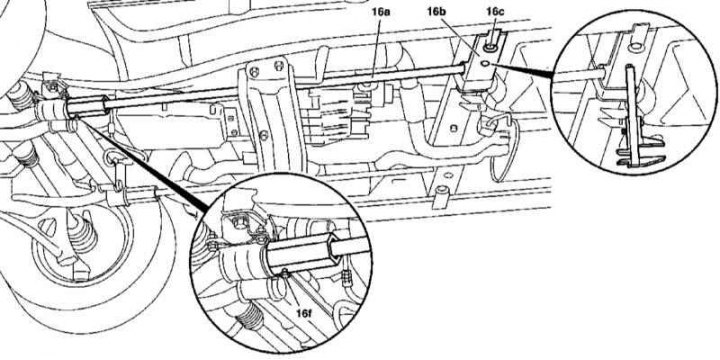
Installation details of the front suspension torsion springs
16a - Torsion spring; 16b - Squeeze bar; 16c - Bolt; 16f - Bolt
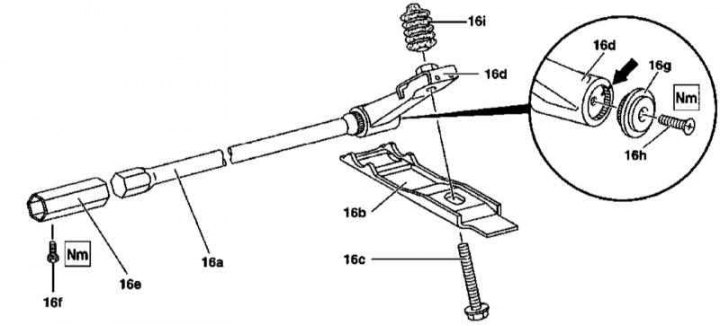
Installation details of the front suspension torsion springs
16a - Torsion spring; 16b - Squeeze bar; 16c - Bolt; 16d - Thrust lever; 16e - Profile sleeve; 16f - Bolt; 16g - End cap; 16h - Screw; 16i - duster
1. Installation details of the front suspension torsion springs are shown in the illustrations, which include all references in the text.
2. Jack up the car and put it on stands.
3. Using a Columbus, measure the spring preload (16a) - when installing, the preload must be maintained.
4. Removing the bolt (16s), release the spring bar (16a).
5. Loosen the bolt (16f) fixing the profile sleeve (16th) and slide the latter back along the bar.
6. Remove the torsion spring assembly from under the vehicle.
7. Loosen the screw (16h) and remove the end cap (16g).
8. Release the torsion bar (16a) from the thrust lever (16d).
9. Installation is carried out in the reverse order - pre-lubricate the knurled section of the rod. Pay attention to labeling (arrow), regulating the position of the bar (16a) relative to the stop lever (16d). Don't forget to grease the bolt (16s) and fill his boot with the same lubricant (16i). Check that the original spring preload is maintained.
10. Check the correct level of the vehicle and the direction of the optical axes of the headlights, if necessary, make the necessary adjustments.