
Attention! Depending on the equipment of the car, various springs are placed in the suspension, each time with its own rubber mounts. To indicate the springs, a red or blue stroke is put on the lower coil, and the part number is also stamped. When replacing, install springs only with the same designation.
Removing
1. Mark with paint the position of the front wheels in relation to the hub. Thanks to this, the balanced wheel returns to the same position after removal. Loosen the wheel bolts before lifting the vehicle. Raise the car at the front and remove the front wheels.
2. Unscrew the shock absorber from above, to do this, substitute a garage jack under the lower arm and, placing a wooden gasket, raise the arm.
3. Remove the bottom protection of a motor compartment.
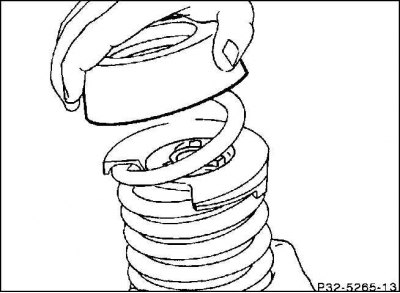
4. The suspension spring is in a compressed state. It needs to be compressed even more to release the spring plates. Do this using the appropriate tool.
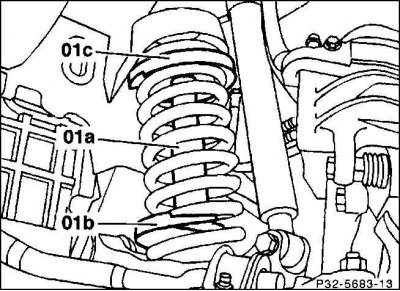
5. Compress the spring with a conventional puller. In company workshops, a special device is used for this, including a tensioning device (01a) (000 589 46 31 00), plates (01b), (01c) (000 589 79 63 00). In this case, the spring tensioner should cover 8 turns. Compress the spring until it can be removed.
Attention! Place the tensioner in the coils of the spring so that they are securely gripped and the tensioner does not slip. Compress the spring at at least three evenly spaced points on the circumference. The spring is highly compressed, so use only a stable tool. To avoid an accident, do not tie the coils of the spring with wire.
6. If a new spring is installed, the removed one is slowly released.
Installation
1. Before installation, inspect the rubber support for porosity or damage, and replace if necessary. Clean the spring mounting locations on the lever.
2. Install the spring tensioner and compress it slowly.
3. Turning to the right, put the rubber support on the spring. To facilitate installation, the support can be lubricated with liquid soap or glycerin.
4. Install the spring so that the end of the lower coil sits on the stop of the spring plate in the lever.
5. Raise the transverse arm slightly with a garage jack, insert the upper end of the shock absorber. Place the shock absorber washer in front of the engine compartment, tighten the nut on the rod with a torque of 15 Nm. Secure it with a lock nut with a torque of 30 Nm.
Attention! When lifting the lever, be careful not to lift the vehicle.
6. Slowly release the spring, while making sure that the rubber support is properly seated in the base of the body and on the bottom of the lever.
7. Remove the garage jack.
8. Install the engine compartment trim.
9. Put on the wheels, observing the previously painted markings of their previous position. Screw on the wheels. Lower the vehicle onto the wheels and cross tighten the wheel bolts to 110 Nm.
10. Have the vehicle level on the front axle checked by a workshop.
11. Install headlights.