
Cars BMW Cars Volkswagen Cars Chevrolet Cars Land Rover Cars Lada Cars Honda Cars Peugeot
English Русский
Български
Беларускі
Український
Српски
Hrvatski
Română
Polski
Slovenský
Magyar
Bookmark News and articles Sitemap Feedback Site search
MercedesMan.ru


A-Class C-Class E-Class G-Class M-Class S-Class Others
190 (W201) (1982-1993) W202 (1993-2000) W203 (2000-2007)
  • Main
  • C-Class
  • W202 (1993-2000)
  • Chassis
  • Suspension, wheels and tires
  • Shock absorbers — removal and installation

Shock absorbers — removal and installation (Mercedes-Benz C-Class W202)

0
Contents: Removal ↡ Installation ↡
Shock absorbers can be replaced individually, paying attention not to their manufacturer, but to the conventional coloring and marking, for example, "V1 orange".

Removal


1. Mark the position of the front wheels in relation to the hub with paint. This ensures that the balanced wheel returns to the same position after removal. Loosen the wheel bolts before raising the car. Raise the car at the front and remove the front wheels.

2. Remove the engine compartment protection from below.

3. The shock absorbers also serve as a stop for the return stroke. Place a garage jack under the lower control arm and, using a wooden shim, lift it slightly so that after removing the shock absorber, the suspension does not fall down.

4. Remove the front engine compartment cover. Due to the difficult access to the upper shock absorber mount on the right side of the car, the overvoltage protection relay must be removed.

Article was obtained from the portal: MercedesMAN

5. On the diesel engine, the gas drive is removed on the left, and on the diesel engine with an automatic transmission, the vacuum control valve is removed.
5. On the diesel engine, the gas drive is removed on the left, and on the diesel engine with an…


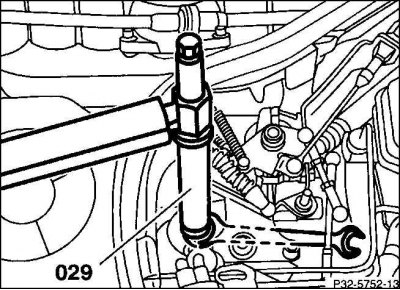
6. Unscrew the lock nut and the shock absorber nut, while holding the shock absorber rod with a wrench by two flats so that it does not turn. Remove the washers and rubber support.


6. Unscrew the lock nut and the shock absorber nut, while holding the shock absorber rod with a…


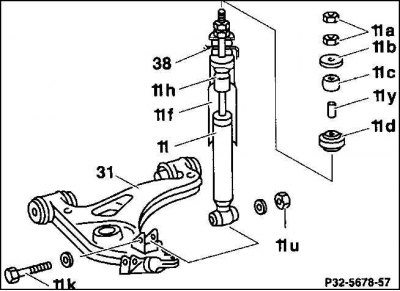
7. Unscrew the nut (11u) on the suspension arm (31), remove the bolt (11k) with the washer and remove the shock absorber.

Attention! The garage jack can be removed. The suspension has a stop on the upper arm, which rests on the side member and prevents further reverse movement.


Installation


1. Check the presence of the stop buffer (11b), protective sleeve (11f) and dimension bushing (11u), if necessary – put on. On new shock absorbers these parts are already put on. Install the damper (11d).

2. Place the shock absorber with the bolt on the lower arm, putting on the washers, and screw a new self-locking nut onto the bolt. Tighten it to 55 N·m.

3. Using a garage jack, position the suspension arm to the position necessary to install the upper shock absorber mount.

4. Place the rubber support (11c) and washer (11b) onto the shock absorber rod at the front of the engine compartment.

5. Tighten the piston rod nut to a torque of 15 N·m, while holding the shock absorber piston rod by the flats with a wrench. Tighten the lock nut to a torque of 30 N·m, while holding the nut from turning.

6. Remove the garage jack.


7. Install engine compartment protection.

8. Put on the wheels, observing the previously painted marking of their previous position. Screw on the wheels. Lower the car onto the wheels and tighten the wheel bolts in a cross pattern to a torque of 110 Nm.

9. Insert the surge relay.

10. For diesel models, install a gas drive and, accordingly, a low-pressure control valve.
This article is available at: russian, bulgarian, belarusian, ukrainian, serbian, croatian, romanian, polish, slovak, hungarian
The article has been verified: Khromov Roman Mikhailovich
Share with friends:
◀ Previous
C-Class W202 / Suspension, wheels and tires
Next ▶

Front suspension design
Checking and recycling shock absorbers
Front springs — removal and installation
Setting the clearance in the front bearings
Anti-roll bar — removal and installation
Rear suspension design
More similar articles for repairing other models

☛ Shock absorber strut — removal and installation Mercedes W168 (1997-2004)
☛ Checking, removing and installing shock absorbers Mercedes W123 (1976-1985)
☛ Removal, checking and installation front shock absorbers Mercedes W463 (1999-2019)
☛ Removal, checking and installation front shock absorbers Mercedes W163 (1997-2005)
☛ Removal and installation the shock absorber Mercedes W140 (1991-1998)
☛ Checking shock absorbers Mercedes Sprinter (1995-2000, diesel)
Link in different formats to this article
Comments and feedback from visitors
No comments yet


How much will 14 + 38 ?


W203 (2000-2007) 
  • General information
  • Introduction to guide
  • User manual
  • Maintenance
  • Power unit
  • Gasoline engines
  • Diesel engines
  • Cooling system
  • Ventilation and heating
  • Supply system
  • Injection system (gasoline)
  • Injection system (diesel)
  • Exhaust system
  • Ignition and control system
  • Charge and launch systems
  • Transmission
  • Mechanical gearbox
  • Automatic gearbox
  • Clutch and drive shafts
  • Differential
  • Chassis
  • Brake system
  • Car suspension
  • Steering
  • Body
  • Exterior (external elements)
  • Interior (internal elements)
  • Electrical equipment
  • Equipment and devices
  • Lighting system
  • Electrical diagrams (2000)
  • Electrical diagrams (since 2001)
W202 (1993-2000) 
  • General information
  • User manual
  • Driving a car
  • Car care
  • Maintenance
  • Power unit
  • Gasoline engines
  • Diesel engines
  • Lubrication system
  • Cooling system
  • Heating and ventilation
  • Ignition system
  • Fuel system
  • Injection system (gasoline)
  • Injection system (diesel)
  • Exhaust system
  • Transmission
  • Clutch
  • Car gearbox
  • Chassis
  • Suspension, wheels and tires
  • Steering
  • Brake system
  • Body
  • Exterior (external elements)
  • Interior (internal elements)
  • Doors and windows
  • Electrical equipment
  • Equipment and devices
  • Power devices
  • Lighting system
  • Electrical circuits
190 (W201) (1982-1993) 
  • General information
  • Introduction to the guide
  • Operation and care
  • Maintenance (gasoline)
  • Maintenance (diesel)
  • Troubleshooting
  • Power unit
  • Petrol engine I4
  • Petrol engine V6
  • Diesel engines
  • Engine overhaul
  • Cooling and heating
  • Power system (carburetor)
  • Injection system (gasoline)
  • Injection system (diesel)
  • Exhaust system
  • Charge and start system
  • Ignition system (I4)
  • Ignition system (V6)
  • Diesel heating system
  • Transmission
  • Clutch
  • Mechanical gearbox
  • Automatic gearbox
  • Cardan shaft and axle shafts
  • Chassis
  • Brake system
  • Car suspension
  • Steering
  • Body
  • Exterior (external elements)
  • Interior (internal elements)
  • Doors, locks and windows
  • Electrical equipment
  • Equipment and devices
  • Electrical circuits
 
MercedesMan.ru © 2017–2026 · Mobile version · Read about Mercedes · Sitemap: EN BG BY UA RS HR RO PL SK HU · Feedback · Site search · Bookmark A-Class (W168) · C-Class (W201) · C-Class (W202) · C-Class (W203) · E-Class (W123) · E-Class (W124) · E-Class (W210) · G-Class (W463) · M-Class (W163) · S-Class (W116, petrol) · S-Class (W126, petrol) · S-Class (W140) · S-Class (W220) · Sprinter · Vito 1 · Vito 2 · Vario 814D ·
 
We only use cookies without which some of the site's features may not be available.