
Cars BMW Cars Volkswagen Cars Chevrolet Cars Land Rover Cars Lada Cars Honda Cars Peugeot
English Русский
Български
Беларускі
Український
Српски
Hrvatski
Română
Polski
Slovenský
Magyar
Bookmark News and articles Sitemap Feedback Site search
MercedesMan.ru


A-Class C-Class E-Class G-Class M-Class S-Class Others
190 (W201) (1982-1993) W202 (1993-2000) W203 (2000-2007)
  • Main
  • C-Class
  • W202 (1993-2000)
  • Chassis
  • Suspension, wheels and tires
  • Setting the clearance in the front bearings

Setting the clearance in the front bearings (Mercedes-Benz C-Class W202)

0
1. Mark the position of the front wheels in relation to the hub with paint. This will ensure that the balanced wheel returns to the same position after removal. Loosen the wheel bolts before raising the car. Place the front of the car on stands and remove the front wheels.

1. Mark the position of the front wheels in relation to the hub with paint. This will ensure that…


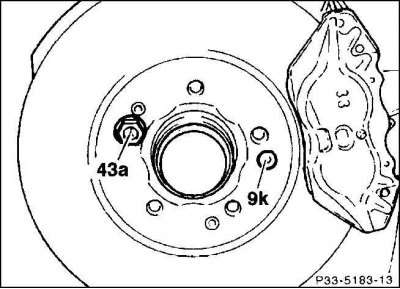
2. Screw the brake disc to the hub using the wheel bolt (43a), inserting it into the hole located opposite the mounting bolt (9k).

3. Carefully use a screwdriver to pry the brake pads away from the brake disc.
3. Carefully use a screwdriver to pry the brake pads away from the brake disc.


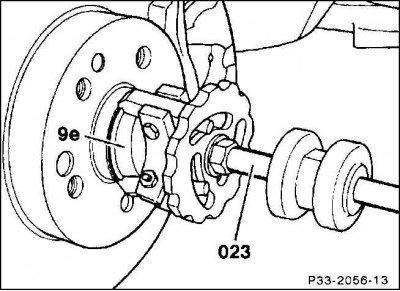
4. Remove the hub cap (9e) using the puller (023) or knock it off with a rubber hammer.
4. Remove the hub cap (9e) using the puller (023) or knock it off with a rubber hammer.


5. Check the clearance by pulling and pushing the flange by hand. Rotate the hub slightly before each attempt.


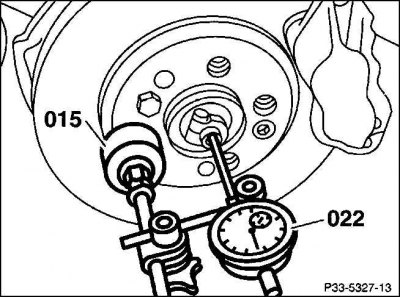
6. In workshops, the axial clearance is measured using a device that has a small-travel dial indicator as a sensor. The sensor is installed with a 2 mm measuring rod recess. The specified value of the correct clearance is 0.01–0.02 mm.

Caution! During the individual measurement process, feeding the flange back and forth along the axis, do not rotate the hub.

Caution! During the individual measurement process, feeding the flange back and forth along the…


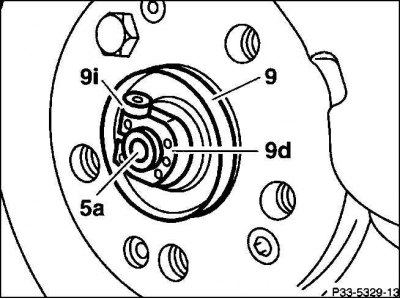
7. Loosen the Allen bolt (9i).

8. Tighten the split nut while rotating the hub until it can no longer be turned. Then loosen the nut by 1/3 of a turn and hit the axle (5a) with a plastic hammer to loosen the tension. Measure the clearance.

9. If necessary, repeat the gap setting. Mercedes prescribes setting the gap using a dial indicator. However, in practice (when there is no indicator) the gap is considered correct if the washer under the split nut can be moved back and forth with some effort using a screwdriver. If the washer cannot be moved, the split nut must be pressed or released.

10. Tighten the Allen bolt on the split nut to 8 Nm and check the bearing clearance again.
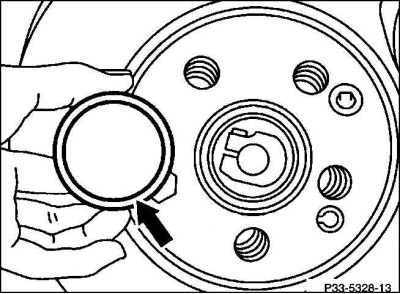
10. Tighten the Allen bolt on the split nut to 8 Nm and check the bearing clearance again.


11. Fill the hub cap with approximately 15 g of high-temperature bearing grease up to the edge of the flange (arrow).


12. Replace the hub cap using special tool 025 or tap it in with a rubber mallet.

(Material created based on the website: MercedesMan.ru)

Attention! Be sure to replace a damaged cap, since moisture penetrates into the bearing through the joint leaks, causing it to quickly deteriorate.


13. Remove the wheel bolt from the brake disc.

14. Put the wheel on, observing the previously painted marking of its previous position. Screw the wheel on. Lower the car onto the wheels and tighten the wheel bolts in a cross pattern to a torque of 110 Nm.

15. Press the brake pedal repeatedly until the brake pads are in working position.
This article is available at: russian, bulgarian, belarusian, ukrainian, serbian, croatian, romanian, polish, slovak, hungarian
The article has been verified: Khromov Roman Mikhailovich
Share with friends:
◀ Previous
C-Class W202 / Suspension, wheels and tires
Next ▶

Front springs — removal and installation
Checking and recycling shock absorbers
Shock absorbers — removal and installation
Front suspension design
Anti-roll bar — removal and installation
Rear suspension design
Rear shock absorbers — removal and installation
Rear springs — removal and installation
Half shafts — removal and installation
More similar articles for repairing other models

☛ Front catalytic converter — removal and installation Mercedes W168 (1997-2004)
☛ Setting the front hub bearing clearance Mercedes W210 (1996-2002)
☛ Checking the correct setting of the ignition timing on gasoline models Mercedes W463 (1999-2019)
☛ Access to the right front seat storage compartment Mercedes W163 (1997-2005)
☛ Adjusting the clearance in the front wheel bearing Mercedes W140 (1991-1998)
☛ Checking the axial clearance in the crankshaft main bearings Mercedes Vito 1 (1996-2003)
Link in different formats to this article
Comments and feedback from visitors
No comments yet


How much will 28 + 27 ?


W203 (2000-2007) 
  • General information
  • Introduction to guide
  • User manual
  • Maintenance
  • Power unit
  • Gasoline engines
  • Diesel engines
  • Cooling system
  • Ventilation and heating
  • Supply system
  • Injection system (gasoline)
  • Injection system (diesel)
  • Exhaust system
  • Ignition and control system
  • Charge and launch systems
  • Transmission
  • Mechanical gearbox
  • Automatic gearbox
  • Clutch and drive shafts
  • Differential
  • Chassis
  • Brake system
  • Car suspension
  • Steering
  • Body
  • Exterior (external elements)
  • Interior (internal elements)
  • Electrical equipment
  • Equipment and devices
  • Lighting system
  • Electrical diagrams (2000)
  • Electrical diagrams (since 2001)
W202 (1993-2000) 
  • General information
  • User manual
  • Driving a car
  • Car care
  • Maintenance
  • Power unit
  • Gasoline engines
  • Diesel engines
  • Lubrication system
  • Cooling system
  • Heating and ventilation
  • Ignition system
  • Fuel system
  • Injection system (gasoline)
  • Injection system (diesel)
  • Exhaust system
  • Transmission
  • Clutch
  • Car gearbox
  • Chassis
  • Suspension, wheels and tires
  • Steering
  • Brake system
  • Body
  • Exterior (external elements)
  • Interior (internal elements)
  • Doors and windows
  • Electrical equipment
  • Equipment and devices
  • Power devices
  • Lighting system
  • Electrical circuits
190 (W201) (1982-1993) 
  • General information
  • Introduction to the guide
  • Operation and care
  • Maintenance (gasoline)
  • Maintenance (diesel)
  • Troubleshooting
  • Power unit
  • Petrol engine I4
  • Petrol engine V6
  • Diesel engines
  • Engine overhaul
  • Cooling and heating
  • Power system (carburetor)
  • Injection system (gasoline)
  • Injection system (diesel)
  • Exhaust system
  • Charge and start system
  • Ignition system (I4)
  • Ignition system (V6)
  • Diesel heating system
  • Transmission
  • Clutch
  • Mechanical gearbox
  • Automatic gearbox
  • Cardan shaft and axle shafts
  • Chassis
  • Brake system
  • Car suspension
  • Steering
  • Body
  • Exterior (external elements)
  • Interior (internal elements)
  • Doors, locks and windows
  • Electrical equipment
  • Equipment and devices
  • Electrical circuits
 
MercedesMan.ru © 2017–2026 · Mobile version · Read about Mercedes · Sitemap: EN BG BY UA RS HR RO PL SK HU · Feedback · Site search · Bookmark A-Class (W168) · C-Class (W201) · C-Class (W202) · C-Class (W203) · E-Class (W123) · E-Class (W124) · E-Class (W210) · G-Class (W463) · M-Class (W163) · S-Class (W116, petrol) · S-Class (W126, petrol) · S-Class (W140) · S-Class (W220) · Sprinter · Vito 1 · Vito 2 · Vario 814D ·
 
We only use cookies without which some of the site's features may not be available.