
Cars BMW Cars Volkswagen Cars Chevrolet Cars Land Rover Cars Lada Cars Honda Cars Peugeot
English Русский
Български
Беларускі
Український
Српски
Hrvatski
Română
Polski
Slovenský
Magyar
Bookmark News and articles Sitemap Feedback Site search
MercedesMan.ru


A-Class C-Class E-Class G-Class M-Class S-Class Others
190 (W201) (1982-1993) W202 (1993-2000) W203 (2000-2007)
  • Main
  • C-Class
  • W202 (1993-2000)
  • Chassis
  • Suspension, wheels and tires
  • Half shafts — removal and installation

Half shafts — removal and installation (Mercedes-Benz C-Class W202)

0
Contents: Removal ↡ Installation ↡
Caution! To tighten the axle nut, you need a wrench with a torque adjustable to at least 220 Nm.


Removal


Removal


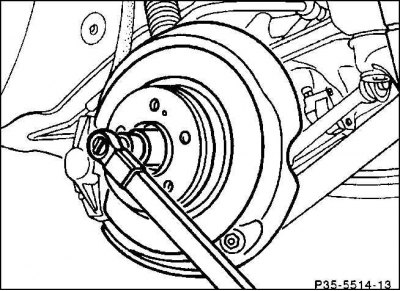
1. Unscrew the axle shaft mounting nut using a twelve-sided socket wrench SW 30.

Attention! In order to avoid an accident, the car must be on its wheels, the gear must be engaged, and the parking brake must be applied.


2. Mark the position of the wheels in relation to the hub with paint. This will allow you to put the balanced wheel back in place after removal. Loosen the wheel bolts when the car is on the ground, then put the rear of the car on stands and remove the rear wheels.
2. Mark the position of the wheels in relation to the hub with paint. This will allow you to put…


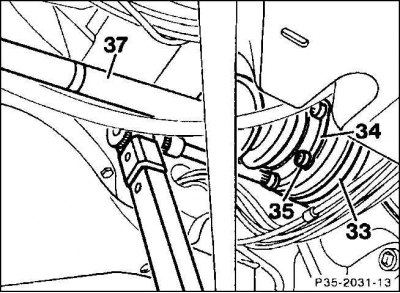
3. Unscrew the half shaft (37) from the connecting flange (33). To do this, unscrew the socket head cap screws (35) (key SW 10, for example HAZET 2751 or 990 SLg 10) and remove them together with the lock washers (34).


Attention! Make sure the key is seated correctly in the bolt heads. It is advisable to clean the internal hexagons in the bolt heads beforehand.

Attention! Make sure the key is seated correctly in the bolt heads. It is advisable to clean the…


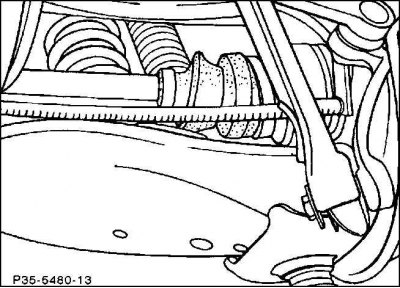
4. Place a garage jack under the suspension arm, lift the arm until the axle shaft is approximately horizontal. Don't forget the wooden spacer between the arm and the jack.

Caution: When lifting, be careful not to lift the vehicle off the stands.

Caution: When lifting, be careful not to lift the vehicle off the stands.


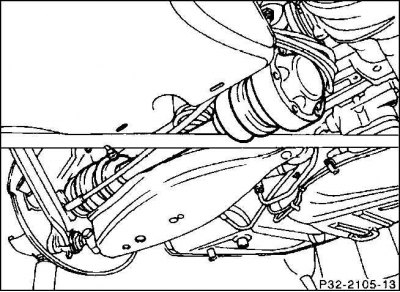
5. Extend the axle shaft, then tilt it downwards at an angle.

Caution! Make sure that the shaft cover does not unscrew when removing the axle shaft.
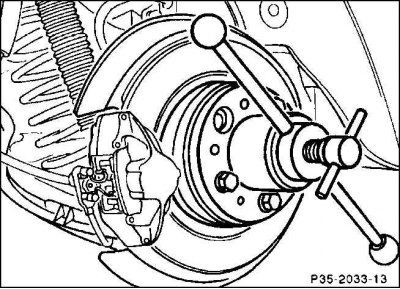

Caution! Make sure that the shaft cover does not unscrew when removing the axle shaft.


6. Remove the axle shaft from the hub. If it is firmly seated, use a suitable ordinary tool to press it out of the flange.


7. Remove the axle shaft, check the rubber seals and cover for leaks and damage, and repair if necessary.

Installation


1. Clean the surface between the flange and the axle cover.

2. Insert the shaft into the hub.

3. Attach the shaft to the coupling flange.

4. Install new washers and new socket head cap screws.

Caution! Lightly lubricate the threads and bolt mating surfaces beforehand. Measure the thread diameter, as this determines the tightening torque.


5. Tighten the 10 mm diameter bolts to 70 Nm in a cross pattern and the 12 mm diameter bolts to 100 Nm.

6. Lower and remove the garage jack.

7. Position the rear wheels so that the paint mark on the wheel and hub coincide. Screw the wheels on. Lower the car and tighten the wheel bolts to 110 N·m.

8. Screw the new twelve-point half shaft mounting nut into the hub and tighten to 220 Nm.

Caution: Lightly lubricate the threads and mating surface beforehand.


Attention! During this operation the car must be on its wheels. The nut is fundamentally replaced. When tightening, the parking brake must be applied and the gear engaged.
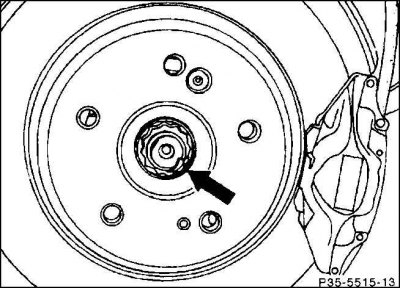

Attention! During this operation the car must be on its wheels. The nut is fundamentally replaced.…


9. Pin the axle shaft mounting nut onto the flange (arrow) by driving the flange of the nut into the slot in the shaft with a punch.
This article is available at: russian, bulgarian, belarusian, ukrainian, serbian, croatian, romanian, polish, slovak, hungarian
The article has been verified: Khromov Roman Mikhailovich
Share with friends:
◀ Previous
C-Class W202 / Suspension, wheels and tires
Next ▶

Rear springs — removal and installation
Rear shock absorbers — removal and installation
Rear suspension design
Anti-roll bar — removal and installation
Setting the clearance in the front bearings
Removal axle shafts / replacing rubber seals
Why do you need a shock absorber?
Types of shock absorbers
Additional protection for ball joints of steering rods
Secret bolts for securing external elements
More similar articles for repairing other models

☛ Differential, primary and secondary shafts — removal and installation Mercedes W168 (1997-2004)
☛ Disassembling the primary and intermediate shafts Mercedes W123 (1976-1985)
☛ Disconnecting and connecting cardan shafts on the transfer case Mercedes W463 (1999-2019)
☛ Removal and installation drive shafts Mercedes W163 (1997-2005)
☛ The middle part of the rear axle (differential) with half shafts Mercedes W126 (1979-1991, petrol)
☛ Removal and installation of drive axle shafts Mercedes Sprinter (1995-2000, diesel)
Link in different formats to this article
Comments and feedback from visitors
No comments yet


How much will 11 + 34 ?


W203 (2000-2007) 
  • General information
  • Introduction to guide
  • User manual
  • Maintenance
  • Power unit
  • Gasoline engines
  • Diesel engines
  • Cooling system
  • Ventilation and heating
  • Supply system
  • Injection system (gasoline)
  • Injection system (diesel)
  • Exhaust system
  • Ignition and control system
  • Charge and launch systems
  • Transmission
  • Mechanical gearbox
  • Automatic gearbox
  • Clutch and drive shafts
  • Differential
  • Chassis
  • Brake system
  • Car suspension
  • Steering
  • Body
  • Exterior (external elements)
  • Interior (internal elements)
  • Electrical equipment
  • Equipment and devices
  • Lighting system
  • Electrical diagrams (2000)
  • Electrical diagrams (since 2001)
W202 (1993-2000) 
  • General information
  • User manual
  • Driving a car
  • Car care
  • Maintenance
  • Power unit
  • Gasoline engines
  • Diesel engines
  • Lubrication system
  • Cooling system
  • Heating and ventilation
  • Ignition system
  • Fuel system
  • Injection system (gasoline)
  • Injection system (diesel)
  • Exhaust system
  • Transmission
  • Clutch
  • Car gearbox
  • Chassis
  • Suspension, wheels and tires
  • Steering
  • Brake system
  • Body
  • Exterior (external elements)
  • Interior (internal elements)
  • Doors and windows
  • Electrical equipment
  • Equipment and devices
  • Power devices
  • Lighting system
  • Electrical circuits
190 (W201) (1982-1993) 
  • General information
  • Introduction to the guide
  • Operation and care
  • Maintenance (gasoline)
  • Maintenance (diesel)
  • Troubleshooting
  • Power unit
  • Petrol engine I4
  • Petrol engine V6
  • Diesel engines
  • Engine overhaul
  • Cooling and heating
  • Power system (carburetor)
  • Injection system (gasoline)
  • Injection system (diesel)
  • Exhaust system
  • Charge and start system
  • Ignition system (I4)
  • Ignition system (V6)
  • Diesel heating system
  • Transmission
  • Clutch
  • Mechanical gearbox
  • Automatic gearbox
  • Cardan shaft and axle shafts
  • Chassis
  • Brake system
  • Car suspension
  • Steering
  • Body
  • Exterior (external elements)
  • Interior (internal elements)
  • Doors, locks and windows
  • Electrical equipment
  • Equipment and devices
  • Electrical circuits
 
MercedesMan.ru © 2017–2026 · Mobile version · Read about Mercedes · Sitemap: EN BG BY UA RS HR RO PL SK HU · Feedback · Site search · Bookmark A-Class (W168) · C-Class (W201) · C-Class (W202) · C-Class (W203) · E-Class (W123) · E-Class (W124) · E-Class (W210) · G-Class (W463) · M-Class (W163) · S-Class (W116, petrol) · S-Class (W126, petrol) · S-Class (W140) · S-Class (W220) · Sprinter · Vito 1 · Vito 2 · Vario 814D ·
 
We only use cookies without which some of the site's features may not be available.