
Removing
1. Mark the position of the front wheels on the hub with paint. This will allow the assembly to set the balanced wheel in its original position.
2. Loosen the wheel nuts. In this case, the car must be on wheels.
3. Jack up the front of the car, jack it up and remove the wheels.
4. Release the wire of the wheel speed sensor and the wire of the brake pad wear sensor from the mounting on the shock absorber.
5. Unscrew the bolt 3 fastening the connecting strut 2 of the anti-roll bar to the spring strut 1 (see illustration).

Attention! Do not damage the dust cap. Hold the ball joint finger 4 of the connecting rack from turning with a wrench.
Attention! If necessary, disconnect the lower fastening of the connecting column in the same way.
6. Mark the position of the suspension strut 1 on the steering knuckle with a felt-tip pen (see illustration).
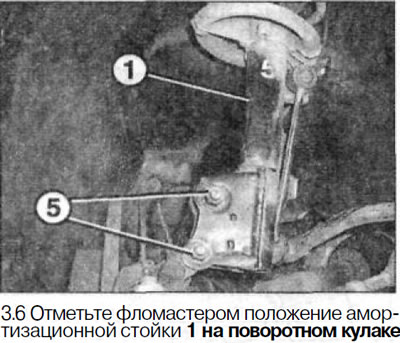
7. Unscrew nuts 5 and remove bolts (see illustration 3.6).
8. Support or secure the shock strut before unscrewing the bolts securing the upper strut support to the mudguard. Otherwise, the stand will fall.
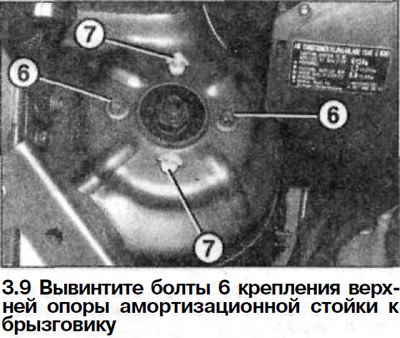
9. Unscrew the bolts 6 fastening the upper support of the suspension strut to the mudguard (see illustration).
Attention! When dismantling the left suspension strut, you must first remove the washer reservoir and fix it away from the place of work, without disconnecting the hoses from the reservoir.
10. Squeeze latch 7 (see illustration 3.9), release the upper support of the rack from the mudguard and remove it from the niche wheels.
Attention! Do not damage the brake hose while doing this.
Installation
11. Carefully slide the suspension strut through the wheel arch into the hole in the mudguard.
12. Fix the upper shock absorber support to the mudguard with bolts, the tightening torque of which is 40 Nm.
13. Fix the bottom part of an amortization rack on a rotary fist. At the same time, install the mounting bolts so that their heads are facing forward, in the direction of travel.
14. Screw a nut at first on the bottom bolt of fastening of a rack to a rotary fist, and then on top. Do not tighten nuts.
15. Tighten the nuts first on the top and then on the bottom bolts of the suspension strut to the steering knuckle with a force of 100 Nm, while holding each bolt from turning.
16. Attach the anti-roll bar link to the shock strut with a new self-locking nut with gasket. The tightening torque of the nut is 45 Nm. At the same time, keep the pin of the ball joint 4 of the connecting rod from turning with a wrench.
17. Fix the rack, if it was detached, to the anti-roll bar. The tightening torque is 45 Nm.
18. Attach the wires of the wheel speed sensor and the brake pad wear sensor to the suspension strut.
19. Install in place, if removed, the washer reservoir and secure it with a locking lever.
20. Install the front wheel in accordance with the marks made during removal. Before doing this, grease the centering saddle of the wheel disc on the hub with a thin layer of grease. Do not lubricate wheel bolts. Replace rusted bolts with new ones.
21. Screw in bolts of fastening of wheels and lower the car.
22. Tighten the wheel bolts in a cross pattern to 110 Nm.
23. Check and adjust the camber and toe-in if a new suspension strut was installed.