



- a) slow return of the body to its original position when driving on an uneven road;
- b) increasing vibrations of the body when the wheels hit nearby unevenness in the road;
- c) bouncing of wheels even on a smooth road surface;
- d) difficult stopping (uncontrollability) car when braking (this may be caused by other reasons as well);
- d) instability and skidding of the car on turns;
- e) increased tire wear accompanied by tread wear;
- g) knocks and squeaks while driving. Noises can often be caused by other reasons, such as loose bolts and nuts of the chassis, a faulty hub bearing or CV joint. Therefore, before changing the shock absorber, it must be checked on a stand.
The performance of the shock absorber can also be checked manually.
However, a more accurate check is only possible using special equipment, such as a dynamometer stand, where the check is performed without dismantling the shock absorber, or on a special machine
Manual check of shock absorber performance
1. Remove the shock absorber.
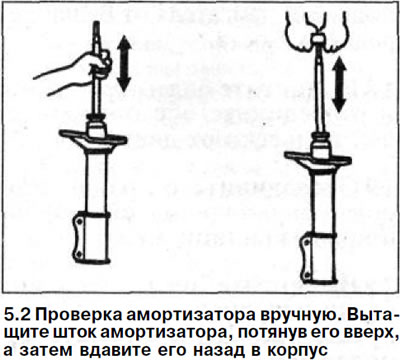
2. Pull out the shock absorber rod, holding the removed shock absorber in the mounting position, and then press it back into the housing. The shock absorber rod should move evenly and without jerks along the entire length of its stroke (see illustration).
3. Inspect the surface of the shock absorber rod and make sure that there is no damage on it, and that the rod is not bent or jammed in the guide sleeve.
4. Check the condition and fit of the shock absorber rubber sealing plugs. The plugs should sit firmly in the mounting holes and not have any cracks or damage. Damaged rubber plugs may cause knocking noises while driving.
In gas-filled shock absorbers, the piston rod should return to its original position under gas pressure.
If this does not happen, it does not mean that the shock absorber is subject to replacement. Its action, if there is no significant leakage of shock absorber fluid, is equal to the function of a regular shock absorber.
Damping of vibrations can also occur in the absence of pressure in the shock absorber. However, in this case it will not be possible to avoid noise or knocking when the shock absorber is operating.
If the shock absorber is functioning normally, small traces of shock absorber fluid leakage are not a reason to replace the shock absorber.
The shock absorber is considered to be in good condition if traces of shock absorber fluid leakage are within the area between the upper piston rod sealing ring and the lower spring cup, provided that the shock absorber fluid stain has a matte shade or is covered with a dry layer of dust.
A small amount of fluid leakage even has a positive effect, as the sealing ring is lubricated, which increases its service life. If there is a significant oil leak from the shock absorber, it must be replaced.
Shock absorber disposal
Before disposing of a defective shock absorber, the oil must be drained from them. After the oil has been removed, the shock absorber can be disposed of as regular scrap metal.
Attention! The pressure in a new shock absorber reaches 25 bar. Therefore, when opening the shock absorber, it is necessary to observe certain precautions and wear protective glasses.
There are two ways to drain the oil from the shock absorber: by drilling a hole in it or by making a cut in the side wall.
Drilling a hole
5. Clamp the dismantled shock absorber in a vice, placing it in a vertical position, with the rod down.
6. Drill a hole in the shock absorber body at point A using a 5 mm drill. The hole should be approximately 20 mm from the bottom of the shock absorber (see illustration).
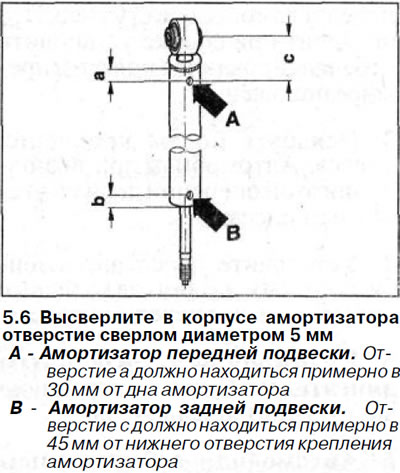
7. Rear shock absorber. Drill another hole with a diameter of 5 mm at point B, stepping back from the top of the shock absorber by about 30 mm. Distance "b" = 30 mm (see illustration 5.6).
Attention!. In gas-filled shock absorbers, gas begins to escape after drilling the first wall of the shock absorber. Cover the hole with a rag while the gas is escaping, and then continue drilling the hole on the wall of the inner sleeve.
8. Drain the oil from the shock absorber by holding it over an oil collection container and moving the shock absorber rod up and down.
9. Drain the oil completely from the shock absorber. The drained oil is subject to disposal at special points, and the shock absorber is subject to scrap metal.