
Removing
1. Disconnect the front wheel drive shaft, see relevant chapter.
Attention! Do not lower the vehicle onto the wheels after disconnecting the axle shafts.
2. Cut the clamping collars on the cuff of the CV joint with side cutters and remove them (see illustration).
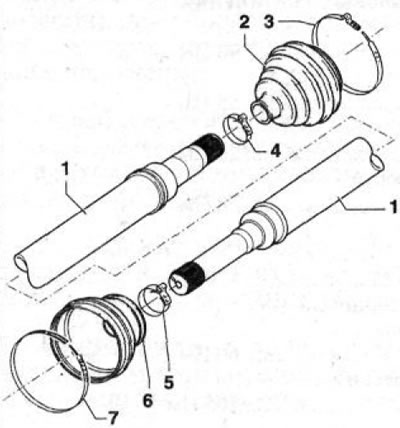
8.2 Front wheel drive shaft
1 - drive shaft 2 - cuff of the external hinge
3 - clamping collar on the landing belt of the cuff of large diameter
4 - clamping collar on the landing band of the cuff of small diameter
5 - clamping collar on the landing band of the cuff of small diameter
6 - cuff of the internal hinge
7 - clamping collar on the landing band of the cuff of large diameter
3. Cut the damaged cuff and remove it from the CV joint.
4. Remove the appropriate outer joint from the axle shaft. To do this, knock the hinge 8 off the shaft with a suitable mandrel, resting it on the sprocket 9 (see illustration).
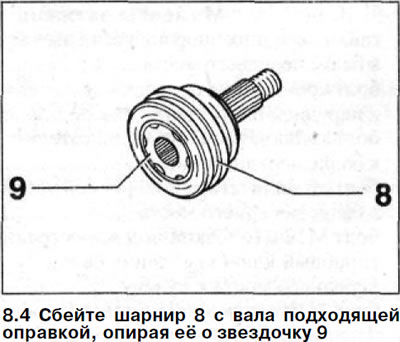
Fasten the hinge only by the splined shank and do not damage the sealing surfaces of the glands.
5. Clean the CV joint housing.
Attention! In case of water or dirt ingress, the outer CV joint must be disassembled. To do this, it is necessary to mark the location of the inner sprocket and cage in the hinge housing.
The inner hinge cannot be disassembled. In case of contamination, the inner joint or axle shaft must be completely replaced.
Installation
Attention! Clamps must be replaced with new ones.
6. Put the cuff fastening clamp on the shaft along the small landing belt.
7. Put a new seal on the shaft.
8. Pack grease into the joint up to the top edge of the sprocket.
The amount of grease for the CV joint of the drive shaft of the front wheels:
- outer hinge - 100 g
- internal hinge - 120 g
9. External CV joint. Be sure to replace the shaft shank retaining ring with a new one.
10. Stuff the pivot onto the drive shaft.
11. Pack the rest of the lubricant into the cuff and hinge.
12. Put on a cuff on the hinge and a shaft of a drive of forward wheels.
On the inner hinge, before installing the clamps, adjust the cuff to a length of 159 mm.
13. Install the clamping collars and tighten them with a suitable pliers, eg HAZET 1847. In this case, the spindle A of the pliers must be tightened with a torque of 27+3 Nm. Gap between jaws (see arrows B in illustration 8.13) should not exceed 2.5 mm.
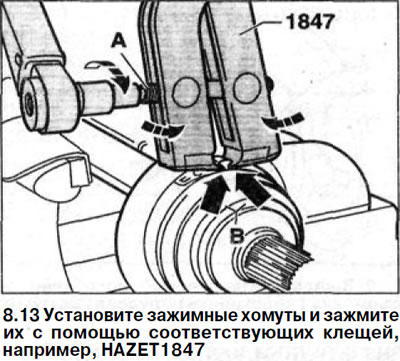
Attention! Before using the pliers, check the ease of movement of the spindle A. Lubricate it if necessary (see illustration 8.13).
14. Reinstall the front wheel drive shaft.